Enter what you are looking for!
When you login you'll be taken to your "My profile" page. Clicking on the "Event Solutions" tab will take you straight into our "Create New Event" section. Here you'll complete six simple pages...just fill in the blanks. On our finish page you'll have the opportunity to preview your event before publishing it on your website. If you have any problems, we're just a phone call away to walk you through this process.
Make an error or want to change something? No problem! Simply click on the "Edit my Event" tab, make your updates, and click on "Save and Publish" Your changes are processed immediately and your website is accurate in an instant.
After you've created your event you can access our complete VOLUNTEER MANAGEMENT system. You'll find our "Volunteer Management" tab within our "Event Solutions" section. Use the dropdown menu to select the event that needs volunteers. Here you can completely customize your events' volunteer needs. You'll be able to create volunteer positions, ask volunteer questions, and even allow them to select their shirt sizes! Once this information is saved our volunteer management code will be placed on your website and ready for immediate use.
You can view all of your event reports within your "My Financials" tab. First you'll select your event in the dropdown box and click on the "My Financials" tab. Here you'll find all of the financials of your event. These figures are updated instantly as your participants register for the event. This data can even be downloaded to a spreadsheet in an easy-to-read format to share with others on your event team/committee.
Our product/services are absolutely free for the event director and their events. We do charge a very competitive online registration fee that is paid by your participants. No two events are the same. As such, our goal is to provide you pricing that is unique to your event and meets your specific objectives. Please contact us for more information.
Absolutely! The Driven takes the security of an online transaction very seriously. We use Secure Socket Layer (SSL) encryption (issued by GoDaddy.com, Inc.) on our payment server. This encryption scrambles all payment information between the participant's computer and our servers.
The Driven believes you should have choices. That's why we let you select the date you receive your first payment. After that we'll mail you a check every two weeks, on the same schedule. Furthermore, you can elect to have the funds wired into your account.
Absolutely not! Unlike many of our competitors, we don't lock you into a long term contract that you can't get out of. We're certain you'll appreciate all that The Driven has to offer. However, if for any reason you're unhappy, you are free to use another provider at any time.
When you click on the PARTICIPANTS tab within EVENT SOLUTIONS, you will see a master list of all of your registered PARTICIPANTS, meaning everyone who has signed up for any one or more of your SUB-EVENTS. Here you will see all of the requested participant information from the registration.
After you login to The Driven, click on the MY PROFILE tab at the top right. Then, at the bottom of your profile page, you will see your events listed under Director Events. Click on the Manage Sub Admin link. Then, on the next screen, click on the Add Sub Admin button to enter in your sub-administrator information and their level of access to your event then click SAVE. You can add multiple sub-administrators--for example, maybe you have one person handling just the volunteers and another person managing the communications. Its all in your hands!
Adding EVENT sub-administrators allows others to access your event according to your designations. You can grant sub-administrators full access to all aspects of your event in our Event Solutions platform by selecting all of the options (Edit My Event, Participants, Volunteer Management, Communication, My Financials), or you can allow them access to specific components you select.
After you login to The Driven, click on the EVENT SOLUTIONS tab at the top left, then select CREATE NEW EVENT. Fill in the required fields as designated by the asterisks, then click SAVE & CONTINUE. Don’t worry if you need to make changes--our platform will reflect your updates in real time.
Here is your opportunity to provide a description of your event, complete with pictures, colorful font, hyperlinks, and more. You may want to include a description of the course or set up, the purpose of the event, the event’s cause (if applicable), packet pick up, and any other information important for your registrants to know.
This feature, found on the EVENT page, will allow registrants to get a discounted price for registering for multiple sub-events within your event. Select YES if and only if you will have more than one event (such as having both a 5K and a 10K run on the same day) AND you want registrants to get a discount for registering for more than one sub-event. You will enter in pricing for this option on the next page. Select NO if you will only have one event* OR if you do not want to offer a discount for participants who register for more than one sub-event. *Note: If you want to have group pricing for your single event AND you want to allow less than the required participants to register in the original transaction, select YES for this option vs. the GROUP PRICING option on the REGISTRATION OPTIONS page.
Great question! The EVENT is your overall occasion. If your registrants only have one option, for example the only choice is a 5K run/walk, then it’s likely your EVENT and SUB-EVENT are the same thing, and you will enter the required SUB-EVENT information, adding more details about the event as you wish. However, if your event will feature more than one option, such as a 5K and a 10K route, then you will enter in information for each SUB-EVENT. This will help you track participants, assign bib information appropriately, manage course volunteers, as well as allow you to assign different start times for different sub-events, set different entry fees, and more.
After creating your event, simply click on the REGISTRATION OPTIONS link under EDIT MY EVENT and click on the ADD ANOTHER SUB-EVENT button and follow all the same steps to set up your sub-event and save. Repeat this process as needed for multiple entry fees (such as Adult and Youth) and/or for multiple sub-events (such as 5K, 10K, and Half Marathon).
If your event/sub-event will only allow a certain number of participants on the course at a time and/or you wish to have staggered start times, then you will want to select MULTIPLE WAVE TIMES to set up the start time and participant cap for each wave.
If you are providing electronic timing (either yourself or via a timing company) for your participants, select YES to the question Chip Timing Provided?. This lets your registrants know that their event will be accurately timed using digital chip technology. Using chip timing is definitely suggested for events where you will be awarding prizes for top finishers. If you need timing company suggestions, let us know!
REGISTRATION PERIODS are registration windows for which you may opt to have varied pricing based on the selected time frames. For example, you may want to have an “Early Bird†special registration window that offers a discounted price for your registrants. In our platform, you can select to have 1, 2 or 3 REGISTRATION PERIODS.
Absolutely. On the REGISTRATION OPTIONS page, select YES to enable GROUP PRICING, then click on the ADD GROUP FEE button. For GROUP TITLE, you will name your group discount package, e.g. “4-Person Party Packâ€, then you will set the NUMBER OF PARTICIPANTS* necessary to register for the GROUP PRICING. Next, you will decide whether to allow more group registrants to be added at no additional charge or to allow additional group registrants to register at the discounted rate. Pricing will be set by you on the next page. You can have multiple GROUP PRICING options within one sub-event. *Note: All registrants must be registered in one transaction to get the GROUP PRICING. If you want registrants to be able to register in separate transactions, select the GROUP PRICING FOR MULTIPLE SUB-EVENTS on the EVENT page instead.
On the PRICING/QUESTIONS page of your event set up, simply select YES to the question “Do you want to sell items like food tickets, raffle tickets, packet mailing, etc?â€. You will be prompted to enter in a title, description, price and other details relevant to your ticket item. Don’t worry, you can add multiple extra items by clicking on the ADD ANOTHER TICKET button if you so choose. Remember, there is a separate question regarding the sale of extra/upgraded T-shirts already built into our platform.
For each item your registrants select to purchase (registration, extra items, etc.) there is a processing fee--that is how we are able to keep our multi-million dollar platform FREE to you without hassling your registrants with registering for us as a third party site just to register for YOUR EVENT! For each PROCESSING FEE, you have two options. If you select the first option, Processing Fee paid by the participant, the amount of the fee will show up as the registrant checks out and must be paid in order for their registration to be complete. If you select the second option, the Processing Fee comes out of the charge, then the fee will come out of your total sales per our fee schedule. You may opt to cover this fee by adjusting your event pricing.
Our CUSTOMIZED QUESTIONS feature allows you to collect other information about your event and registrants. For example, you might ask “How did you hear about our event?†to track your marketing efforts.
YES! Once you enter in a CUSTOMIZED QUESTION, you will have the option to select the sub-event to which you want to assign the question.
DISCOUNT CODES allow you to offer reduced pricing to select registrants. For example, you may want to offer early bird pricing to the first 100 registrants within a certain window of time, or you may want to offer a percentage off to registrants who spend a certain dollar amount.
DISCOUNT CODES allow you to offer reduced pricing to select registrants. For example, you may want to offer early bird pricing to the first 100 registrants within a certain window of time, or you may want to offer a percentage off to registrants who spend a certain dollar amount. Under the DISCOUNT CODE OPTION, select DISCOUNT OFFER. Then, enter in the text you want for the DISCOUNT CODE, such as “EARLYBIRDâ€. Then, select the dates you want the code to be effective, and the amount of the discount--either in terms of dollars off the regular fee or a percentage off. Next, you will choose whether to restrict the DISCOUNT CODE’s usage. If you select NO RESTRICTION, then your DISCOUNT CODE will be able to be used by any registrant during the specified discount code window. You can restrict the use of the DISCOUNT CODE by setting a minimum cart dollar amount for use of the code OR by limiting the usage to a set number of participants (you set the number!). Be sure to click the gray SAVE button within the DISCOUNT CODE OPTION section before continuing. You can add multiple DISCOUNT CODES to meet your event’s need, and you can assign different DISCOUNT CODES to different Events/SUB-EVENTS. Note: The discount will be applied prior to the processing fee. Should you need unique DISCOUNT CODES for your event, just let us know!
Should you opt to accept DONATIONS, upon checkout your registrants/end users will have the option to make a donation to your cause. You can set a minimum donation amount, donor levels, and add descriptions for donor levels/benefits, as well as give your registrants the option to donate on behalf of or in memory of an entity. The donations and associated fees (see our FEE SCHEDULE) will be accounted for you in your RACE MANAGEMENT report. If you want to allow your participants to FUNDRAISE for your event, click on the FUNDRAISING tab to employ that feature.
In the EVENT PAYMENT SET-UP section of your event creation, you can opt to receive your payments via an Electronic Funds Transfer (EFT) or via a mailed check to the address you provide. Should you choose to receive payment via EFT, you will need to provide the bank’s routing number and your account number, as well as a scan/photocopy of a voided check from the selected account. The Driven disburses payments every two weeks; however, if your event has unique needs, just let us know.
Most definitely! On the FINISH page of your event creation, you will be prompted to answer the question “Are participants required to accept and event waiver prior to checkout?†If you select YES to this question, you will be able to type in or upload your event waiver in the platform and it will be visible to your registrants, who must agree to the terms in order to checkout. You can also assign this WAIVER to multiple SUB-EVENTS.
This is the email that each registrant will get upon registering for your event using The Driven’s platform. Remember that The Driven, unlike other platforms, does NOT require your participants to create a separate account nor do we send spam/third party emails to your users. You can simply use the preset fields in the CONFIRMATION EMAIL box, or you may type in or upload your own information/file.
This is the email address that will show as the sender for the CONFIRMATION EMAILS that are sent to your registrants.
Yes. In fact, if you select the PARTICIPANTS REGISTRATION NOTIFICATION option, you can select up to 5 email addresses to receive an EMAIL NOTIFICATION. This comes in handy when you have sub-administrators for your event.
We will provide you with an event URL. You can redirect your existing website to the event URL or have a “registration†button/link added to your existing site that takes the user to your event URL. If you do not have an existing website, you can purchase a domain name for a nominal fee from any number of online options, giving your participants a familiar web address to more easily find your event online. If you will not have a website, then you can enter the link to your Facebook page or you can simply cut and paste the EVENT REGISTRATION LINK found further down on the page and enter it into the EVENT WEBSITE LINK box.
The QR CODE allows your registrants to use Quick Response (QR) scanning technology to take them directly to your event registration without typing in a web address.
You can set custom BORDER, BAR (for section headers), and BUTTON colors as well as select a BACKGROUND IMAGE to customize and personalize your event registration page.
You sure can. Just click on the PREVIEW EVENT WEB PAGE button on the FINISH page of your event creation to see what your custom page will look like. You can even click on the REGISTER button on the PREVIEW to see what your registrants will see.
When you select SAVE & PUBLISH on the FINISH page of your event creation, this makes your event URL “go live†(meaning it is viewable on the web and open for users). If you are not ready to do this, just select SAVE BUT DO NOT PUBLISH at this time.
Absolutely. Simply login and scroll down to the bottom of your PROFILE page, and select EDIT MY EVENT for the one for which you wish to make changes. Then, click on the tab for the details you want to edit and enter your changes. Once you are satisfied with your changes, be sure to click on SAVE at the bottom of the page. Your changes will immediately be reflected on your live event site.
We use the highest level of SSL encryption offered by GoDaddy. This scrambles all of the payment information and none of your registrants’ card information is stored on our servers.
Click on the COMMUNICATIONS tab in EVENT SOLUTIONS. Here you can upload a document or draft an email that can be sent to all of your EVENT PARTICIPANTS or SELECT GROUPS such as VOLUNTEERS or registrants for just one of your SUB-EVENTS. The emails will be sent to the emails the registrants used to sign up for your event. You will have the opportunity to send a test email to make sure the COMMUNICATION is how you want it. Do note that the email recipients have the right to unsubscribe from future email communications.
The MY FINANCIALS feature allows you to view your FINANCIALS (for event fees, fundraising, sponsorships, and donations), PAYOUT HISTORY, as well as tallies up your GIVE-AWAYS for participants and volunteers so that you have a quick, current, and accurate account of your event at-a-glance. To see SUB-EVENT-specific reports, simply click on the View This Sub-Event link at the top. There are no editing options in this feature; however, should you ever have a question about your Financials, please contact us at team@thedriven.net.
Yes. Simply click on the MY FINANCIALS tab within EVENT SOLUTIONS. Then, select the SUB-EVENT (or you can download a master list) for which you want the spreadsheet, and click the DOWNLOAD SPREADSHEET button.
Yes, and just like your event participants, they will NOT have to register for an account with us just to volunteer at your event. After you create your event, click on the VOLUNTEER MANAGEMENT tab within EVENT SOLUTIONS to begin entering in the required information for VOLUNTEER registration. You have options to customize VOLUNTEER positions, dates and times, and much more.
This is the email address that will be displayed when you send confirmation and other emails to your VOLUNTEERS. If you select to receive an email confirmation of volunteer registrations, that CONFIRMATION EMAIL will go to the email you used to create your account for The Driven.
Yes. Simply click on the VOLUNTEERS tab within EVENT SOLUTIONS. Then, select MY VOLUNTEERS and click the DOWNLOAD SPREADSHEET button. Remember that our platform does a lot of the work for you, such as tallying T-shirt counts for volunteers, in the My Financials feature.
Just click on the VOLUNTEERS tab within EVENT SOLUTIONS. Then, select MY VOLUNTEERS for a quick view of all of your VOLUNTEER POSITIONS and registered VOLUNTEERS.
Absolutely. Simply click on the VOLUNTEER MANAGEMENT tab within EVENT SOLUTIONS and click on the MANUALLY ADD VOLUNTEER link. After you enter in the required information, click on the ADD VOLUNTEER TO EVENT button to complete the process.
In the VOLUNTEER MANAGEMENT section of EVENT SOLUTIONS, select MY VOLUNTEERS. Then, click the EDIT button next to the VOLUNTEER POSITION you wish to EDIT. Then, EDIT the details you wish, being sure to click the SAVE button to finalize the changes. If you need to DELETE a VOLUNTEER, you can do so in this feature.
In the VOLUNTEER MANAGEMENT section of EVENT SOLUTIONS, select MY VOLUNTEERS. Then, click the X button next to the VOLUNTEER POSITION you wish to DELETE. Then, EDIT the details you wish, being sure to click the SAVE button to finalize the changes. If you need to DELETE a VOLUNTEER, you can do so in this feature.
If you have more than one SUB-EVENT listed on your event registration, then simply click on the SUB-EVENT for which you want to VIEW ONLY THIS SUB-EVENT PARTICIPANTS in the header row above the PARTICIPANTS tab.
Absolutely. Simply click on the PARTICIPANTS tab within EVENT SOLUTIONS and click on the MANUALLY ADD PARTICIPANT link, then select the SUB-EVENT for which you want to ADD A PARTICIPANT and complete the required information.
Yes. Simply click on the PARTICIPANTS tab within EVENT SOLUTIONS. Then, select the SUB-EVENT (or you can download a master list) for which you want the spreadsheet, and click the DOWNLOAD SPREADSHEET button. Remember that our platform does a lot of the work for you, such as tallying T-shirt counts and such, in the My Financials feature.
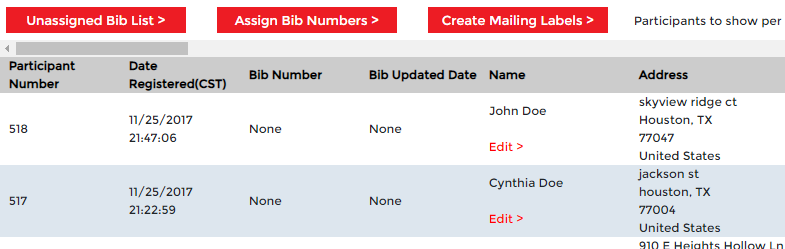
Indeed you can. Simply click on the PARTICIPANTS tab within EVENT SOLUTIONS. Then, select the SUB-EVENT for which you want the MAILING LABELS, and click the CREATE MAILING LABELS button and complete the required information.
Click on the PARTICIPANTS tab within EVENT SOLUTIONS. Then, select the SUB-EVENT for which you want to ASSIGN BIB NUMBERS, then click on the ASSIGN BIB NUMBERS button. This feature allows your event timing company to pre-assign bib numbers while online registration is still active. Using the DYNAMIC REGISTRATION feature in combination with this allows you to keep online registration open until just before the event starts. Step 1: Download the PARTICIPANTS spreadsheet. Step 2: Enter the BIB NUMBERS into the bib number column. Step 3: Upload the modified spreadsheet with the new BIB NUMBERS added. Note: While sorting the entries in the spreadsheet, do not change the position of the first two rows; and, if you want to add any new column, please add it on the far right.
DYNAMIC REGISTRATION allows for easy onsite registration and/or packet pick up. Complete flexibility is provided while always keeping your PARTICIPANTS database accurate and secure. Online (and onsite) registration can stay open until just before the scheduled start time of your event, where the timing company (if applicable) can connect to the database to add new participants.
Following DYNAMIC REGISTRATION set up, a URL to a secure login screen is provided. An unlimited number of computers can then be connected using the same access information allowing multiple computers to serve as check in stations, allowing not only registration, but also participants to edit their information and/or switch sub-events, based on your wants/needs.
To activate this feature, click on the ACTIVATE DYNAMIC REGISTRATION link in the PARTICIPANTS section within EVENT SOLUTIONS and complete the required fields.
Here is complete guide to Dynamic registration. Click Here
Our EVENT SOLUTIONS platform is integrated with the most used timing company software applications. With The Driven, you can easily provide PARTICIPANTS data access to any TIMING COMPANY that uses either The Event Director or Run Score software platforms. Integrating with a TIMING COMPANY greatly minimizes the risk of errors and the workload of both entities. For example, using this feature allows TIMING COMPANIES to access data when they need to and allows event directors to assign bibs nightly for larger events with multiple packet pick up days. To activate this feature, click on the TIMING COMPANY INTEGRATION link in the PARTICIPANTS section within EVENT SOLUTIONS and complete the required fields.
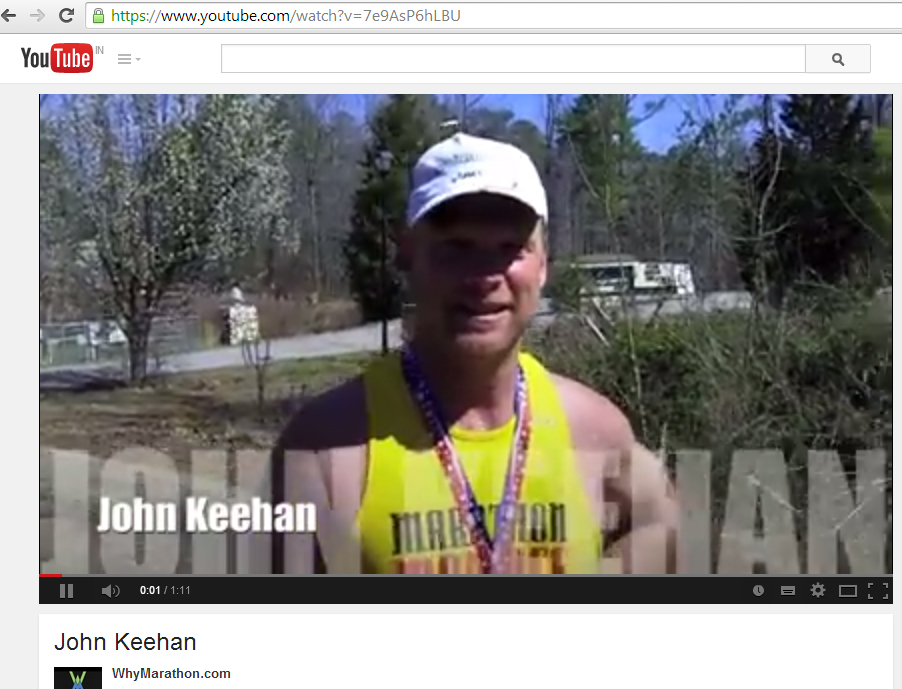
Upload your video to YouTube and then open it.
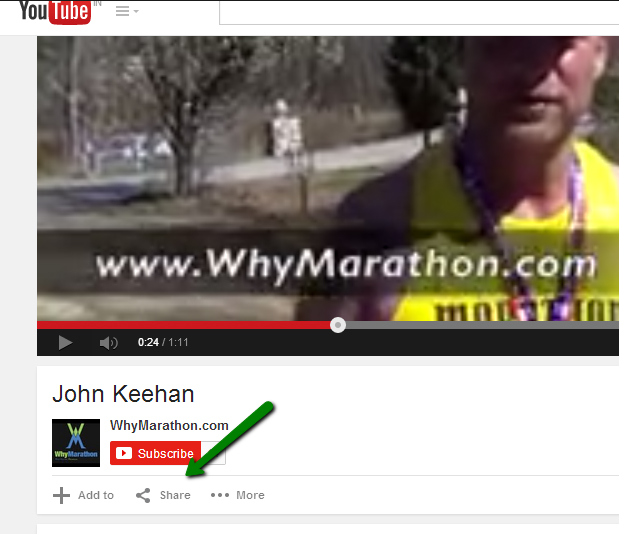
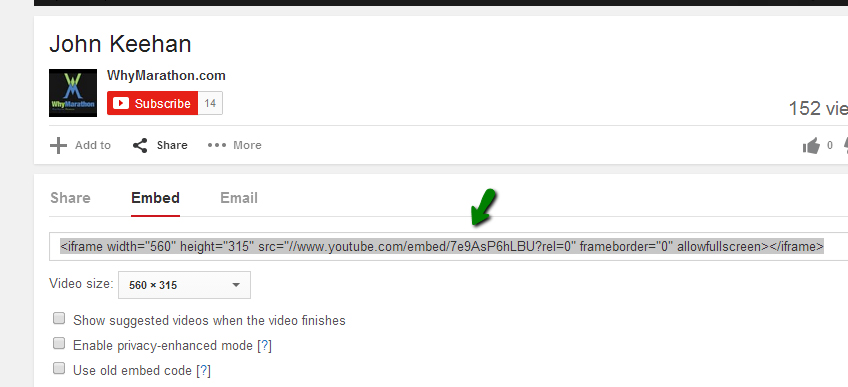
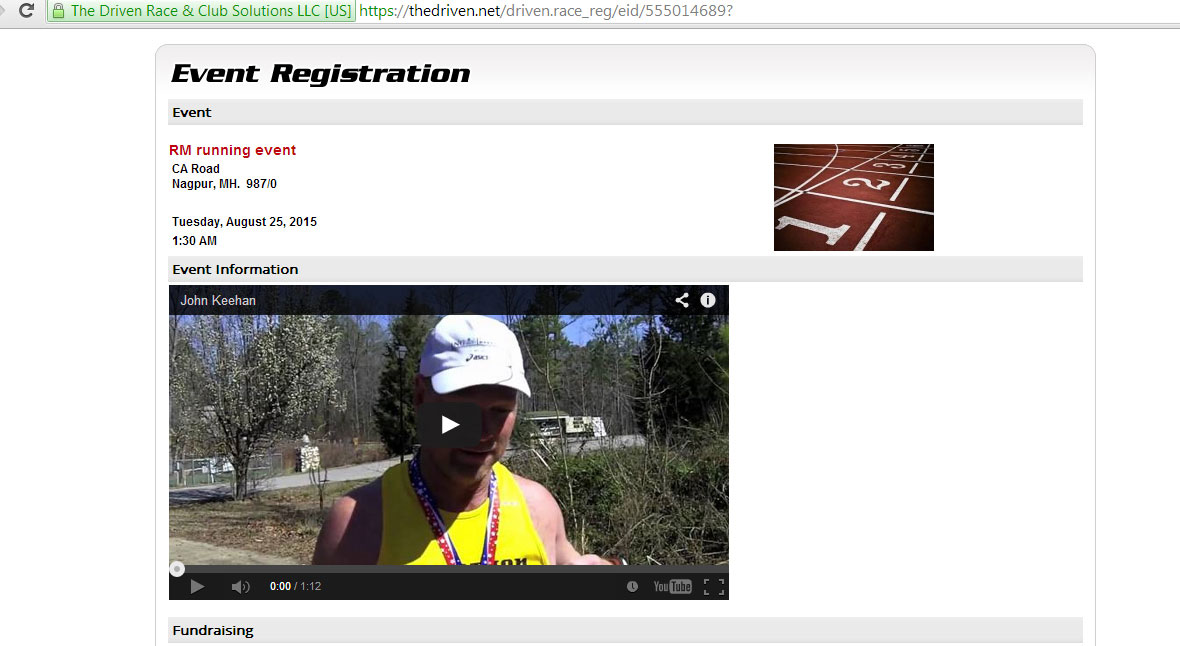
Then Hit share Click on Embed and Uncheck all 3 checkboxes and copy the embed code. Paste the code in the Event information editor where you want to place the video. Now save the changes and check the event page. If you do not see the video in the event page, go back to the event setup and hit save. Again if you want to adjust the height and width of the video screen you can change that in the code you copied
Issuing refunds is solely at your discretion. Remember that registration fees can be refunded; however, processing fees cannot be refunded via our system.
To issue a refund,
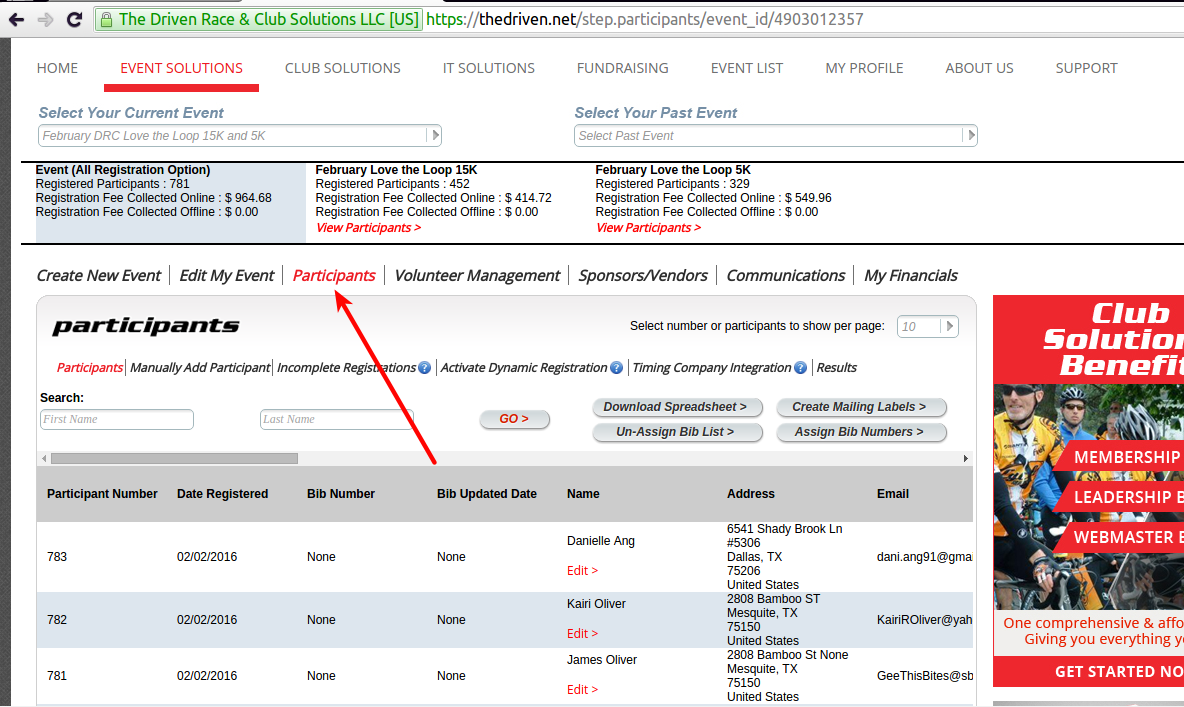
Login to your account and click on the "Participants/Results" link under "Event Solution" tab. View Screenshot
Select your event from the event dropdown here and click on "Participant link". View Screenshot
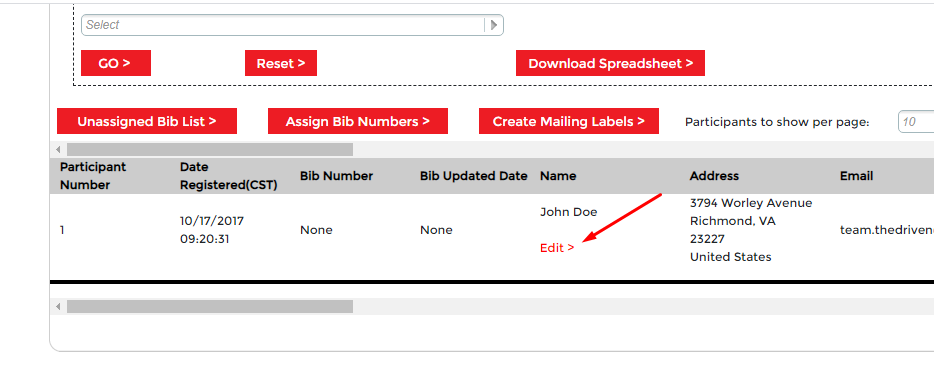
On this page you will find the "Edit > " link for each participant name. View Screenshot
These links contain all options for refunds, delete or defer participants. View Screenshot
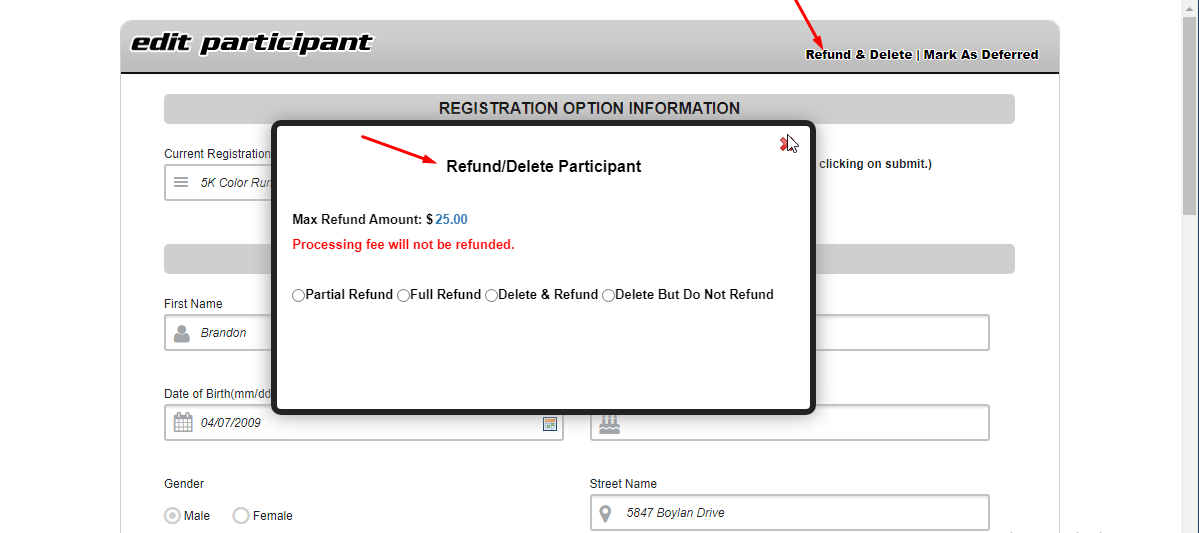
1) Refund/Delete Participant >> Here you can process full or partial refund to participants. With option if you want to keep that participant in the list or need to delete. View Screenshot
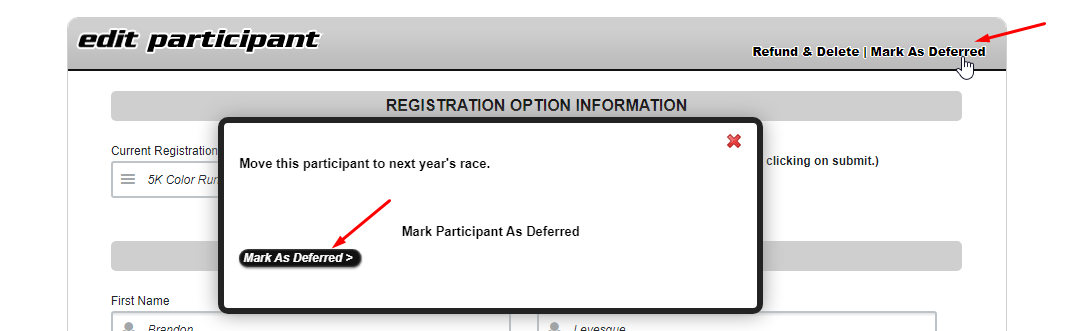
2) Mark Participant As Deferred >> If you don't want to process refunds now, but need to give some kind of exemption to these participants for your next event (like allow them with some discounted price Or allow them to participate without registration to the next event ), you can consider this option. View Screenshot
Because the majority of our costs are related to the online transaction, The Driven is unable to issue refunds for our fees. However, you will still receive the event fees for every participant. We encourage you to prominently display your refund policy on your event website.
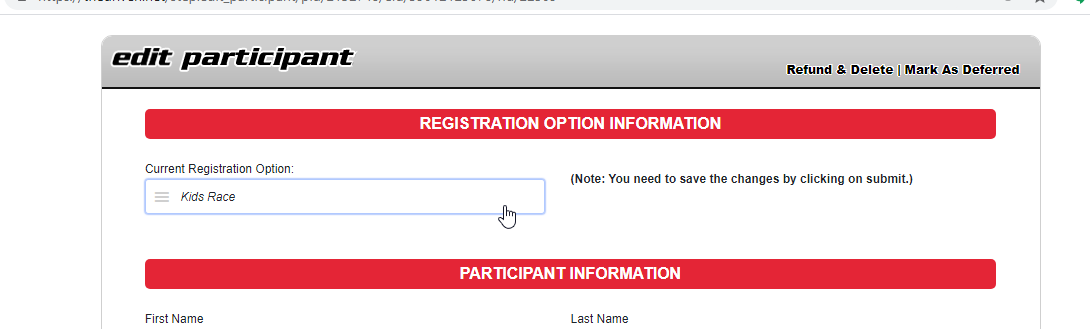
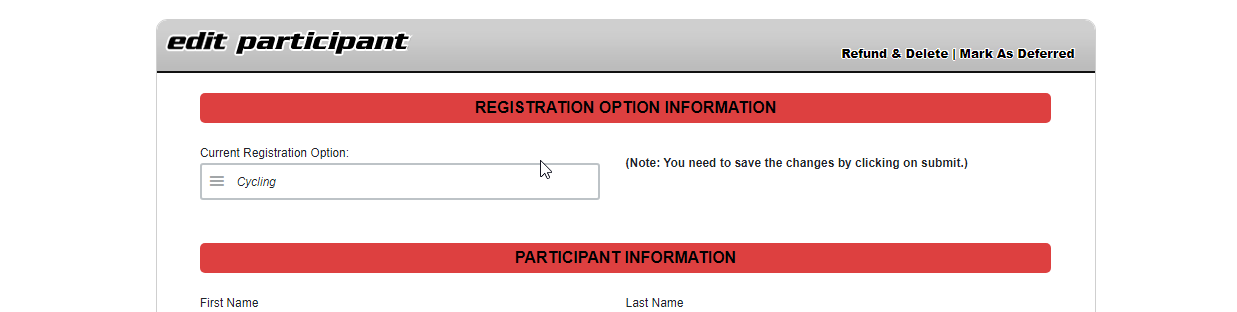
In the "Participants/Results" section under EVENT SOLUTIONS, select "Edit" under the name of the PARTICIPANT you wish to EDIT. View Screenshot
Then, EDIT the details you wish, being sure to click the SUBMIT button to finalize the changes.
This feature makes it easy for you to switch PARTICIPANTS from one registration option to another. View Screenshot
Yes. Click on the RESULTS button in the PARTICIPANTS section of EVENT SOLUTIONS. Select the SUB-EVENT for which you want to integrate RESULTS. From there, you will select whether you want to UPLOAD INDIVIDUAL RESULTS, DELETE RESULTS, or UPLOAD PRE-FORMATTED RESULTS FILE (such as from a TIMING COMPANY).
Please follow the below steps to add donation manually.
Step 1) Login to your account https://thedriven.net
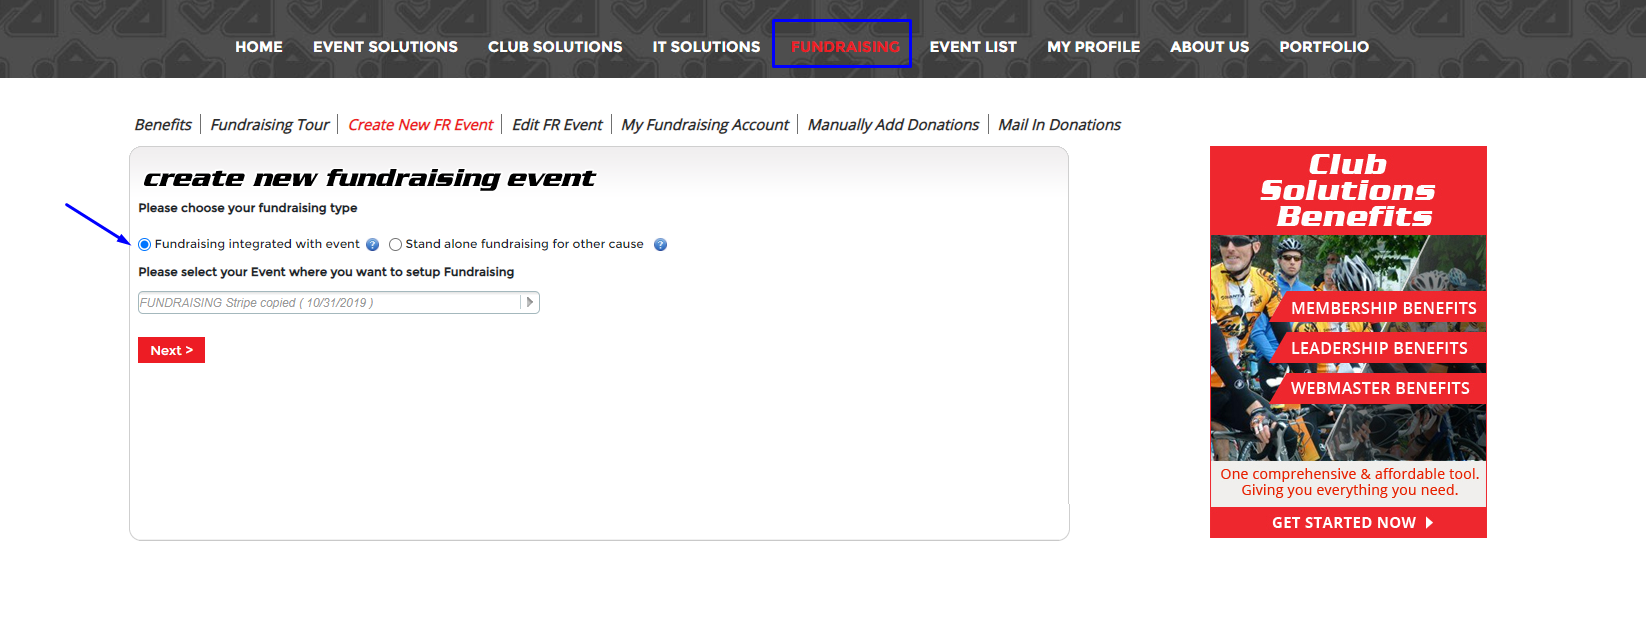
Step 2) Edit the Fundraising setup View Screenshot
Step 3) Click on the Fundraising tab, select the fundraising event name and click on Next button View Screenshot
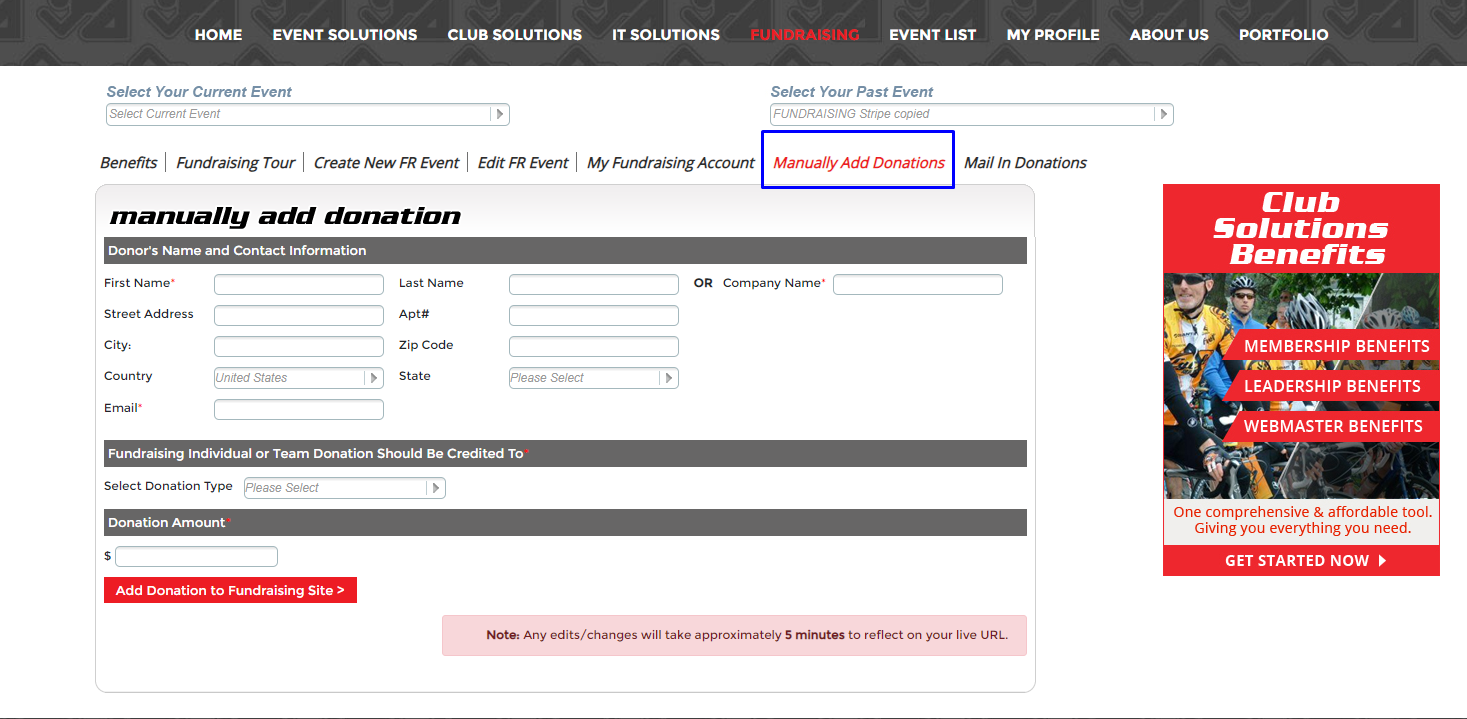
Step 4) Click on Manually Add Donations tab View Screenshot
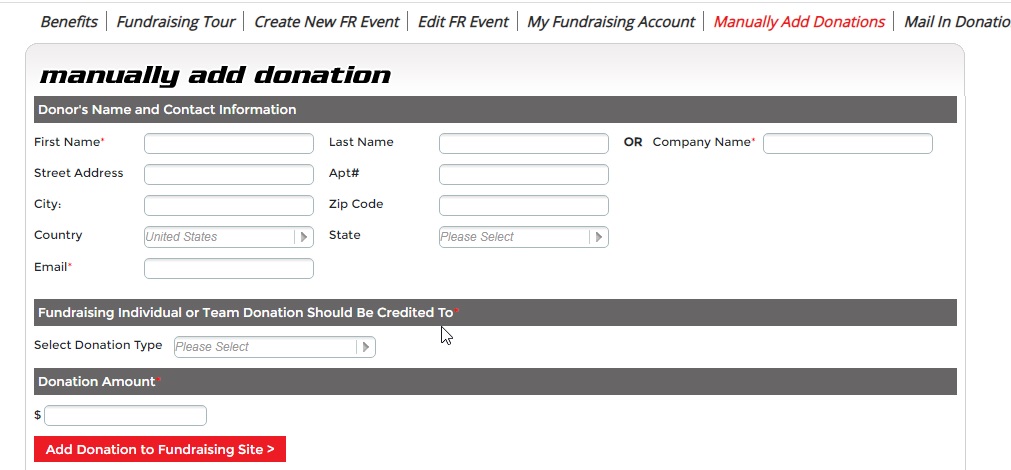
Step 5) Fill in all the required details View Screenshot
Step 6) Finally, click on 'Add Donation to Fundraising Site' button and the donation will be added.
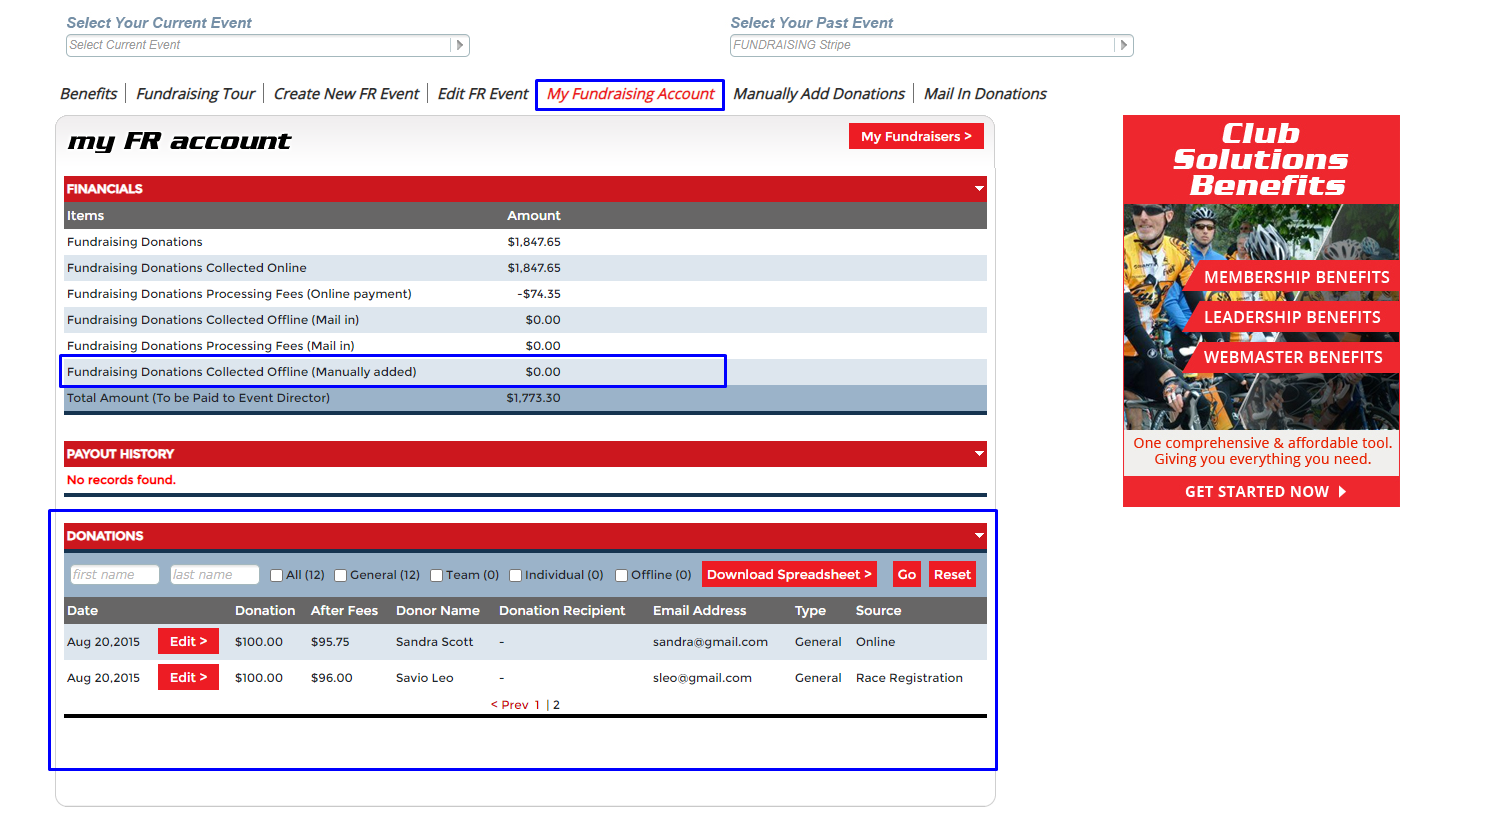
The donation details can be viewed in the tab 'My Fundraising Account' View Screenshot
Setting up a Timing company account is easy.
Login to https://thedriven.net
Under Event Solution tab, go to Participants. View Screenshot
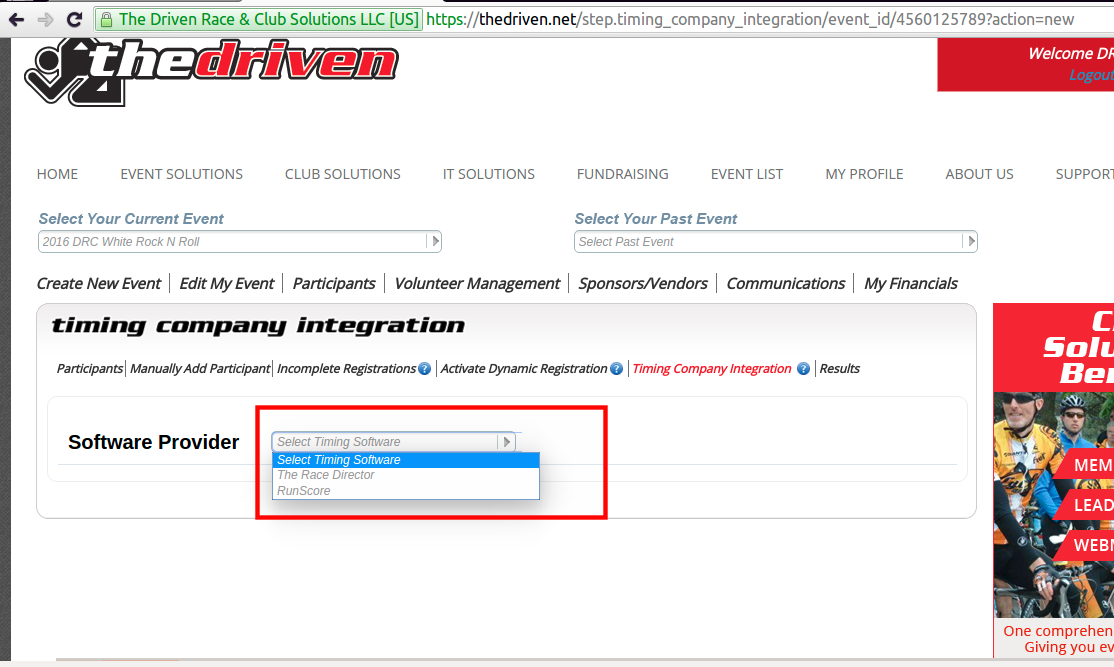
Click on timing company integration option. View Screenshot
Click the add new timing company button to the right. View Screenshot
Next, you will need to select the timing company from the dropdown. View Screenshot
1. The Race Director
OR
2. Run Score
Fill out the fields: Timing company name, username, password, confirm password. View Screenshot
Below these fields, you will see the list of events that are created in your account (if any) so you can just check the box to select. View Screenshot
If you already have an account you could just login to the site and come to the Timing Company Integration page where you could select current or past events. View Screenshot
When you are done, click "submit" View Screenshot
Login to thedriven.net
Select the event from the dropdown and click on the Participant menu option. View Screenshot
Click on activate dynamic registration. A form will appear to create an account. You need to sign up here with the required information.
View Screenshot
A) You need to add a username and password so that your volunteers will have access to dynamic registration section.
View Screenshot
B) You can set privileges for volunteer access. They can be allowed to change participant information, change Give-away selection and switch registration options.
C) Once you've signed up and activated Dynamic Registration successfully. This is the link that gets you access to the dynamic registration section. This will show up every time you come to this page. View Screenshot
So make a note of this link once you've signed up.
You can allow participants of your event to submit their result, resend links to submit results, arrange the submitted results with result categories.
Please find the details below,
A) Edit the event where you want to enable the post results option or if you are creating a new event then click on Create a new event button.
B) On Step 3) Pricing/Questions scroll down to enable the Post Results option.
C) Select the registration options for which you want to enable the Post Result option. View Screenshot
D) Set up the time frame to accept the results from participants if you want to keep the option time bound. View Screenshot
E) Links to post the result for the event will be included in the participants registration confirmation email. View Screenshot
You can set up result categorie(s) for the event on the "Results" link under the "Participant/Results" tab. View Screenshot
Add the Categories, check the boxes against the category to be displayed and click on Save Result Category.
Result Categories can be set up based on registration option, gender and age. View Screenshot
Option is provided under Participant/Results tab here. View Screenshot
Participant Result Submission:
Participants will be able to submit their result by entering their time. View Screenshot
If you have set up result categories for the event, participants will start showing results in applicable categories.
Results submitted by participants can be accessed from here. View Screenshot
A) Edit the event you want to enable the Medal Shipping option for or if you are creating a new event then click on Create a new event button.
B) On Step 3) Pricing/Questions scroll down to enable the Medal Shipping option.
C) You have the option to set up a charge or ship the medal at no additional cost.
Other options such as donate medal to charity, don't need a medal and other can be setup. The participant will be able to choose any one option.
D) Select the registration options for which you want to enable the medal shipping option. View Screenshot
A) Edit the event you want to enable the Pre-registration option for or if you are creating a new event then click on Create a new event button.
B) On Step 3) Pricing/Questions scroll down to enable the Pre-Registrations option.
C) You have an option to edit the Registration Description View Screenshot,
Message for Event Attendees View Screenshot,
Confirmation Page Description View Screenshot and
set the pre-registration confirmation email. View Screenshot
Once you created your dynamic registration account for your specific event. Click on the link in dynamic registration setup. View Screenshot
You need to login with details(Username and password) you added while creating the account. View Screenshot
There will be two options on the page- Participants check-in and Manually add participants.
1) Participant Check in This page allows you to search participant by their first name, last name and showing search result below. View Screenshot
On left side of each record you will find text box for bib assign, you can assign bib number to multiple participants at once.
You can assign bib numbers from here and can edit existing participant info.
Likewise, they can switch the race, edit details, change the t-shirt size as well.
For switching race and for changing t-shirt, there is an option in right side of the form, check the screenshot below.
View Screenshot
2) Add Participant onsite,
Click on Manually Add Participants: View Screenshot
Enter all the details required in form by participants, remember onsite we take only cash or check, Once done click on the Add Participant button, Your registration is done.
If you want to add any features or content to the registration confirmation email template, we have a list of built-in variables that will display the content on the email template. View Screenshot
You simply need to copy the below mentioned variables into email template.
For example, need to add QR code then you can add as {qr_code} in email template. View Screenshot
If you want to remove any content then you just delete the variable.
Please follow the below steps to do so,
1. Login into your account
2. Select the correct event from the drop-down menu View Screenshot
3. Click on Import participant View Screenshot
4. Select the correct registration option View Screenshot
5. Download the demo excel and maintain all the sequences given in the excel file. View Screenshot
6. Click on choose file and select the participant excel sheet as per downloaded format and then click on the Import Now button. View Screenshot
7. If the participant imported successfully then you will get a successful window. View Screenshot
Please follow the below steps to do so,
1. Under the page "CHECK / EDIT REGISTRATION" click on the " Edit Information" View Screenshot
2. Enter the First name, Last name & email that you used to register in the event View Screenshot, View Screenshot
3. You will receive an email with a link to edit your information. On this page you can purchase the additional tickets View Screenshot, View Screenshot
Please follow the below steps,
1. Login to your event director account https://thedriven.net/site.login
2. Select the event from event dropdown and click on "Edit My Event" tab. View Screenshot
3. Click on "Pricing/Questions" View Screenshot
4. Change the cutoff date as per your requirement and click on the SAVE button at the bottom of the page. View Screenshot, View Screenshot, View Screenshot
Please follow the below steps:
1. Login to the event by the event director
2. Click on the fundraising menu View Screenshot
3. Go to the My Fundraising Account View Screenshot
4. Select your current event from the dropdown. View Screenshot
5. Search Donor name and click on the edit button. View Screenshot
6. Select Donation type and Paid to from the dropdown and click on the Modify button. View Screenshot
Please follow the below steps,
1. Login to your event director account
2. Click on the "Participants/Results" link under "Event Solution" tab View Screenshot
3. Select your event from the event dropdown here and click on the "Participant link" View Screenshot
4. Find the participants and click on the Edit button View Screenshot
5. Click on the current registration dropdown and select the race where you want to move the participants View Screenshot
6. After selecting the race scroll down the page and click on the Submit button View Screenshot
You can find the transfer registration options from the Check/Edit Registration tab View Screenshot
Please follow the below steps to transfer the participant:
1. Click on Check/Edit Registration button View Screenshot
2. Click on the Transfer Registration button View Screenshot
3. After clicking, a popup will display. Please enter participant details as per the registration View Screenshot
4. After clicking on validation a new form will appear. please fill out all the details of the new participants and click on send request. View Screenshot
5. A confirmation email will be sent to the old(original) participant to confirm his registration transfer View Screenshot
6. After confirmation a link will be sent to new participants to complete the registration process
Please follow the below steps to upload the results
1. Login to the event solution
2.Select the event for which you want to upload the results.
3. Go to the Participants/Result tab and click on the Result button. View Screenshot
4. On result page we can upload the individual results by creating a category. we need to select the Upload Individual Results radio button and then enter a category name and select result excel and then upload it. View Screenshot
5. The uploaded result showing on the event page Result menu. View Screenshot
Log in to The Driven, go to Event Solutions >> Select the Past or Current Event from the dropdown >> Then go to the the My Financials menu View Screenshot Scroll down and you will find Donation details, those who donated and registered for the event. And, if you want the details, download the spreadsheet.
Please follow the below steps to edit the confirmation email template.
1. Login to event solution
2. Go to the my events/club page and click on the edit event button View Screenshot
3. Click on step 6 Finish View Screenshot
4. Scroll down the page then you can see the Confirmation email template. add the changes save it. View Screenshot
Please follow the below steps to close the event registration.
1. Login to the event solution
2. Select your event and click on the edit event button View Screenshot
3. Go to step 6 Finish and scroll down the page and click on the Save and Unpublish button View Screenshot
Also, You could setup the registration close period while creating the event from step 3 View Screenshot
Please follow the below steps to setup a banner
1. Login to your event director account https://thedriven.net/site.login
2. Select your event and click on the edit event button View Screenshot
3. Go to step 6 Finish View Screenshot
4. Scroll down the page and click on the Manage/Upload Images button View Screenshot
5. Select Use custom Banner radio button View Screenshot
6. Scroll down the page and click on the Upload custom Image button View Screenshot
7. Choose the image and save it.
Please follow the below steps
1. Login to your event director account https://thedriven.net/site.login
2. Select your event and click on the edit event button View Screenshot
3. Click on Registration Options tab and Edit Race registration option View Screenshot
4. Check the 'Check here if you would like teams created by participants registering for this registration option to appear in the other races within your event.' checkbox and Save View Screenshot
5. Go to Participant/Results tab View Screenshot
6. Choose the participant and click on the edit button View Screenshot
7. Scroll down the page select team and click on the submit button View Screenshot
Please follow the below steps
1. Login to your event director account https://thedriven.net/site.login
2. Select your event and click on the edit event button View Screenshot
3. Go to the Sponsor/vendor page View Screenshot
4. Click on a manually add sponsors View Screenshot
5. Put the sponsor information and save it.
Please follow the below steps
1. Login to your event director account https://thedriven.net/site.login
2. Select your event and click on the edit event button View Screenshot
3. Go to the Sponsor/vendor page View Screenshot
4. Click on the My sponsors View Screenshot
5. Click on the Inactive text to change status to Active. View Screenshot
6. All active sponsors showing on View sponsor page
Please follow the below steps to add participants manually.
1. Login to your event director account https://thedriven.net/site.login
2. Select your event and click on the edit event button View Screenshot
3. Go to the Participants tab View Screenshot
4. Click on Manually add participants View Screenshot
5. Select the registration and fill up the participant's details and save it View Screenshot
To get the Confirmation email please follow the below steps.
1. Go to the event page
2. Click on the Check/Edit registration tab View Screenshot
3. Click on the Request Email button View Screenshot
4. Enter your First name, Last name, and Email address, and then click on the button Send View Screenshot
Please follow the below steps to check/edit your registrations.
1. Go to the event page and click on Check/Edit Registration tab View Screenshot
2. Click on the Edit Information button View Screenshot
3. Enter your First name, last name, and email, and then click on Submit Request button View Screenshot
4. After clicking on submit button system will send you an edit link to your email address.
Please follow the below steps
1. Login to your event director account https://thedriven.net/site.login
2. Go to the My Event/Club View Screenshot
3. Click on the Edit Event button View Screenshot
4. Update the Event date and Event information and then click on the Save button View Screenshot View Screenshot
Please follow the steps below to import participants from Thedriven to The Race Director Software.
1. Open the RaceDirector timing software and Click on the Menu File>New View Screenshot
2. Enter Your Event name and click on the Build race button View Screenshot View Screenshot
3. Go to Update>> Participants View Screenshot
4. Click on the Import (Imp) button View Screenshot
5. Select Thedriven.net radio button and then click on the import button View Screenshot
6. Enter Thedriven userID ad password which is created from Timing Company Integration and then click on Get Races button View Screenshot
7. Select your Event from the event list View Screenshot
8. Select Divison and then click on the Get Registration button View Screenshot
9. If Bib numbers are present then please Map the field and then click on the Create Import button View Screenshot
10. Uploaded data shown on the Update Race Participants tab View Screenshot
Please follow the below steps to add customized questions on registration page.
1. Login to event solution
2. Go to my events/club page and click on the edit event button View Screenshot
3. Click on step 3 Pricing/Questions View Screenshot
4. Scroll down the page, and then you can see the Customized Questions. View Screenshot
5. Enter your question then select Participant Response Format and then select the registration option View Screenshot
Please follow the steps below for creating a team.
1. Go to the event page and choose the race registration where you want to register yourself/team. View Screenshot
2. Click on the Create a Team radio button and enter a team name View Screenshot
3. After adding a team name you can see two checkbox options.
1) Team members must enter a password in order to join. View Screenshot
>> Here you can enter a password for your team. whenever your team members try to join your team then that time they need to enter that team password.
2) Invite friends to join your team (Your friends will receive an invitation email.) View Screenshot
>> Here you can invite your friends to join your team. your friends will receive an invitation email with team details like team name, and team password.
4. Enter your information and proceed to checkout
Please follow the steps below
1. Login to event solution
2. Go to my events/club page and click on the edit event button View Screenshot
3. Click on step 3 Pricing/Questions. View Screenshot
4. Find "Do you want to set passwords for the registration options?" and select the radio button Yes. View Screenshot
5. Select a race that you want to protect, Enter a Password, Select Start date and End date and save it. View Screenshot
The Pre-Registration feature allows the Race Director (RD) to set an event page into pre-registration mode. In this mode, attendees can register for the event as usual, but their card is only put on file—they are not charged immediately. Once the RD decides to move forward with the event, participants are officially registered, and their cards are then charged.
We’ve added an integration that allows you to directly connect your event with your Mailchimp account. This lets you sync participant information seamlessly for marketing and communication purposes.
Please follow the steps below to integrate with Mailchimp
1. Login to your event director account https://thedriven.net/site.login
2. Go to the My Event/Club View Screenshot
3. Click on the Edit Event button View Screenshot
4. Go to Participants/Result tab and click on the Mailchimp Setup View Screenshot
5. If your event is not yet integrated, you’ll see an option to Authorize. Click on the button Authorize to connect. View Screenshot
6. Enter your Mailchimp account details and allow it. Screenshot 1 Screenshot 2
7. After authorisation, the page will display your account details. View Screenshot
8. Map participant fields to Mailchimp fields for accurate syncing. View Screenshot
9. MailChimp List Configuration steps View Screenshot
10. After mapping participant fields to Mailchimp, click on the Mailchimp Lists to link race View Screenshot
11. A page is available to link your event races with specific Mailchimp lists. Select the list and save it. View Screenshot
12. Click on the Sync button to push participant data to Mailchimp. View Screenshot
13. After syncing, contacts will be available in your Mailchimp list. Screenshot 1 Screenshot 2
When you click on the PARTICIPANTS tab within EVENT SOLUTIONS, you will see a master list of all of your registered PARTICIPANTS, meaning everyone who has signed up for any one or more of your SUB-EVENTS. Here you will see all of the requested participant information from the registration.
If you have more than one SUB-EVENT listed on your event registration, then simply click on the SUB-EVENT for which you want to VIEW ONLY THIS SUB-EVENT PARTICIPANTS in the header row above the PARTICIPANTS tab.
Yes. Simply click on the PARTICIPANTS tab within EVENT SOLUTIONS. Then, select the SUB-EVENT (or you can download a master list) for which you want the spreadsheet, and click the DOWNLOAD SPREADSHEET button. Remember that our platform does a lot of the work for you, such as tallying T-shirt counts and such, in the My Financials feature.
Indeed you can. Simply click on the PARTICIPANTS tab within EVENT SOLUTIONS. Then, select the SUB-EVENT for which you want the MAILING LABELS, and click the CREATE MAILING LABELS button and complete the required information.
Click on the PARTICIPANTS tab within EVENT SOLUTIONS. Then, select the SUB-EVENT for which you want to ASSIGN BIB NUMBERS, then click on the ASSIGN BIB NUMBERS button. This feature allows your event timing company to pre-assign bib numbers while online registration is still active. Using the DYNAMIC REGISTRATION feature in combination with this allows you to keep online registration open until just before the event starts. Step 1: Download the PARTICIPANTS spreadsheet. Step 2: Enter the BIB NUMBERS into the bib number column. Step 3: Upload the modified spreadsheet with the new BIB NUMBERS added. Note: While sorting the entries in the spreadsheet, do not change the position of the first two rows; and, if you want to add any new column, please add it on the far right.
Issuing refunds is solely at your discretion. Remember that registration fees can be refunded; however, processing fees cannot be refunded via our system.
To issue a refund,
Login to your account and click on the "Participants/Results" link under "Event Solution" tab. View Screenshot
Select your event from the event dropdown here and click on "Participant link". View Screenshot
On this page you will find the "Edit > " link for each participant name. View Screenshot
These links contain all options for refunds, delete or defer participants. View Screenshot
1) Refund/Delete Participant >> Here you can process full or partial refund to participants. With option if you want to keep that participant in the list or need to delete. View Screenshot
2) Mark Participant As Deferred >> If you don't want to process refunds now, but need to give some kind of exemption to these participants for your next event (like allow them with some discounted price Or allow them to participate without registration to the next event ), you can consider this option. View Screenshot
Because the majority of our costs are related to the online transaction, The Driven is unable to issue refunds for our fees. However, you will still receive the event fees for every participant. We encourage you to prominently display your refund policy on your event website.
In the "Participants/Results" section under EVENT SOLUTIONS, select "Edit" under the name of the PARTICIPANT you wish to EDIT. View Screenshot
Then, EDIT the details you wish, being sure to click the SUBMIT button to finalize the changes.
This feature makes it easy for you to switch PARTICIPANTS from one registration option to another. View Screenshot
Yes. Click on the RESULTS button in the PARTICIPANTS section of EVENT SOLUTIONS. Select the SUB-EVENT for which you want to integrate RESULTS. From there, you will select whether you want to UPLOAD INDIVIDUAL RESULTS, DELETE RESULTS, or UPLOAD PRE-FORMATTED RESULTS FILE (such as from a TIMING COMPANY).
Please follow the below steps to do so,
1. Login into your account
2. Select the correct event from the drop-down menu View Screenshot
3. Click on Import participant View Screenshot
4. Select the correct registration option View Screenshot
5. Download the demo excel and maintain all the sequences given in the excel file. View Screenshot
6. Click on choose file and select the participant excel sheet as per downloaded format and then click on the Import Now button. View Screenshot
7. If the participant imported successfully then you will get a successful window. View Screenshot
Please follow the below steps to do so,
1. Under the page "CHECK / EDIT REGISTRATION" click on the " Edit Information" View Screenshot
2. Enter the First name, Last name & email that you used to register in the event View Screenshot, View Screenshot
3. You will receive an email with a link to edit your information. On this page you can purchase the additional tickets View Screenshot, View Screenshot
Please follow the below steps,
1. Login to your event director account https://thedriven.net/site.login
2. Select the event from event dropdown and click on "Edit My Event" tab. View Screenshot
3. Click on "Pricing/Questions" View Screenshot
4. Change the cutoff date as per your requirement and click on the SAVE button at the bottom of the page. View Screenshot, View Screenshot, View Screenshot
Make an error or want to change something? No problem! Simply click on the "Edit my Event" tab, make your updates, and click on "Save and Publish" Your changes are processed immediately and your website is accurate in an instant.
After you login to The Driven, click on the MY PROFILE tab at the top right. Then, at the bottom of your profile page, you will see your events listed under Director Events. Click on the Manage Sub Admin link. Then, on the next screen, click on the Add Sub Admin button to enter in your sub-administrator information and their level of access to your event then click SAVE. You can add multiple sub-administrators--for example, maybe you have one person handling just the volunteers and another person managing the communications. Its all in your hands!
Adding EVENT sub-administrators allows others to access your event according to your designations. You can grant sub-administrators full access to all aspects of your event in our Event Solutions platform by selecting all of the options (Edit My Event, Participants, Volunteer Management, Communication, My Financials), or you can allow them access to specific components you select.
After you login to The Driven, click on the EVENT SOLUTIONS tab at the top left, then select CREATE NEW EVENT. Fill in the required fields as designated by the asterisks, then click SAVE & CONTINUE. Don’t worry if you need to make changes--our platform will reflect your updates in real time.
Here is your opportunity to provide a description of your event, complete with pictures, colorful font, hyperlinks, and more. You may want to include a description of the course or set up, the purpose of the event, the event’s cause (if applicable), packet pick up, and any other information important for your registrants to know.
Great question! The EVENT is your overall occasion. If your registrants only have one option, for example the only choice is a 5K run/walk, then it’s likely your EVENT and SUB-EVENT are the same thing, and you will enter the required SUB-EVENT information, adding more details about the event as you wish. However, if your event will feature more than one option, such as a 5K and a 10K route, then you will enter in information for each SUB-EVENT. This will help you track participants, assign bib information appropriately, manage course volunteers, as well as allow you to assign different start times for different sub-events, set different entry fees, and more.
Click on the COMMUNICATIONS tab in EVENT SOLUTIONS. Here you can upload a document or draft an email that can be sent to all of your EVENT PARTICIPANTS or SELECT GROUPS such as VOLUNTEERS or registrants for just one of your SUB-EVENTS. The emails will be sent to the emails the registrants used to sign up for your event. You will have the opportunity to send a test email to make sure the COMMUNICATION is how you want it. Do note that the email recipients have the right to unsubscribe from future email communications.
Upload your video to YouTube and then open it.
Then Hit share Click on Embed and Uncheck all 3 checkboxes and copy the embed code. Paste the code in the Event information editor where you want to place the video. Now save the changes and check the event page. If you do not see the video in the event page, go back to the event setup and hit save. Again if you want to adjust the height and width of the video screen you can change that in the code you copied
Login to thedriven.net
Select the event from the dropdown and click on the Participant menu option. View Screenshot
Click on activate dynamic registration. A form will appear to create an account. You need to sign up here with the required information.
View Screenshot
A) You need to add a username and password so that your volunteers will have access to dynamic registration section.
View Screenshot
B) You can set privileges for volunteer access. They can be allowed to change participant information, change Give-away selection and switch registration options.
C) Once you've signed up and activated Dynamic Registration successfully. This is the link that gets you access to the dynamic registration section. This will show up every time you come to this page. View Screenshot
So make a note of this link once you've signed up.
Once you created your dynamic registration account for your specific event. Click on the link in dynamic registration setup. View Screenshot
You need to login with details(Username and password) you added while creating the account. View Screenshot
There will be two options on the page- Participants check-in and Manually add participants.
1) Participant Check in This page allows you to search participant by their first name, last name and showing search result below. View Screenshot
On left side of each record you will find text box for bib assign, you can assign bib number to multiple participants at once.
You can assign bib numbers from here and can edit existing participant info.
Likewise, they can switch the race, edit details, change the t-shirt size as well.
For switching race and for changing t-shirt, there is an option in right side of the form, check the screenshot below.
View Screenshot
2) Add Participant onsite,
Click on Manually Add Participants: View Screenshot
Enter all the details required in form by participants, remember onsite we take only cash or check, Once done click on the Add Participant button, Your registration is done.
When you login you'll be taken to your "My profile" page. Clicking on the "Event Solutions" tab will take you straight into our "Create New Event" section. Here you'll complete six simple pages...just fill in the blanks. On our finish page you'll have the opportunity to preview your event before publishing it on your website. If you have any problems, we're just a phone call away to walk you through this process.
You can view all of your event reports within your "My Financials" tab. First you'll select your event in the dropdown box and click on the "My Financials" tab. Here you'll find all of the financials of your event. These figures are updated instantly as your participants register for the event. This data can even be downloaded to a spreadsheet in an easy-to-read format to share with others on your event team/committee.
After creating your event, simply click on the REGISTRATION OPTIONS link under EDIT MY EVENT and click on the ADD ANOTHER SUB-EVENT button and follow all the same steps to set up your sub-event and save. Repeat this process as needed for multiple entry fees (such as Adult and Youth) and/or for multiple sub-events (such as 5K, 10K, and Half Marathon).
REGISTRATION PERIODS are registration windows for which you may opt to have varied pricing based on the selected time frames. For example, you may want to have an “Early Bird†special registration window that offers a discounted price for your registrants. In our platform, you can select to have 1, 2 or 3 REGISTRATION PERIODS.
Absolutely. On the REGISTRATION OPTIONS page, select YES to enable GROUP PRICING, then click on the ADD GROUP FEE button. For GROUP TITLE, you will name your group discount package, e.g. “4-Person Party Packâ€, then you will set the NUMBER OF PARTICIPANTS* necessary to register for the GROUP PRICING. Next, you will decide whether to allow more group registrants to be added at no additional charge or to allow additional group registrants to register at the discounted rate. Pricing will be set by you on the next page. You can have multiple GROUP PRICING options within one sub-event. *Note: All registrants must be registered in one transaction to get the GROUP PRICING. If you want registrants to be able to register in separate transactions, select the GROUP PRICING FOR MULTIPLE SUB-EVENTS on the EVENT page instead.
On the PRICING/QUESTIONS page of your event set up, simply select YES to the question “Do you want to sell items like food tickets, raffle tickets, packet mailing, etc?â€. You will be prompted to enter in a title, description, price and other details relevant to your ticket item. Don’t worry, you can add multiple extra items by clicking on the ADD ANOTHER TICKET button if you so choose. Remember, there is a separate question regarding the sale of extra/upgraded T-shirts already built into our platform.
For each item your registrants select to purchase (registration, extra items, etc.) there is a processing fee--that is how we are able to keep our multi-million dollar platform FREE to you without hassling your registrants with registering for us as a third party site just to register for YOUR EVENT! For each PROCESSING FEE, you have two options. If you select the first option, Processing Fee paid by the participant, the amount of the fee will show up as the registrant checks out and must be paid in order for their registration to be complete. If you select the second option, the Processing Fee comes out of the charge, then the fee will come out of your total sales per our fee schedule. You may opt to cover this fee by adjusting your event pricing.
Our CUSTOMIZED QUESTIONS feature allows you to collect other information about your event and registrants. For example, you might ask “How did you hear about our event?†to track your marketing efforts.
YES! Once you enter in a CUSTOMIZED QUESTION, you will have the option to select the sub-event to which you want to assign the question.
Absolutely. Simply login and scroll down to the bottom of your PROFILE page, and select EDIT MY EVENT for the one for which you wish to make changes. Then, click on the tab for the details you want to edit and enter your changes. Once you are satisfied with your changes, be sure to click on SAVE at the bottom of the page. Your changes will immediately be reflected on your live event site.
Absolutely. Simply click on the PARTICIPANTS tab within EVENT SOLUTIONS and click on the MANUALLY ADD PARTICIPANT link, then select the SUB-EVENT for which you want to ADD A PARTICIPANT and complete the required information.
You can allow participants of your event to submit their result, resend links to submit results, arrange the submitted results with result categories.
Please find the details below,
A) Edit the event where you want to enable the post results option or if you are creating a new event then click on Create a new event button.
B) On Step 3) Pricing/Questions scroll down to enable the Post Results option.
C) Select the registration options for which you want to enable the Post Result option. View Screenshot
D) Set up the time frame to accept the results from participants if you want to keep the option time bound. View Screenshot
E) Links to post the result for the event will be included in the participants registration confirmation email. View Screenshot
You can set up result categorie(s) for the event on the "Results" link under the "Participant/Results" tab. View Screenshot
Add the Categories, check the boxes against the category to be displayed and click on Save Result Category.
Result Categories can be set up based on registration option, gender and age. View Screenshot
Option is provided under Participant/Results tab here. View Screenshot
Participant Result Submission:
Participants will be able to submit their result by entering their time. View Screenshot
If you have set up result categories for the event, participants will start showing results in applicable categories.
Results submitted by participants can be accessed from here. View Screenshot
A) Edit the event you want to enable the Medal Shipping option for or if you are creating a new event then click on Create a new event button.
B) On Step 3) Pricing/Questions scroll down to enable the Medal Shipping option.
C) You have the option to set up a charge or ship the medal at no additional cost.
Other options such as donate medal to charity, don't need a medal and other can be setup. The participant will be able to choose any one option.
D) Select the registration options for which you want to enable the medal shipping option. View Screenshot
A) Edit the event you want to enable the Pre-registration option for or if you are creating a new event then click on Create a new event button.
B) On Step 3) Pricing/Questions scroll down to enable the Pre-Registrations option.
C) You have an option to edit the Registration Description View Screenshot,
Message for Event Attendees View Screenshot,
Confirmation Page Description View Screenshot and
set the pre-registration confirmation email. View Screenshot
The Driven believes you should have choices. That's why we let you select the date you receive your first payment. After that we'll mail you a check every two weeks, on the same schedule. Furthermore, you can elect to have the funds wired into your account.
This is the email that each registrant will get upon registering for your event using The Driven’s platform. Remember that The Driven, unlike other platforms, does NOT require your participants to create a separate account nor do we send spam/third party emails to your users. You can simply use the preset fields in the CONFIRMATION EMAIL box, or you may type in or upload your own information/file.
This is the email address that will show as the sender for the CONFIRMATION EMAILS that are sent to your registrants.
Yes. In fact, if you select the PARTICIPANTS REGISTRATION NOTIFICATION option, you can select up to 5 email addresses to receive an EMAIL NOTIFICATION. This comes in handy when you have sub-administrators for your event.
If you are providing electronic timing (either yourself or via a timing company) for your participants, select YES to the question Chip Timing Provided?. This lets your registrants know that their event will be accurately timed using digital chip technology. Using chip timing is definitely suggested for events where you will be awarding prizes for top finishers. If you need timing company suggestions, let us know!
Our EVENT SOLUTIONS platform is integrated with the most used timing company software applications. With The Driven, you can easily provide PARTICIPANTS data access to any TIMING COMPANY that uses either The Event Director or Run Score software platforms. Integrating with a TIMING COMPANY greatly minimizes the risk of errors and the workload of both entities. For example, using this feature allows TIMING COMPANIES to access data when they need to and allows event directors to assign bibs nightly for larger events with multiple packet pick up days. To activate this feature, click on the TIMING COMPANY INTEGRATION link in the PARTICIPANTS section within EVENT SOLUTIONS and complete the required fields.
Setting up a Timing company account is easy.
Login to https://thedriven.net
Under Event Solution tab, go to Participants. View Screenshot
Click on timing company integration option. View Screenshot
Click the add new timing company button to the right. View Screenshot
Next, you will need to select the timing company from the dropdown. View Screenshot
1. The Race Director
OR
2. Run Score
Fill out the fields: Timing company name, username, password, confirm password. View Screenshot
Below these fields, you will see the list of events that are created in your account (if any) so you can just check the box to select. View Screenshot
If you already have an account you could just login to the site and come to the Timing Company Integration page where you could select current or past events. View Screenshot
When you are done, click "submit" View Screenshot
Please follow the steps below to import participants from Thedriven to The Race Director Software.
1. Open the RaceDirector timing software and Click on the Menu File>New View Screenshot
2. Enter Your Event name and click on the Build race button View Screenshot View Screenshot
3. Go to Update>> Participants View Screenshot
4. Click on the Import (Imp) button View Screenshot
5. Select Thedriven.net radio button and then click on the import button View Screenshot
6. Enter Thedriven userID ad password which is created from Timing Company Integration and then click on Get Races button View Screenshot
7. Select your Event from the event list View Screenshot
8. Select Divison and then click on the Get Registration button View Screenshot
9. If Bib numbers are present then please Map the field and then click on the Create Import button View Screenshot
10. Uploaded data shown on the Update Race Participants tab View Screenshot
The MY FINANCIALS feature allows you to view your FINANCIALS (for event fees, fundraising, sponsorships, and donations), PAYOUT HISTORY, as well as tallies up your GIVE-AWAYS for participants and volunteers so that you have a quick, current, and accurate account of your event at-a-glance. To see SUB-EVENT-specific reports, simply click on the View This Sub-Event link at the top. There are no editing options in this feature; however, should you ever have a question about your Financials, please contact us at team@thedriven.net.
Yes. Simply click on the MY FINANCIALS tab within EVENT SOLUTIONS. Then, select the SUB-EVENT (or you can download a master list) for which you want the spreadsheet, and click the DOWNLOAD SPREADSHEET button.
Our product/services are absolutely free for the event director and their events. We do charge a very competitive online registration fee that is paid by your participants. No two events are the same. As such, our goal is to provide you pricing that is unique to your event and meets your specific objectives. Please contact us for more information.
Absolutely! The Driven takes the security of an online transaction very seriously. We use Secure Socket Layer (SSL) encryption (issued by GoDaddy.com, Inc.) on our payment server. This encryption scrambles all payment information between the participant's computer and our servers.
DISCOUNT CODES allow you to offer reduced pricing to select registrants. For example, you may want to offer early bird pricing to the first 100 registrants within a certain window of time, or you may want to offer a percentage off to registrants who spend a certain dollar amount.
DISCOUNT CODES allow you to offer reduced pricing to select registrants. For example, you may want to offer early bird pricing to the first 100 registrants within a certain window of time, or you may want to offer a percentage off to registrants who spend a certain dollar amount. Under the DISCOUNT CODE OPTION, select DISCOUNT OFFER. Then, enter in the text you want for the DISCOUNT CODE, such as “EARLYBIRDâ€. Then, select the dates you want the code to be effective, and the amount of the discount--either in terms of dollars off the regular fee or a percentage off. Next, you will choose whether to restrict the DISCOUNT CODE’s usage. If you select NO RESTRICTION, then your DISCOUNT CODE will be able to be used by any registrant during the specified discount code window. You can restrict the use of the DISCOUNT CODE by setting a minimum cart dollar amount for use of the code OR by limiting the usage to a set number of participants (you set the number!). Be sure to click the gray SAVE button within the DISCOUNT CODE OPTION section before continuing. You can add multiple DISCOUNT CODES to meet your event’s need, and you can assign different DISCOUNT CODES to different Events/SUB-EVENTS. Note: The discount will be applied prior to the processing fee. Should you need unique DISCOUNT CODES for your event, just let us know!
In the EVENT PAYMENT SET-UP section of your event creation, you can opt to receive your payments via an Electronic Funds Transfer (EFT) or via a mailed check to the address you provide. Should you choose to receive payment via EFT, you will need to provide the bank’s routing number and your account number, as well as a scan/photocopy of a voided check from the selected account. The Driven disburses payments every two weeks; however, if your event has unique needs, just let us know.
We use the highest level of SSL encryption offered by GoDaddy. This scrambles all of the payment information and none of your registrants’ card information is stored on our servers.
After you've created your event you can access our complete VOLUNTEER MANAGEMENT system. You'll find our "Volunteer Management" tab within our "Event Solutions" section. Use the dropdown menu to select the event that needs volunteers. Here you can completely customize your events' volunteer needs. You'll be able to create volunteer positions, ask volunteer questions, and even allow them to select their shirt sizes! Once this information is saved our volunteer management code will be placed on your website and ready for immediate use.
This is the email address that will be displayed when you send confirmation and other emails to your VOLUNTEERS. If you select to receive an email confirmation of volunteer registrations, that CONFIRMATION EMAIL will go to the email you used to create your account for The Driven.
Yes. Simply click on the VOLUNTEERS tab within EVENT SOLUTIONS. Then, select MY VOLUNTEERS and click the DOWNLOAD SPREADSHEET button. Remember that our platform does a lot of the work for you, such as tallying T-shirt counts for volunteers, in the My Financials feature.
Just click on the VOLUNTEERS tab within EVENT SOLUTIONS. Then, select MY VOLUNTEERS for a quick view of all of your VOLUNTEER POSITIONS and registered VOLUNTEERS.
Absolutely. Simply click on the VOLUNTEER MANAGEMENT tab within EVENT SOLUTIONS and click on the MANUALLY ADD VOLUNTEER link. After you enter in the required information, click on the ADD VOLUNTEER TO EVENT button to complete the process.
In the VOLUNTEER MANAGEMENT section of EVENT SOLUTIONS, select MY VOLUNTEERS. Then, click the EDIT button next to the VOLUNTEER POSITION you wish to EDIT. Then, EDIT the details you wish, being sure to click the SAVE button to finalize the changes. If you need to DELETE a VOLUNTEER, you can do so in this feature.
In the VOLUNTEER MANAGEMENT section of EVENT SOLUTIONS, select MY VOLUNTEERS. Then, click the X button next to the VOLUNTEER POSITION you wish to DELETE. Then, EDIT the details you wish, being sure to click the SAVE button to finalize the changes. If you need to DELETE a VOLUNTEER, you can do so in this feature.
Absolutely not! Unlike many of our competitors, we don't lock you into a long term contract that you can't get out of. We're certain you'll appreciate all that The Driven has to offer. However, if for any reason you're unhappy, you are free to use another provider at any time.
This feature, found on the EVENT page, will allow registrants to get a discounted price for registering for multiple sub-events within your event. Select YES if and only if you will have more than one event (such as having both a 5K and a 10K run on the same day) AND you want registrants to get a discount for registering for more than one sub-event. You will enter in pricing for this option on the next page. Select NO if you will only have one event* OR if you do not want to offer a discount for participants who register for more than one sub-event. *Note: If you want to have group pricing for your single event AND you want to allow less than the required participants to register in the original transaction, select YES for this option vs. the GROUP PRICING option on the REGISTRATION OPTIONS page.
If your event/sub-event will only allow a certain number of participants on the course at a time and/or you wish to have staggered start times, then you will want to select MULTIPLE WAVE TIMES to set up the start time and participant cap for each wave.
Should you opt to accept DONATIONS, upon checkout your registrants/end users will have the option to make a donation to your cause. You can set a minimum donation amount, donor levels, and add descriptions for donor levels/benefits, as well as give your registrants the option to donate on behalf of or in memory of an entity. The donations and associated fees (see our FEE SCHEDULE) will be accounted for you in your RACE MANAGEMENT report. If you want to allow your participants to FUNDRAISE for your event, click on the FUNDRAISING tab to employ that feature.
Most definitely! On the FINISH page of your event creation, you will be prompted to answer the question “Are participants required to accept and event waiver prior to checkout?†If you select YES to this question, you will be able to type in or upload your event waiver in the platform and it will be visible to your registrants, who must agree to the terms in order to checkout. You can also assign this WAIVER to multiple SUB-EVENTS.
We will provide you with an event URL. You can redirect your existing website to the event URL or have a “registration†button/link added to your existing site that takes the user to your event URL. If you do not have an existing website, you can purchase a domain name for a nominal fee from any number of online options, giving your participants a familiar web address to more easily find your event online. If you will not have a website, then you can enter the link to your Facebook page or you can simply cut and paste the EVENT REGISTRATION LINK found further down on the page and enter it into the EVENT WEBSITE LINK box.
The QR CODE allows your registrants to use Quick Response (QR) scanning technology to take them directly to your event registration without typing in a web address.
You can set custom BORDER, BAR (for section headers), and BUTTON colors as well as select a BACKGROUND IMAGE to customize and personalize your event registration page.
You sure can. Just click on the PREVIEW EVENT WEB PAGE button on the FINISH page of your event creation to see what your custom page will look like. You can even click on the REGISTER button on the PREVIEW to see what your registrants will see.
When you select SAVE & PUBLISH on the FINISH page of your event creation, this makes your event URL “go live†(meaning it is viewable on the web and open for users). If you are not ready to do this, just select SAVE BUT DO NOT PUBLISH at this time.
DYNAMIC REGISTRATION allows for easy onsite registration and/or packet pick up. Complete flexibility is provided while always keeping your PARTICIPANTS database accurate and secure. Online (and onsite) registration can stay open until just before the scheduled start time of your event, where the timing company (if applicable) can connect to the database to add new participants.
Following DYNAMIC REGISTRATION set up, a URL to a secure login screen is provided. An unlimited number of computers can then be connected using the same access information allowing multiple computers to serve as check in stations, allowing not only registration, but also participants to edit their information and/or switch sub-events, based on your wants/needs.
To activate this feature, click on the ACTIVATE DYNAMIC REGISTRATION link in the PARTICIPANTS section within EVENT SOLUTIONS and complete the required fields.
Here is complete guide to Dynamic registration. Click Here
Please follow the below steps to add donation manually.
Step 1) Login to your account https://thedriven.net
Step 2) Edit the Fundraising setup View Screenshot
Step 3) Click on the Fundraising tab, select the fundraising event name and click on Next button View Screenshot
Step 4) Click on Manually Add Donations tab View Screenshot
Step 5) Fill in all the required details View Screenshot
Step 6) Finally, click on 'Add Donation to Fundraising Site' button and the donation will be added.
The donation details can be viewed in the tab 'My Fundraising Account' View Screenshot
If you want to add any features or content to the registration confirmation email template, we have a list of built-in variables that will display the content on the email template. View Screenshot
You simply need to copy the below mentioned variables into email template.
For example, need to add QR code then you can add as {qr_code} in email template. View Screenshot
If you want to remove any content then you just delete the variable.


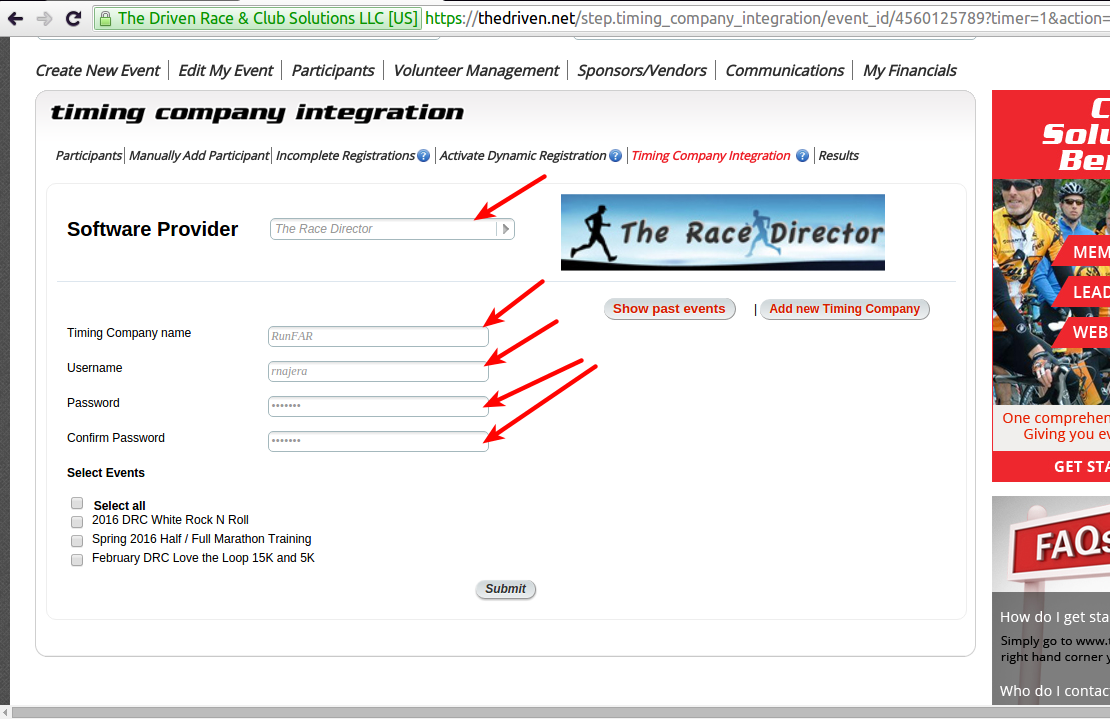
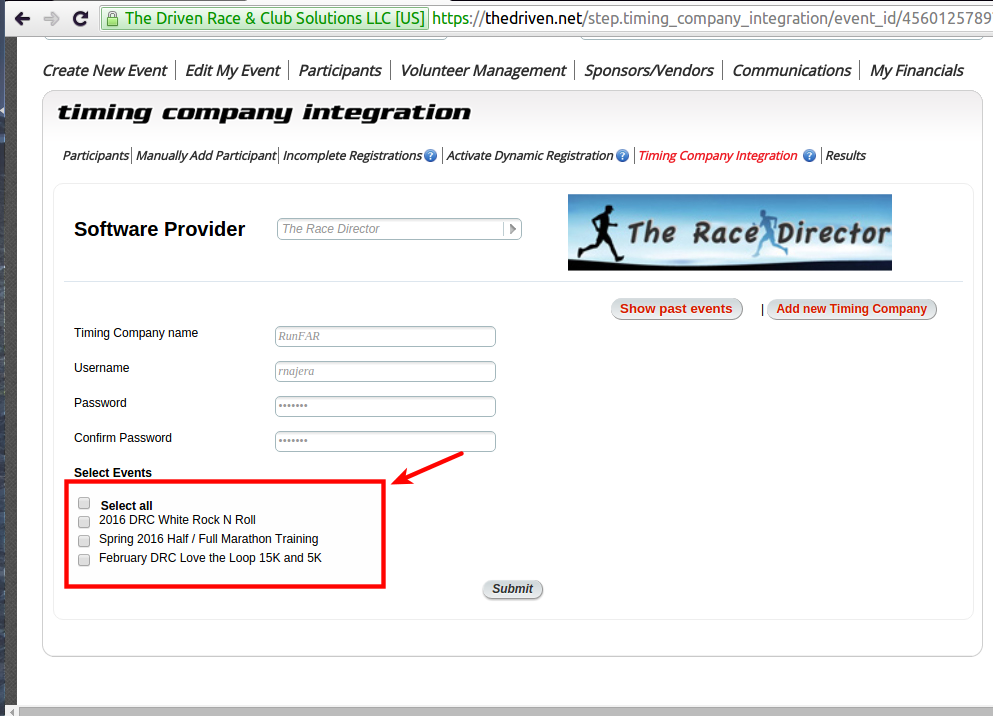
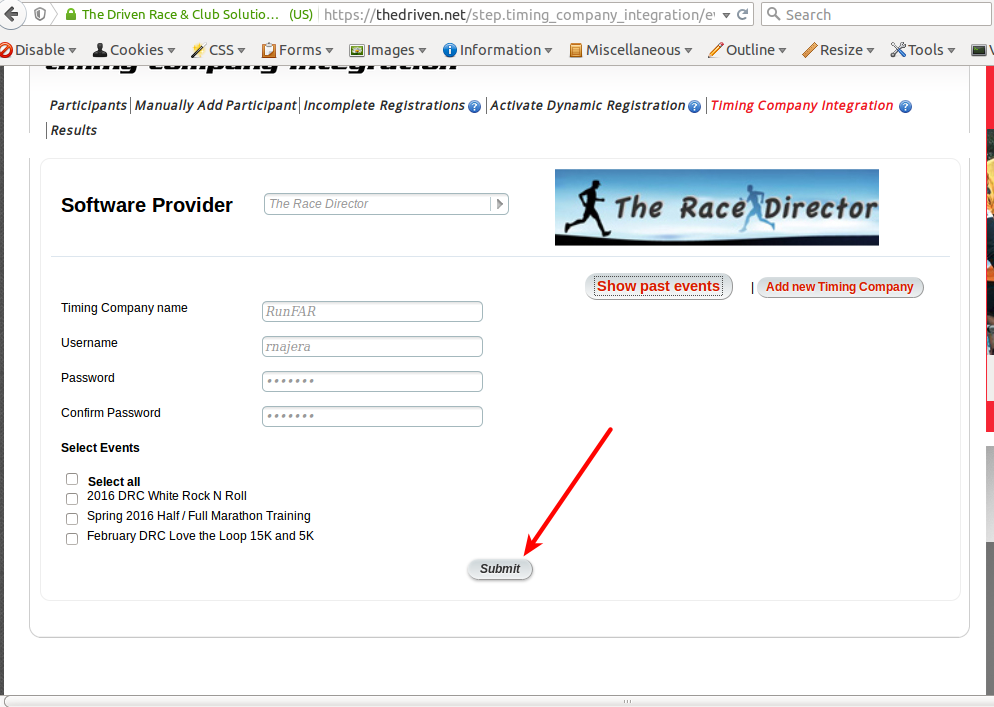
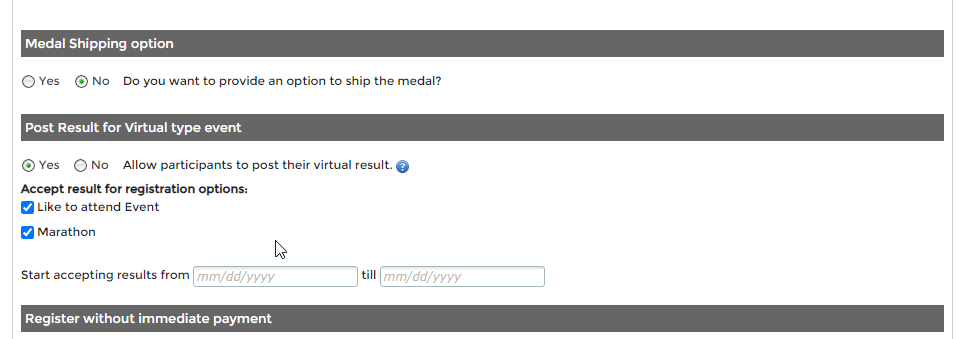
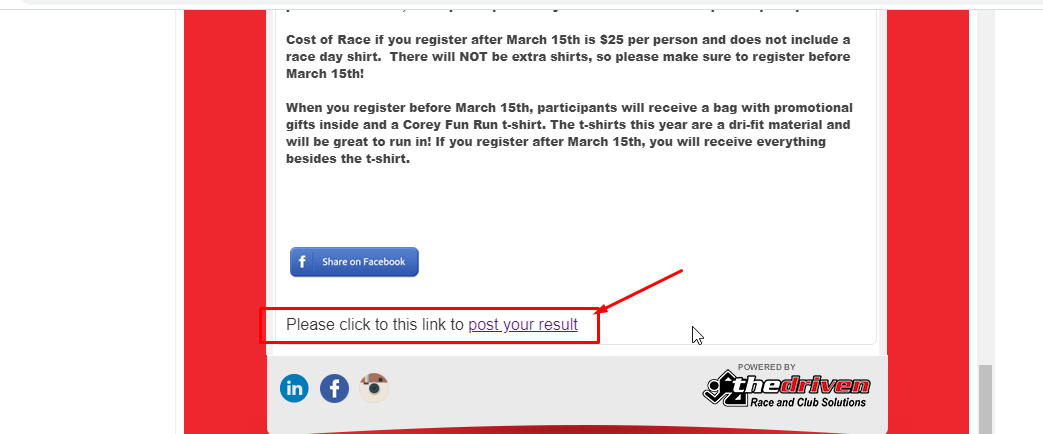
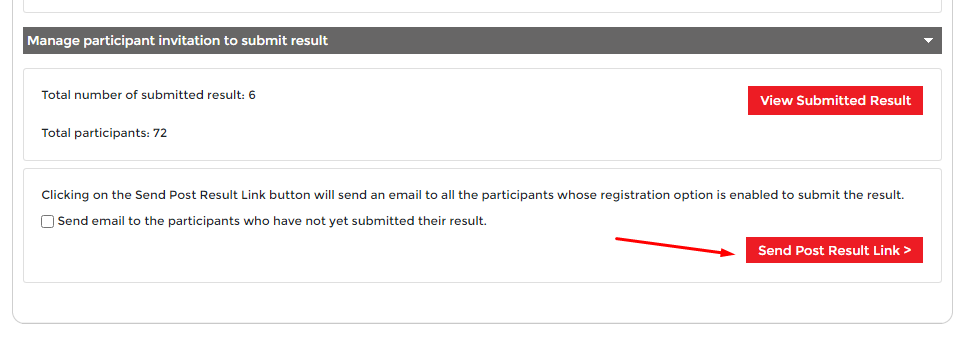
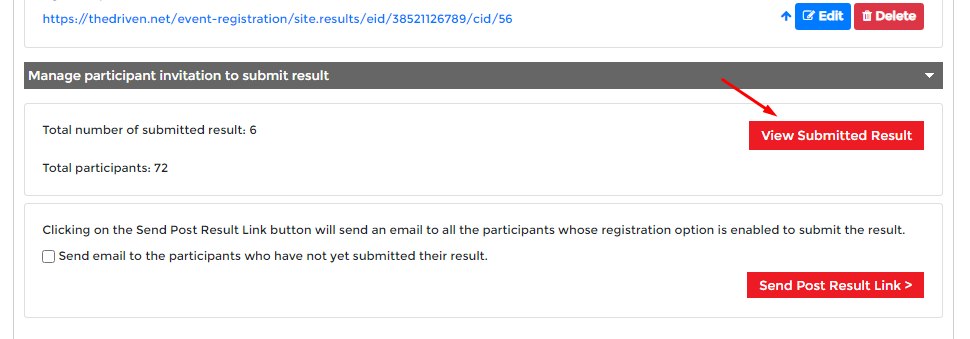
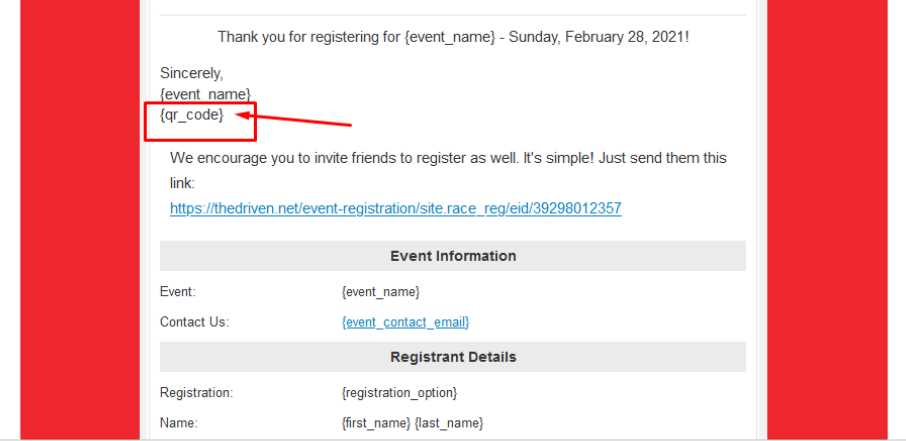
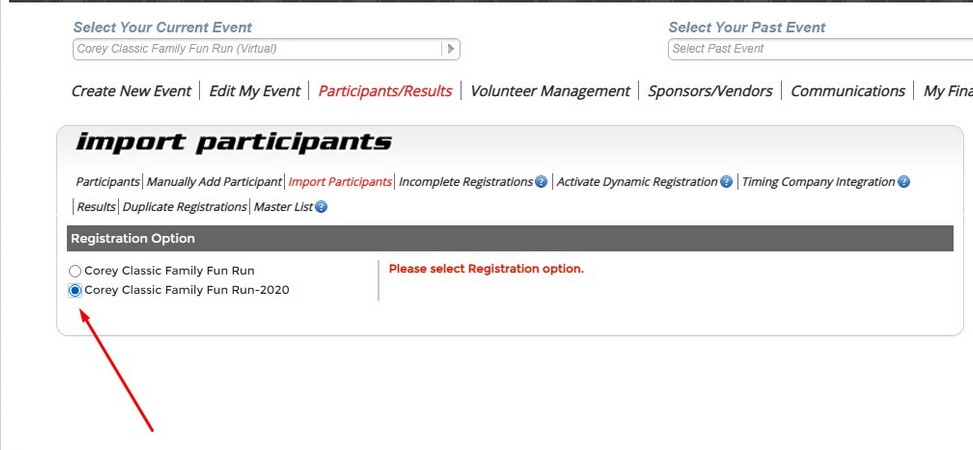
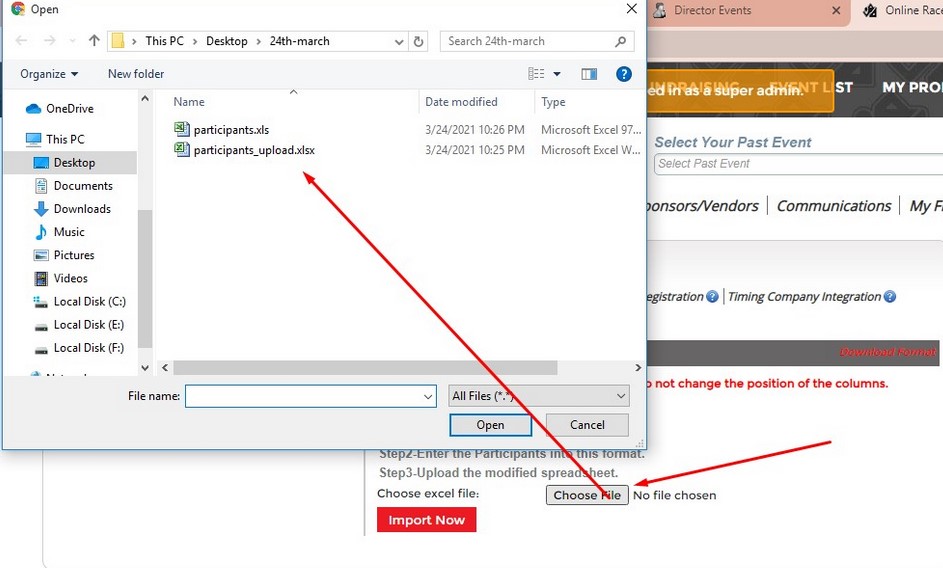
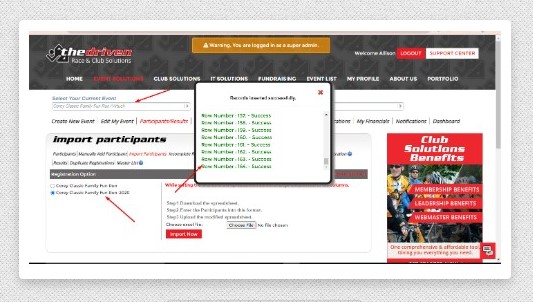
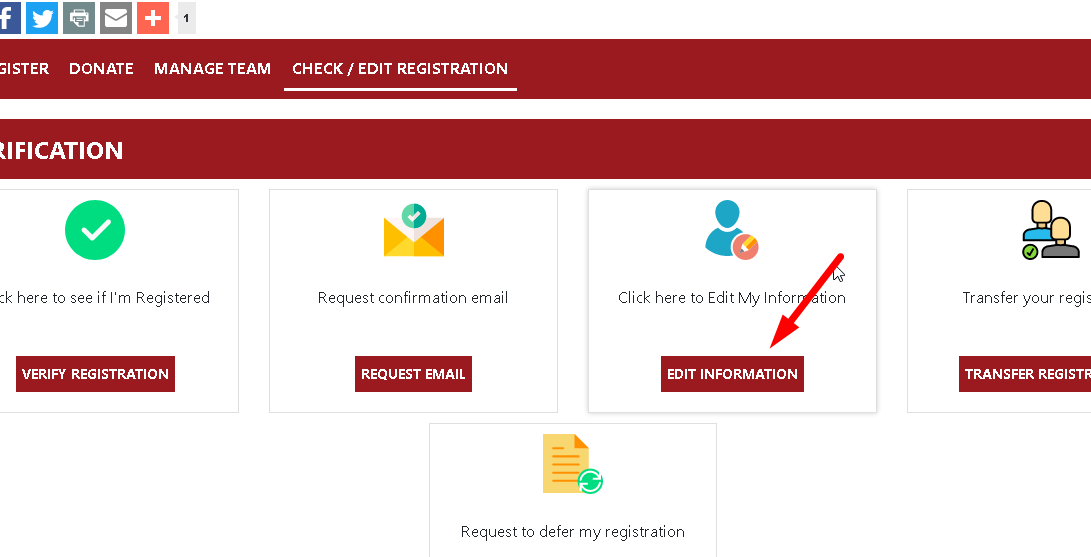
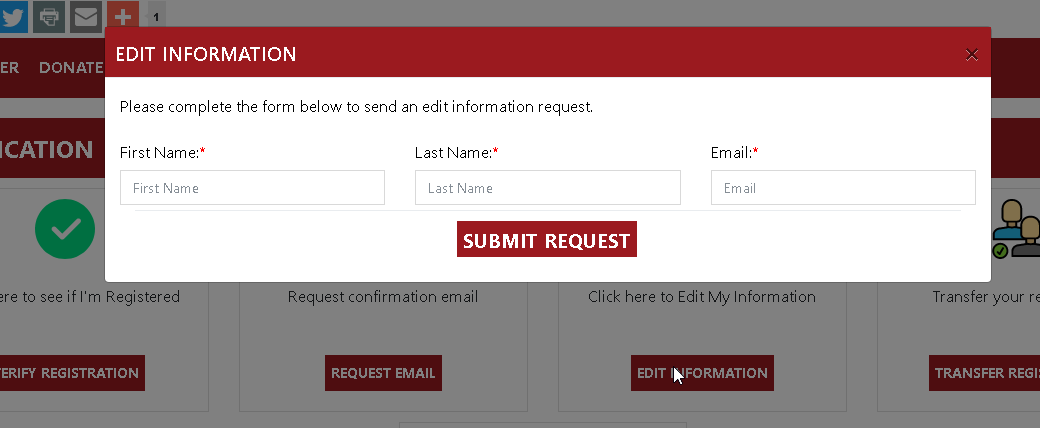
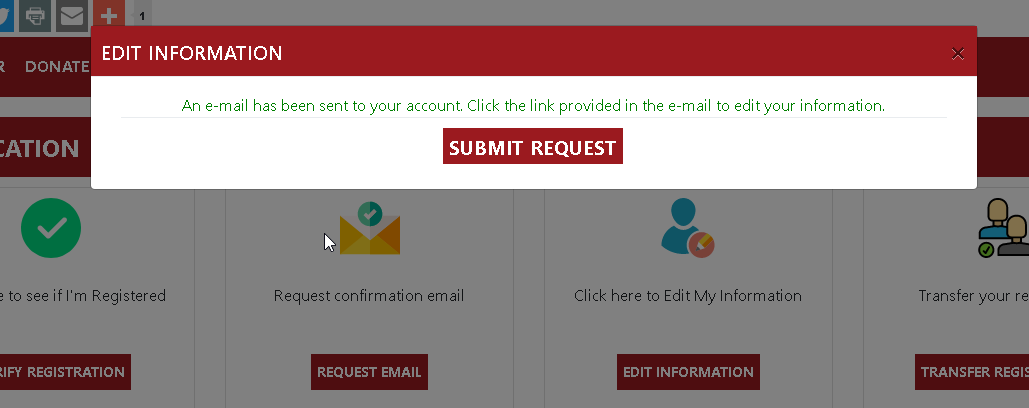
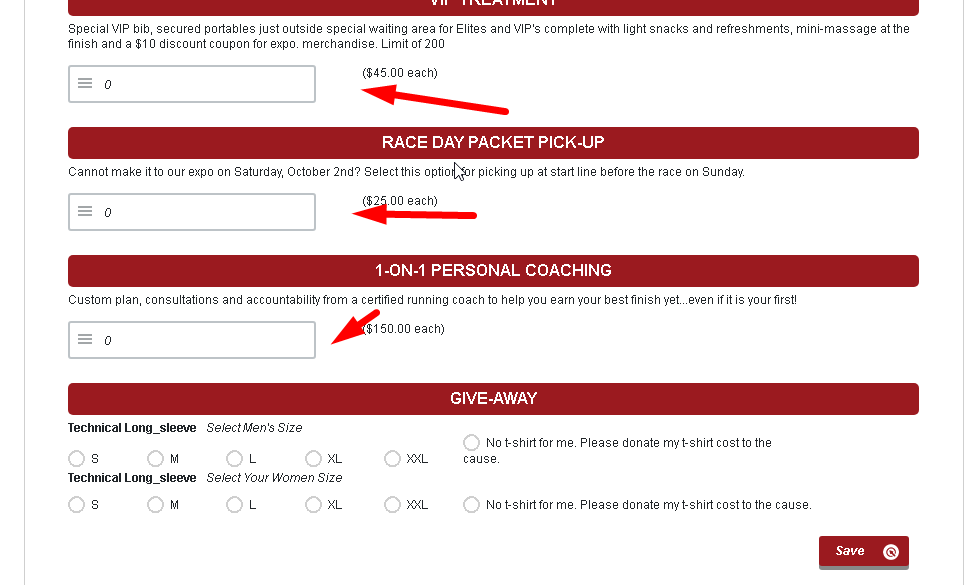
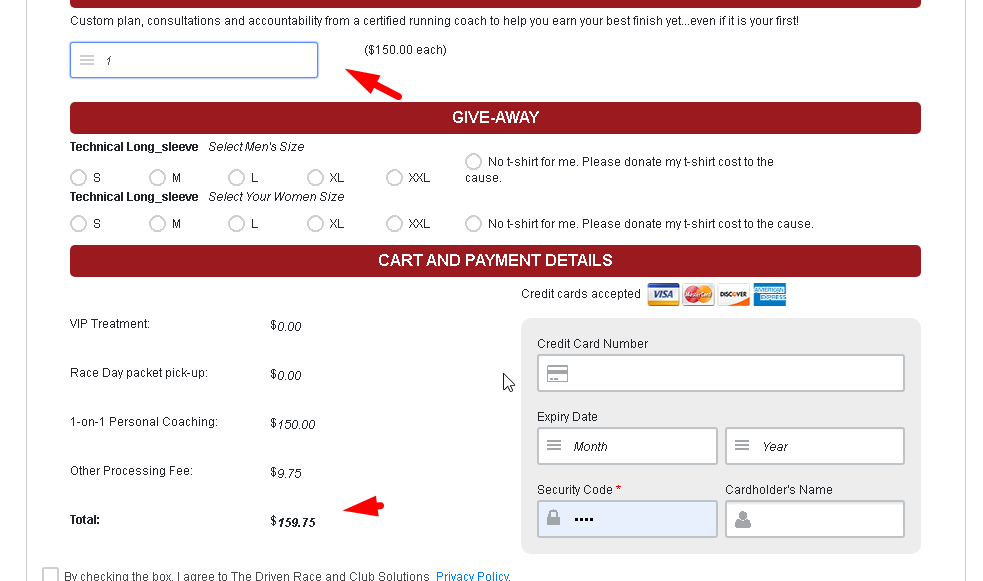
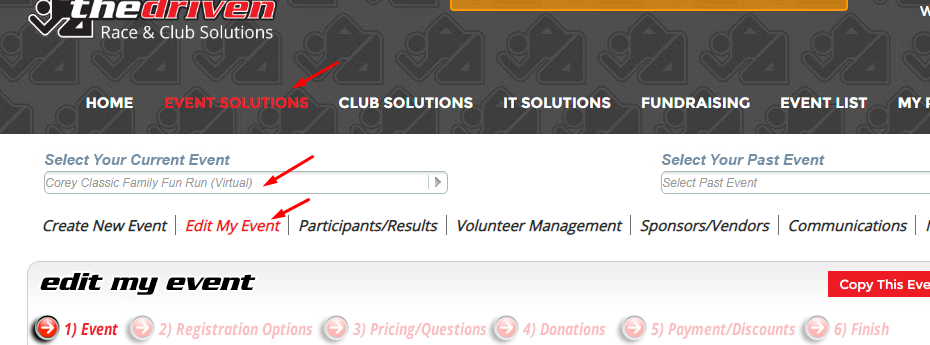
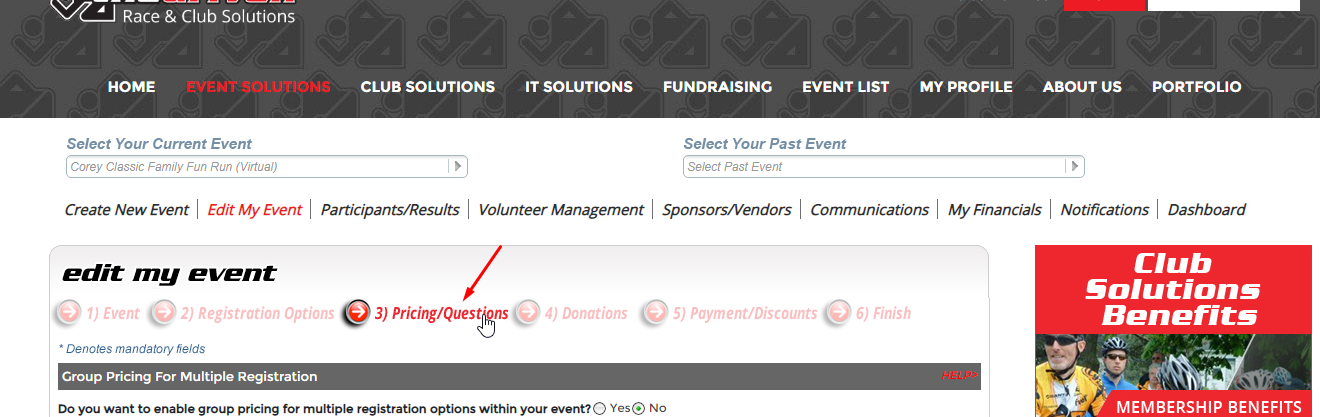
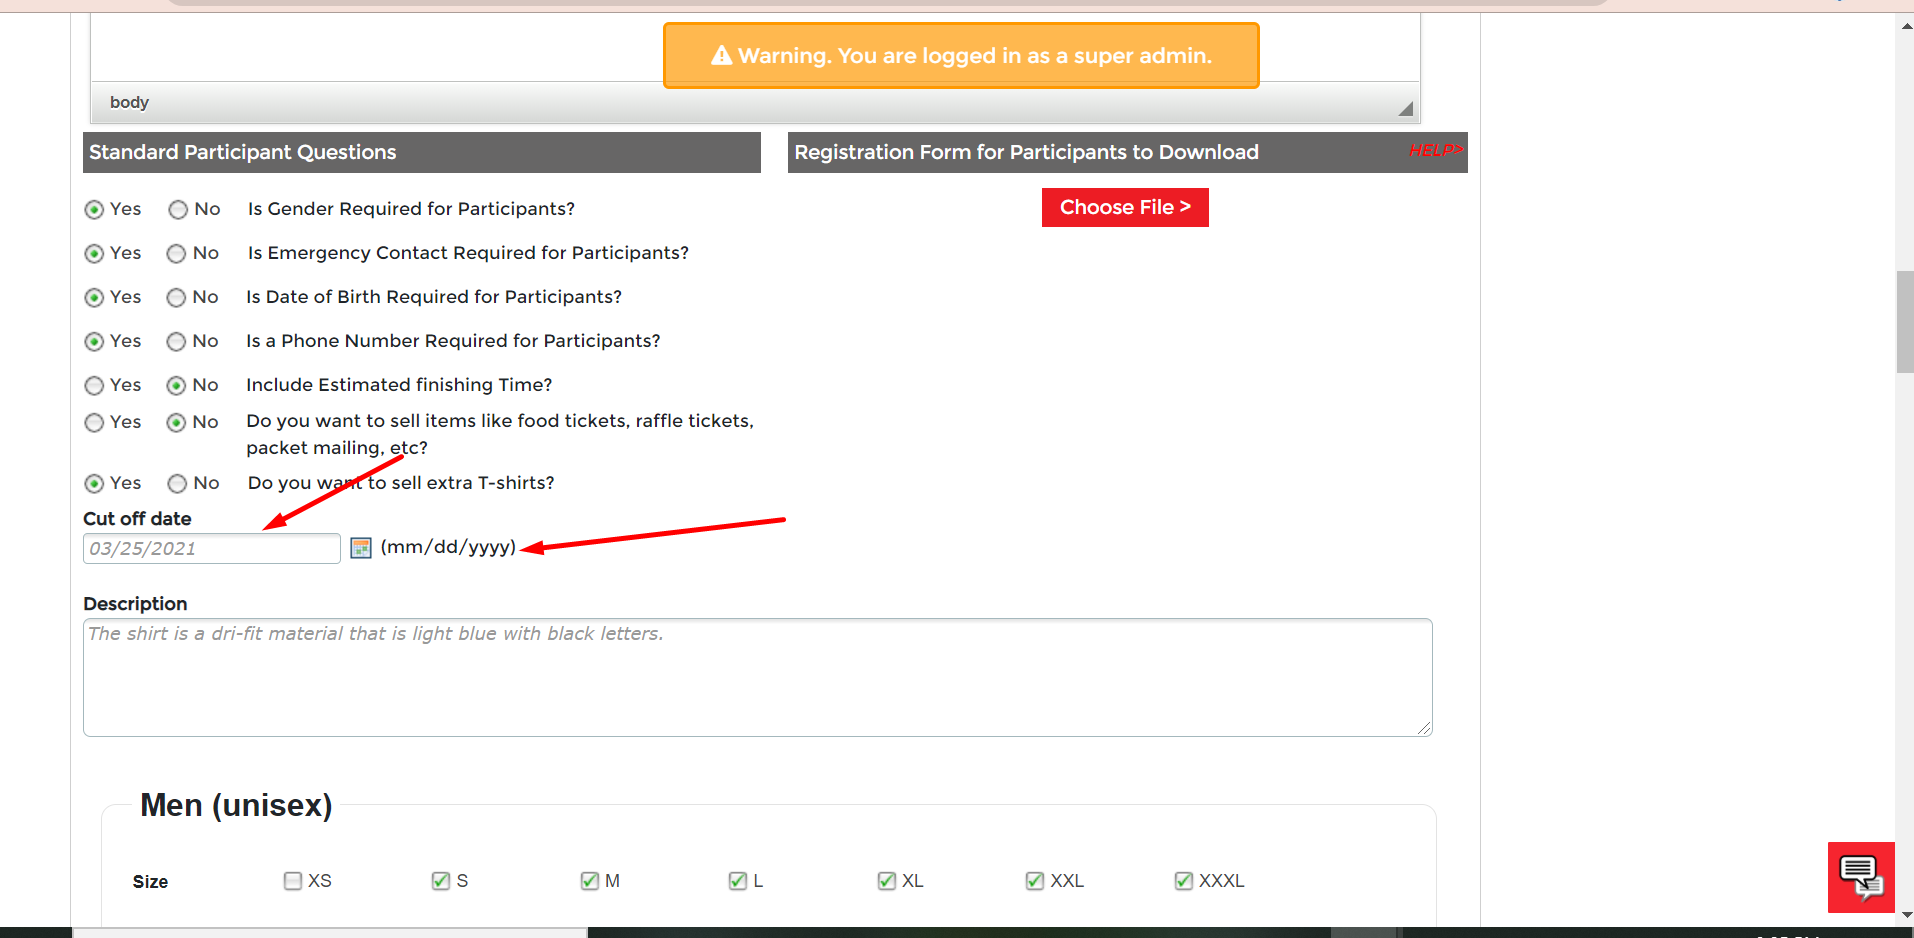
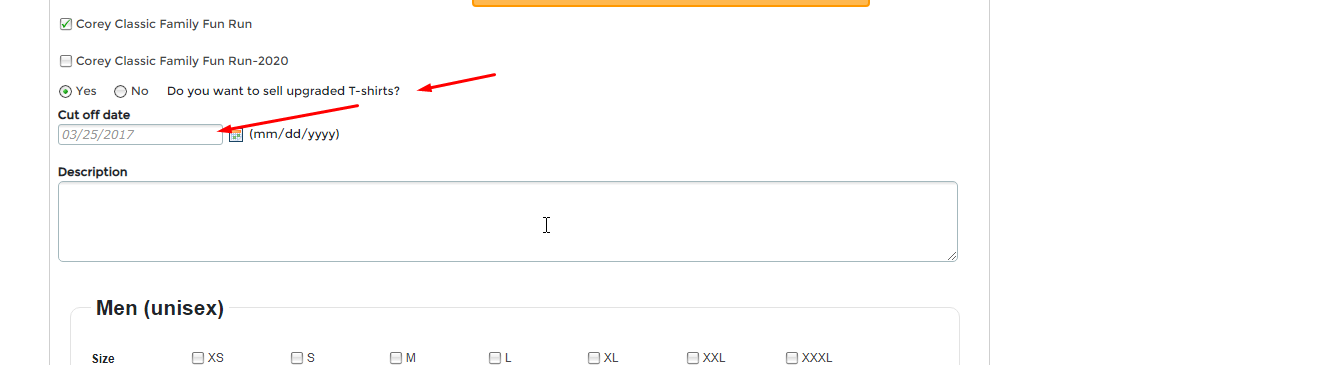
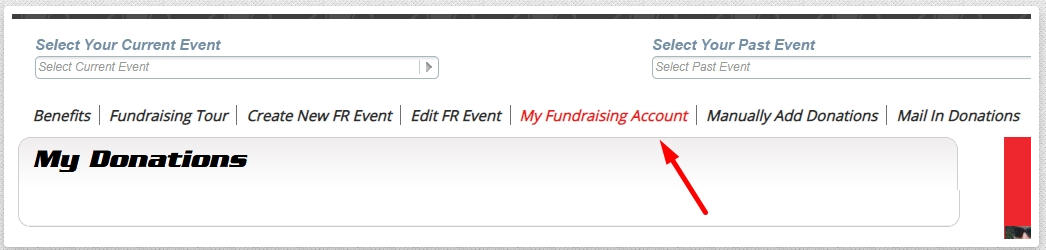
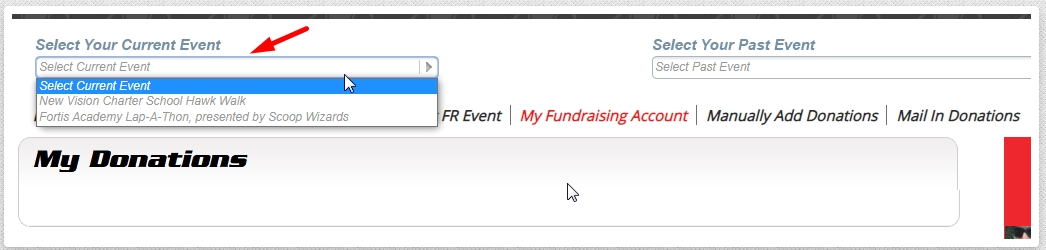
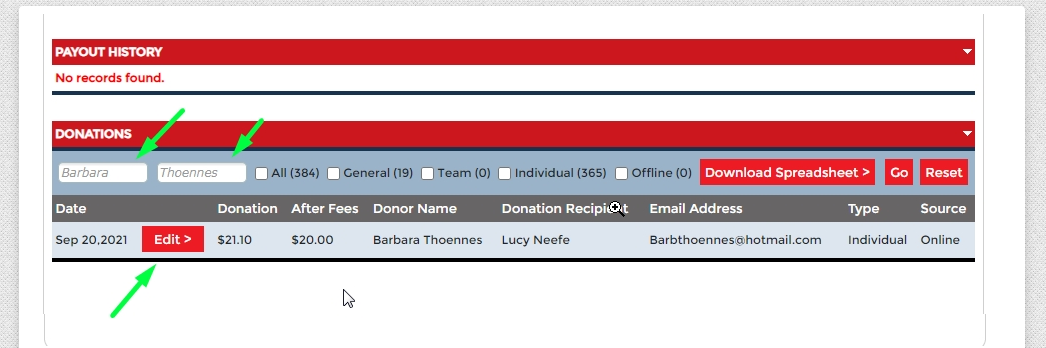
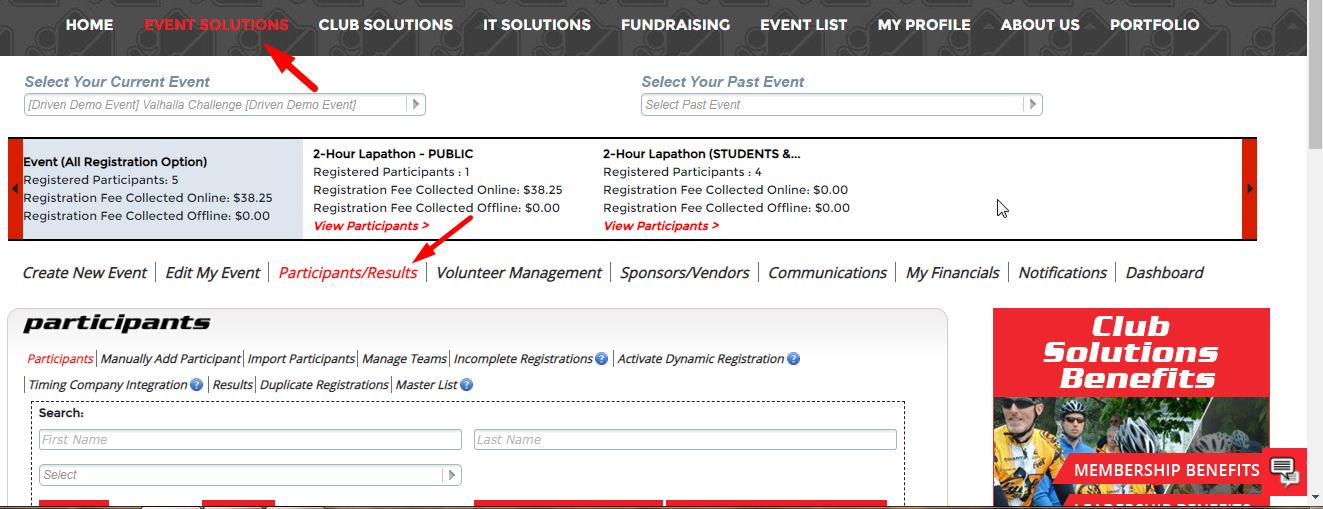
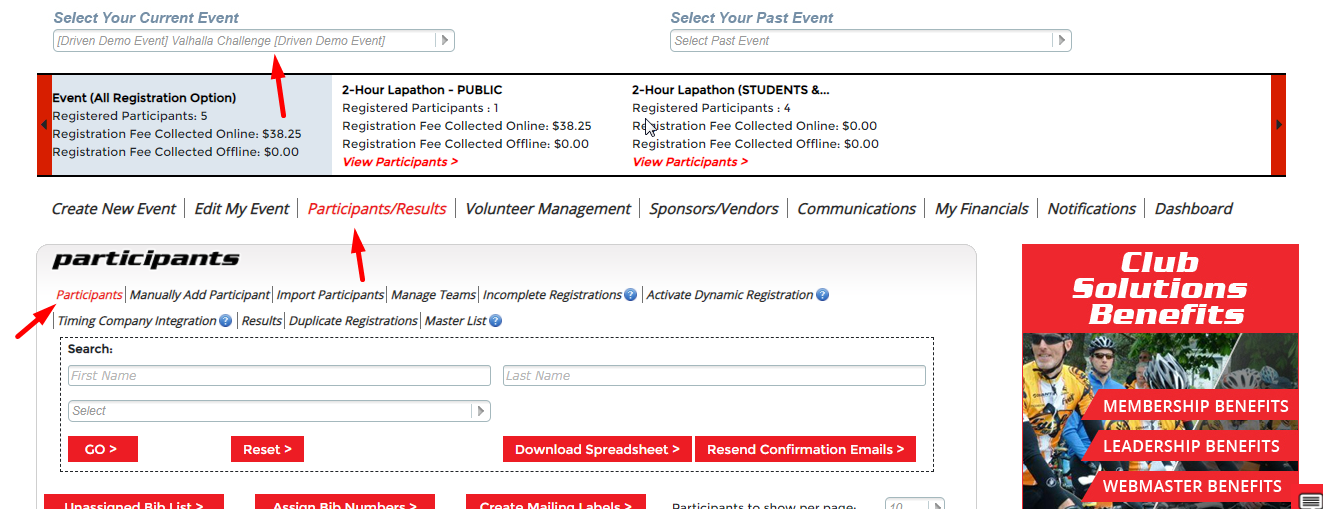
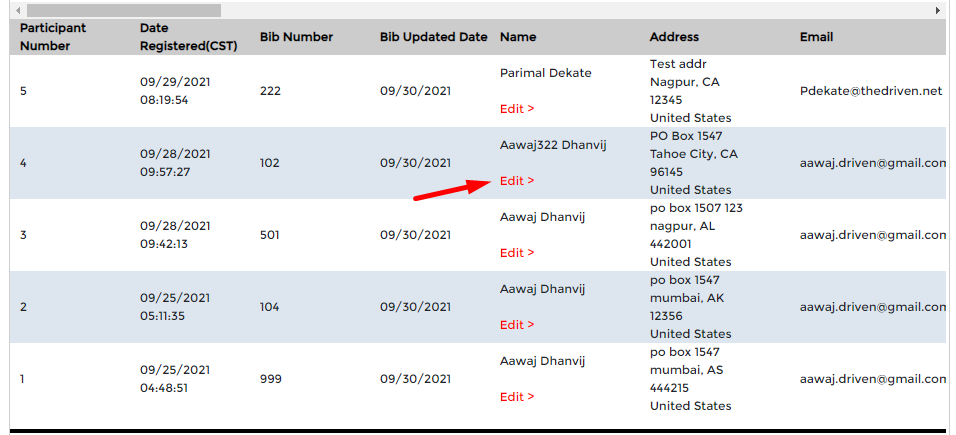
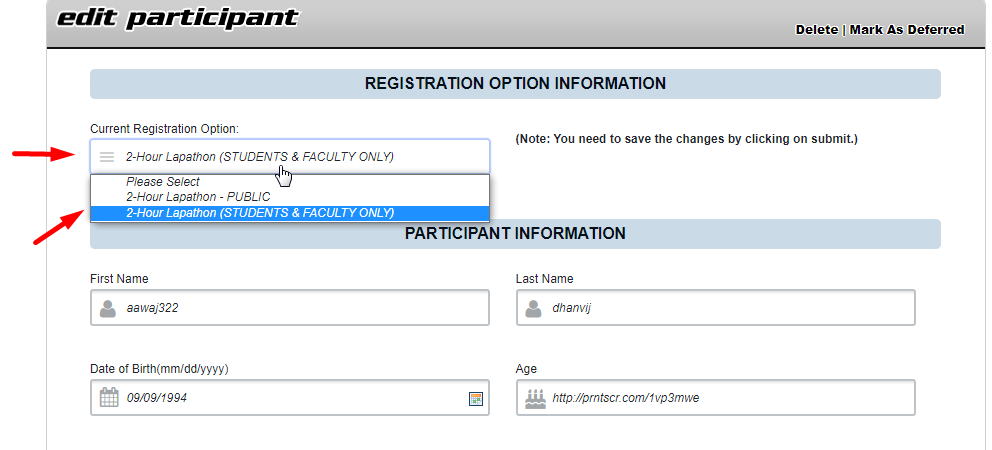
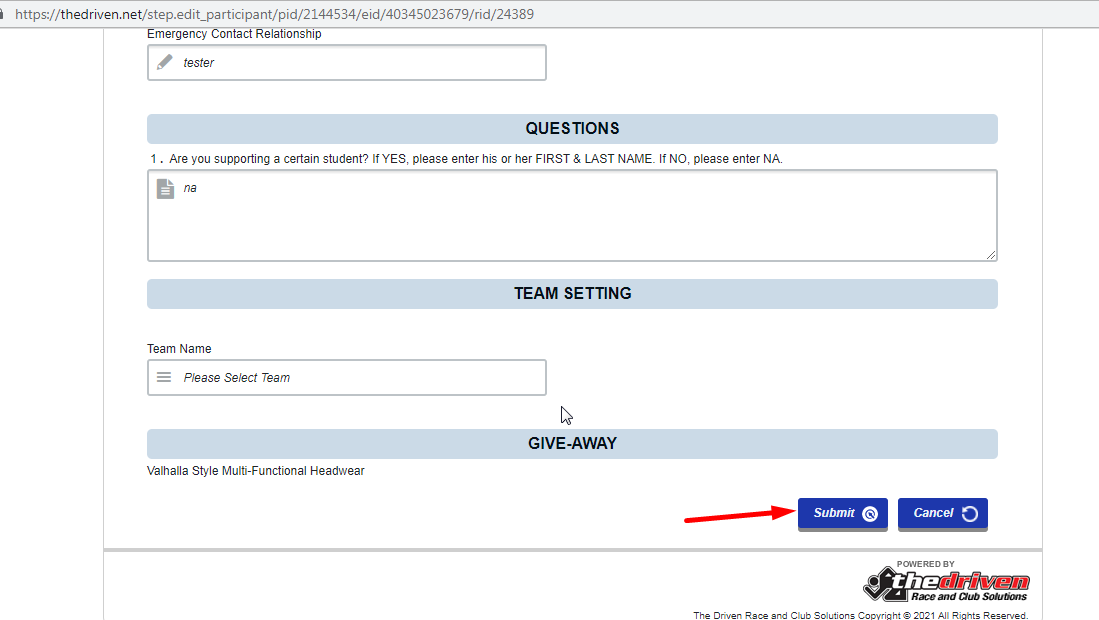
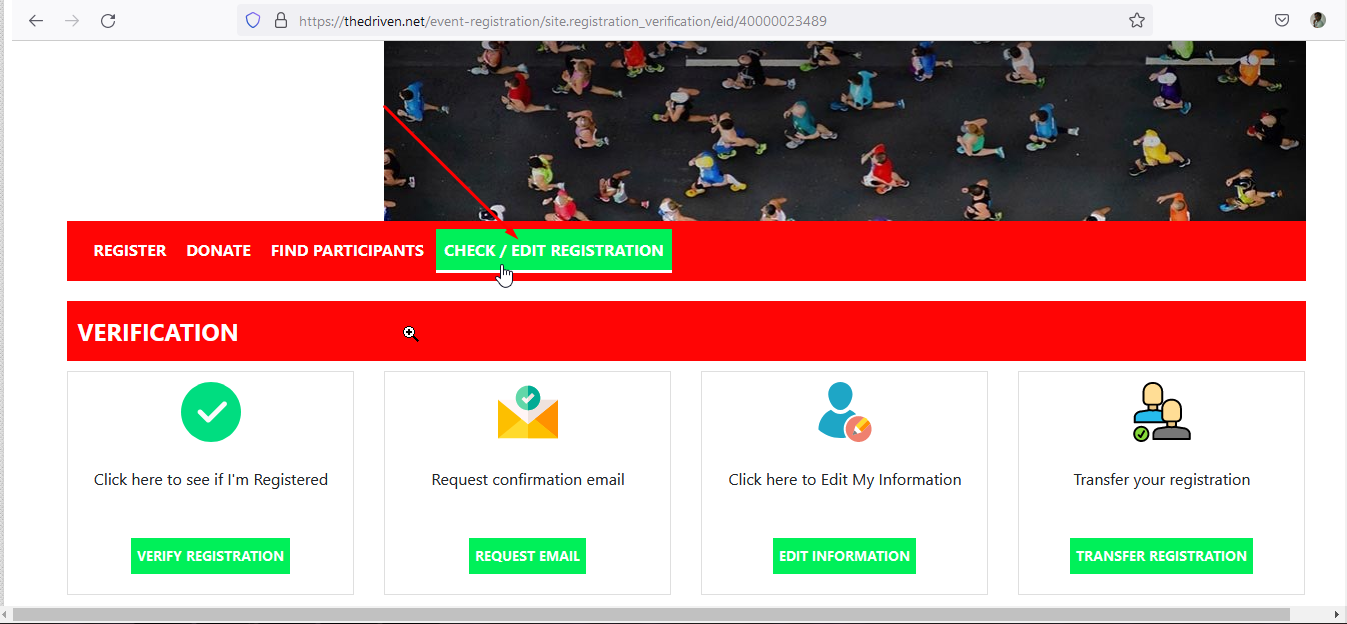
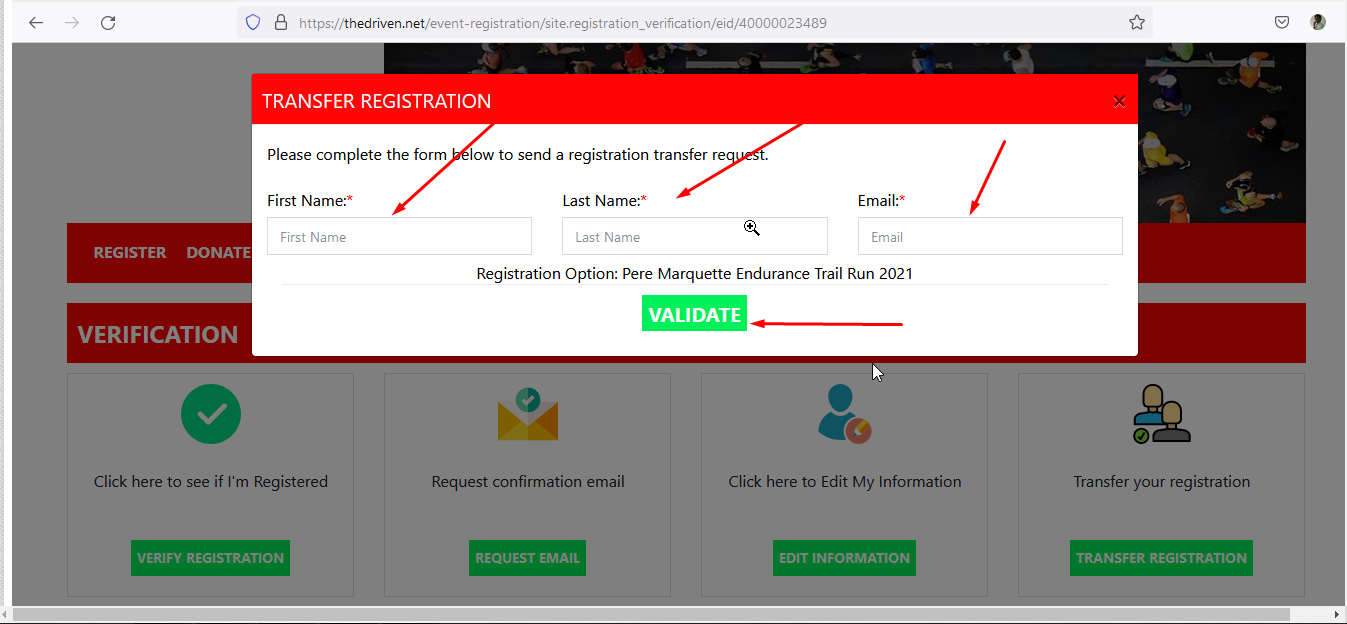
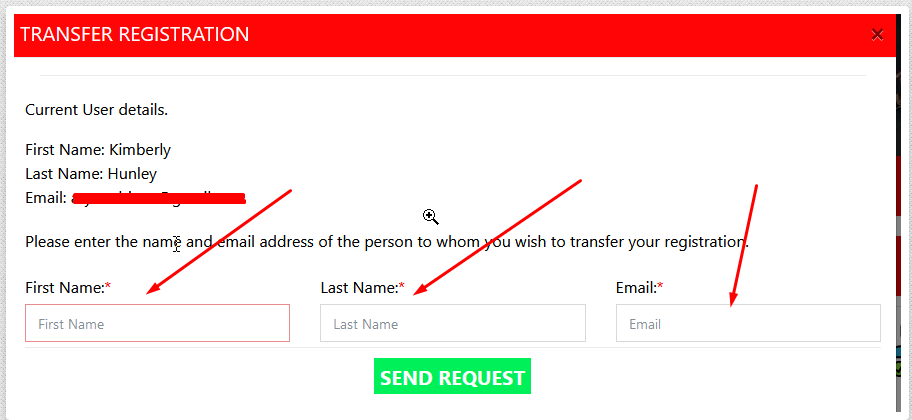
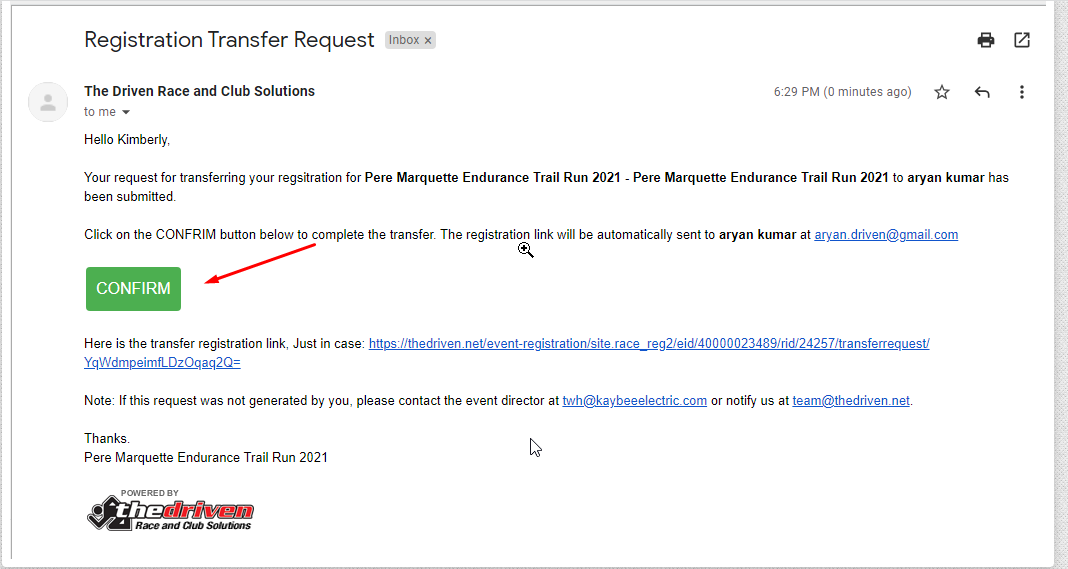
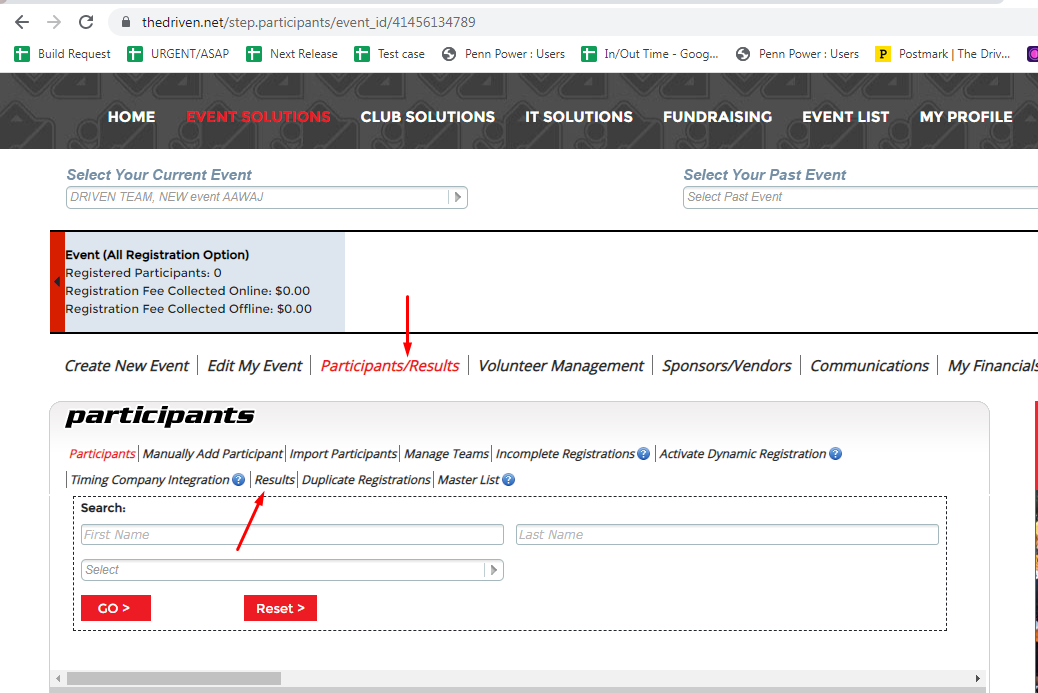
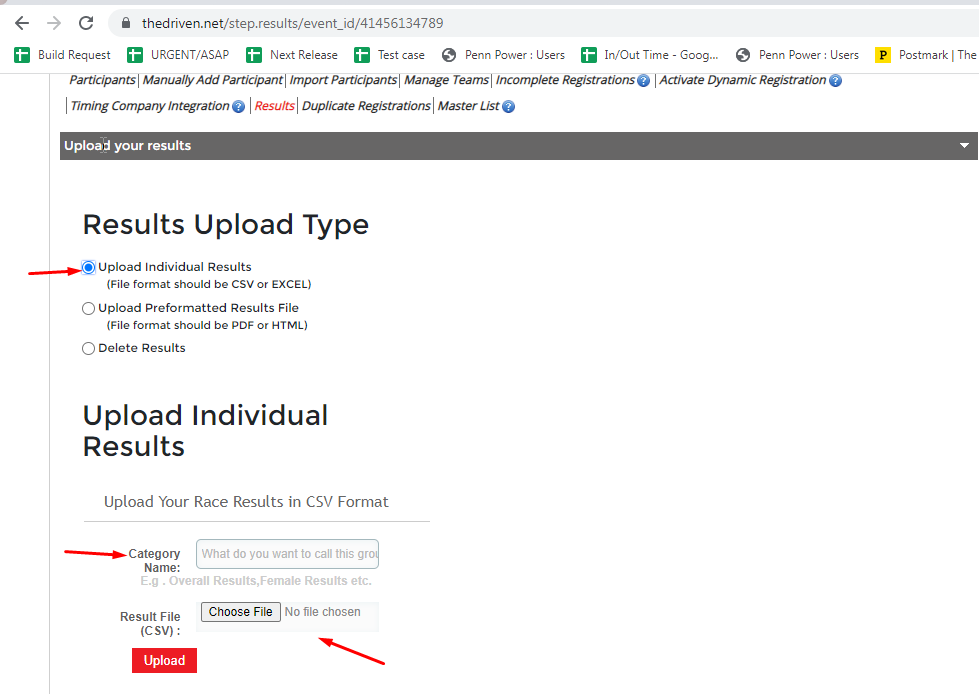
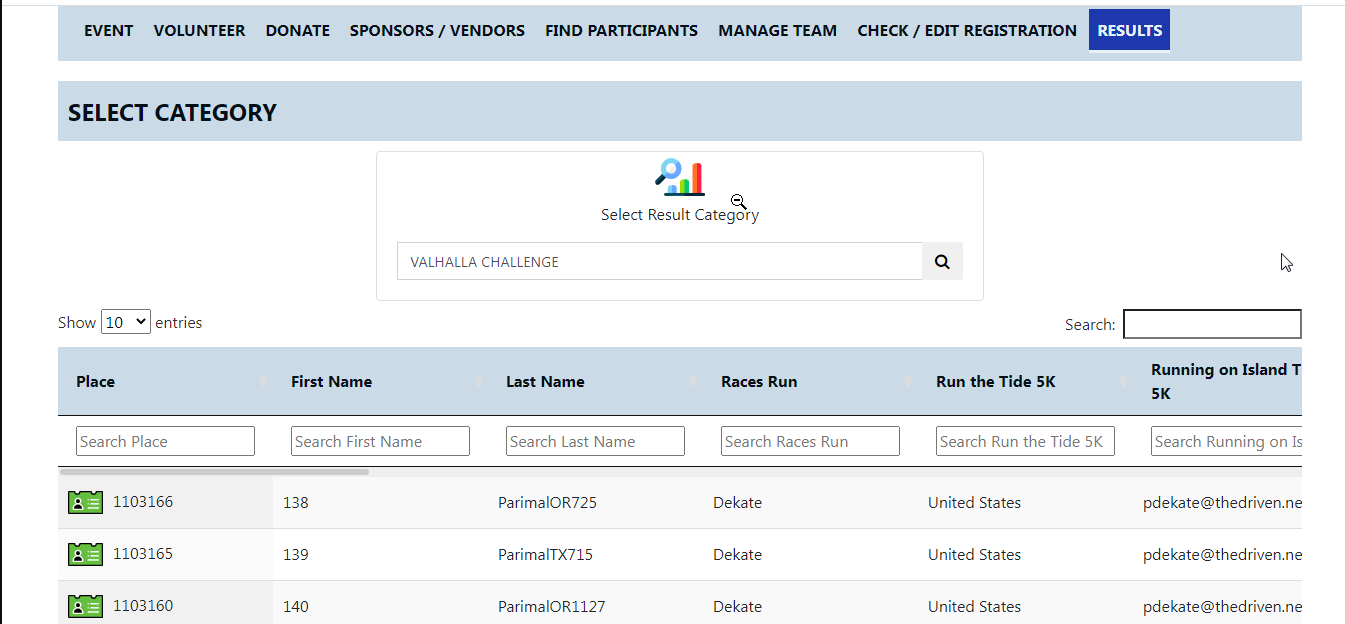
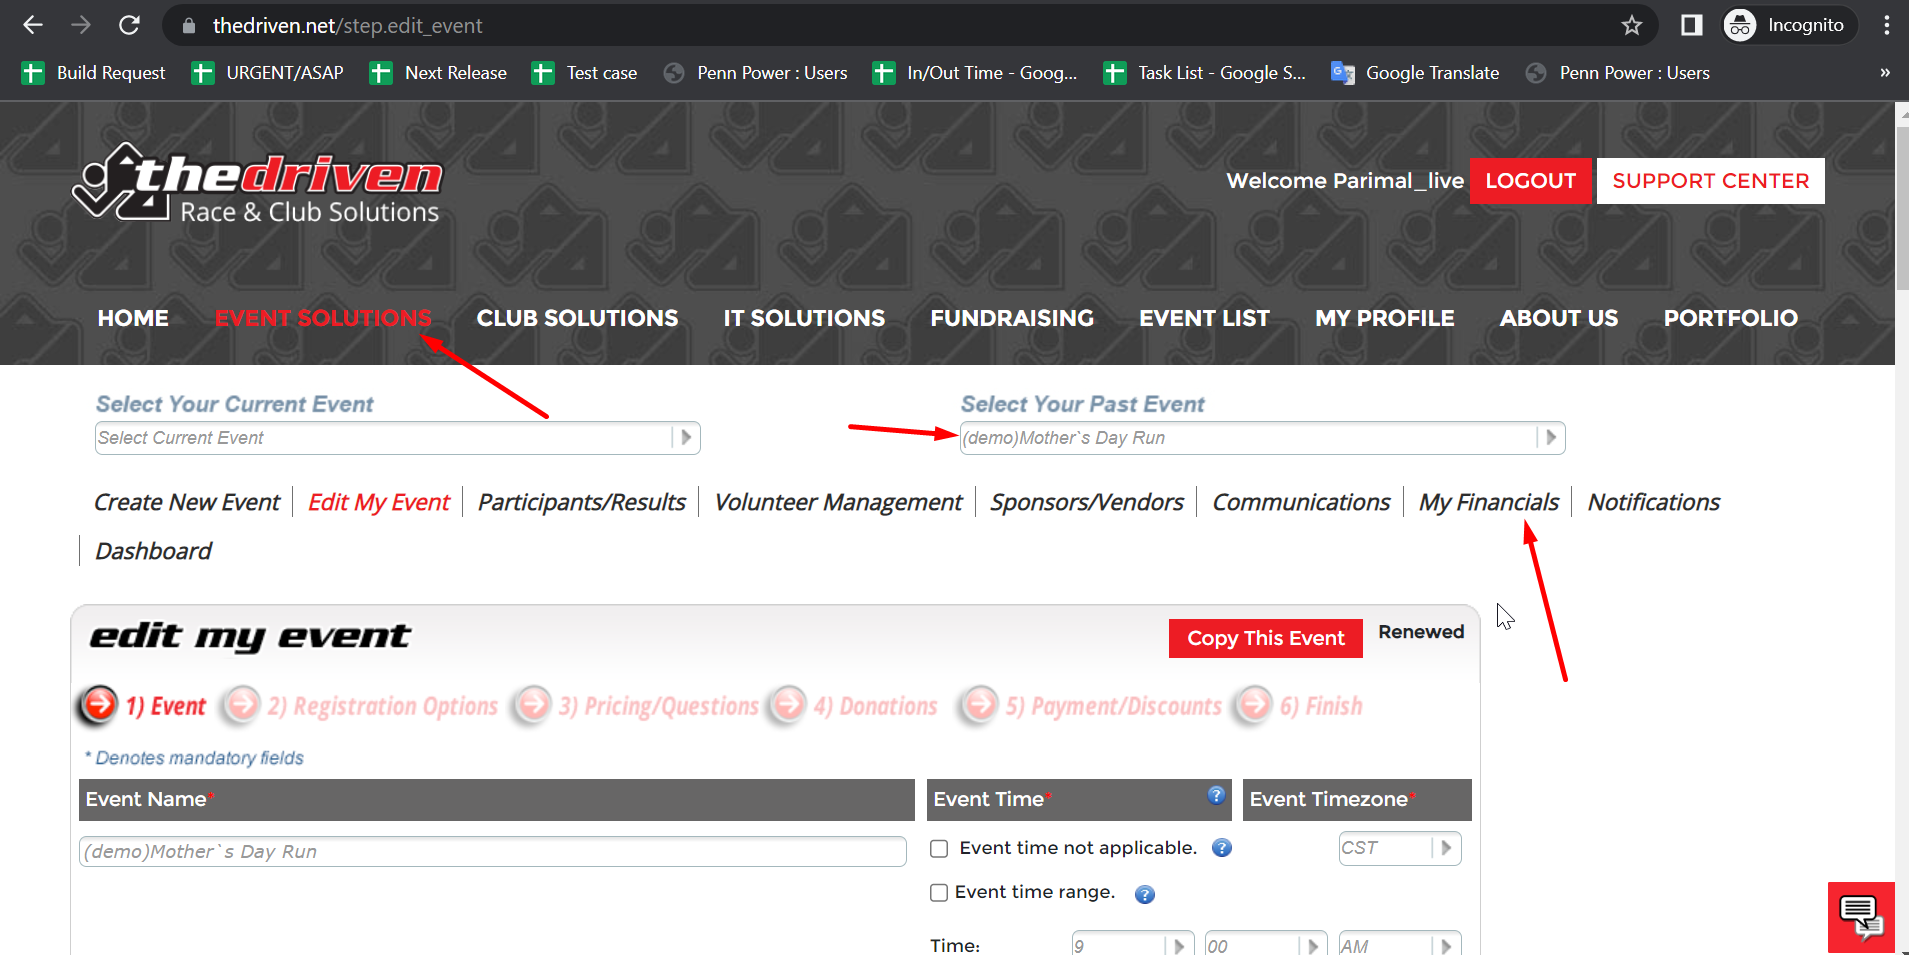
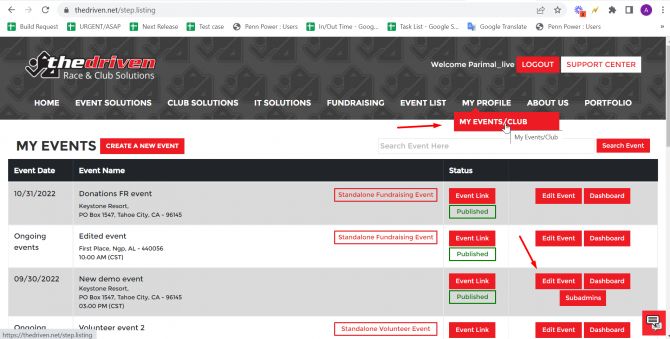
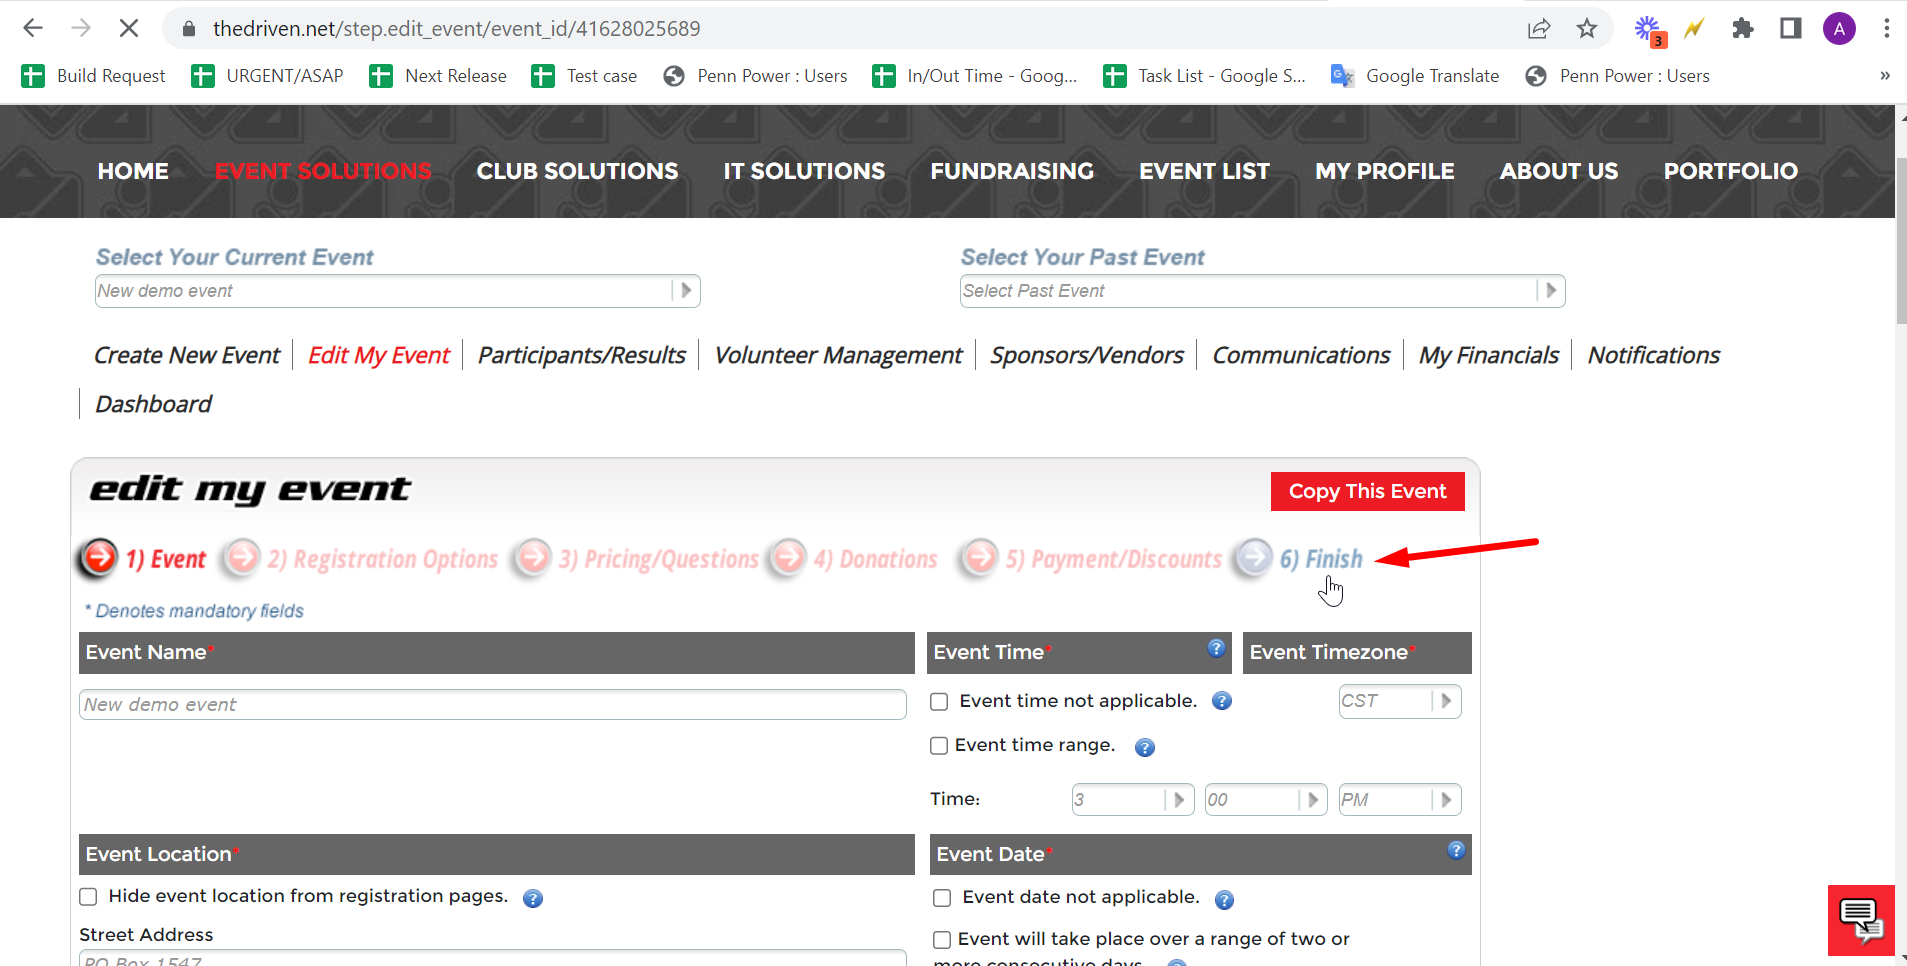
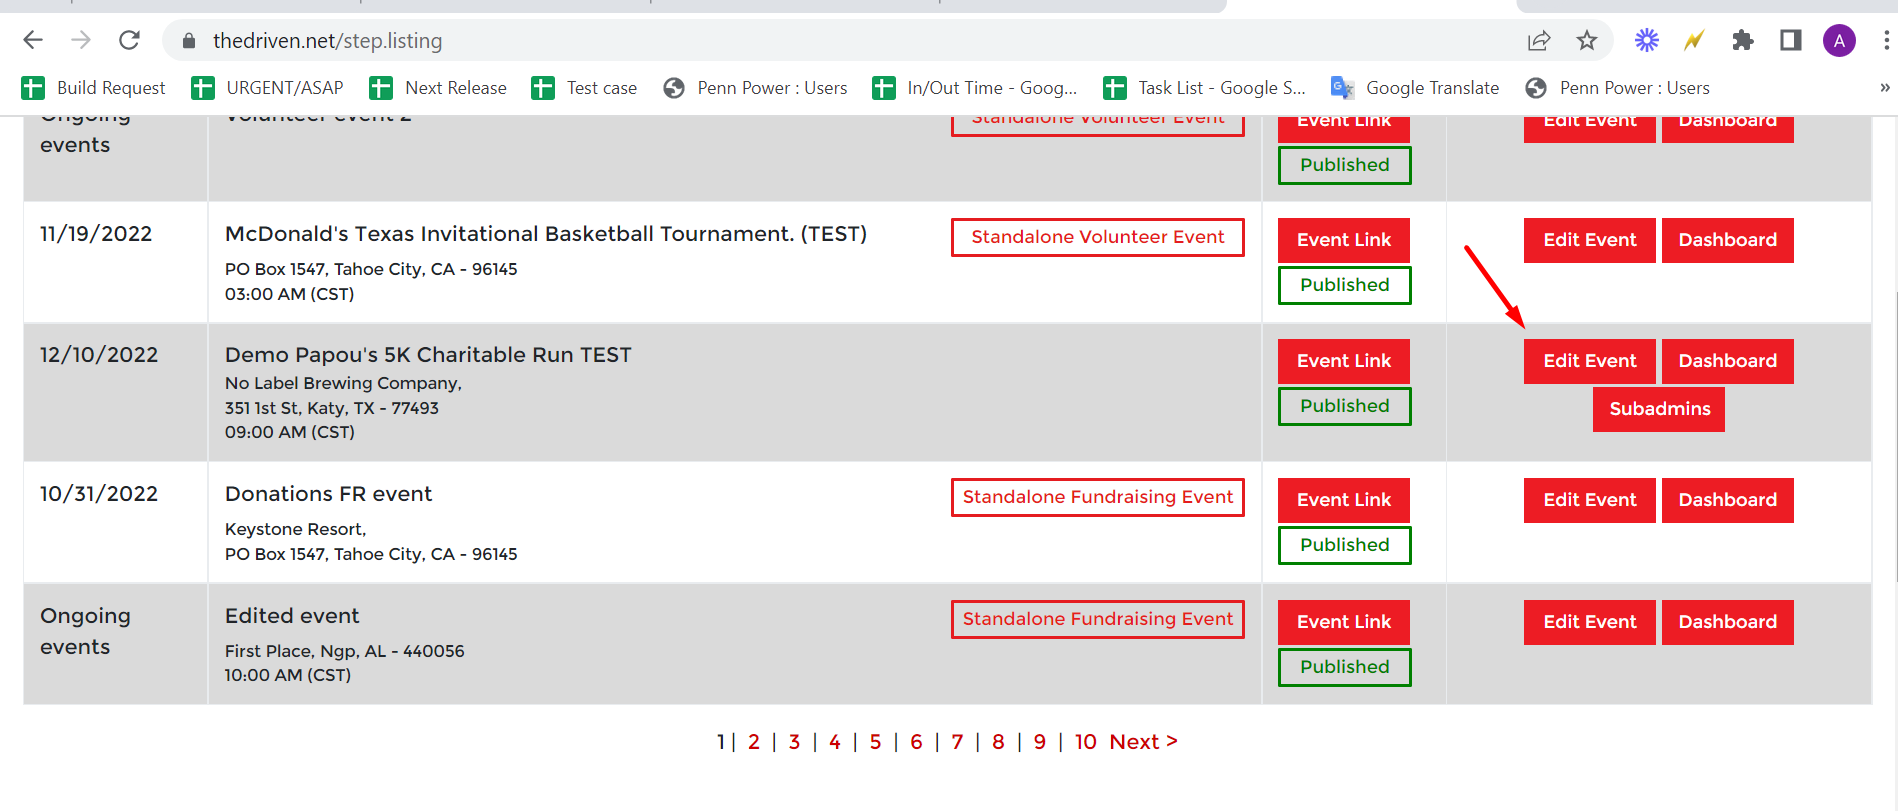
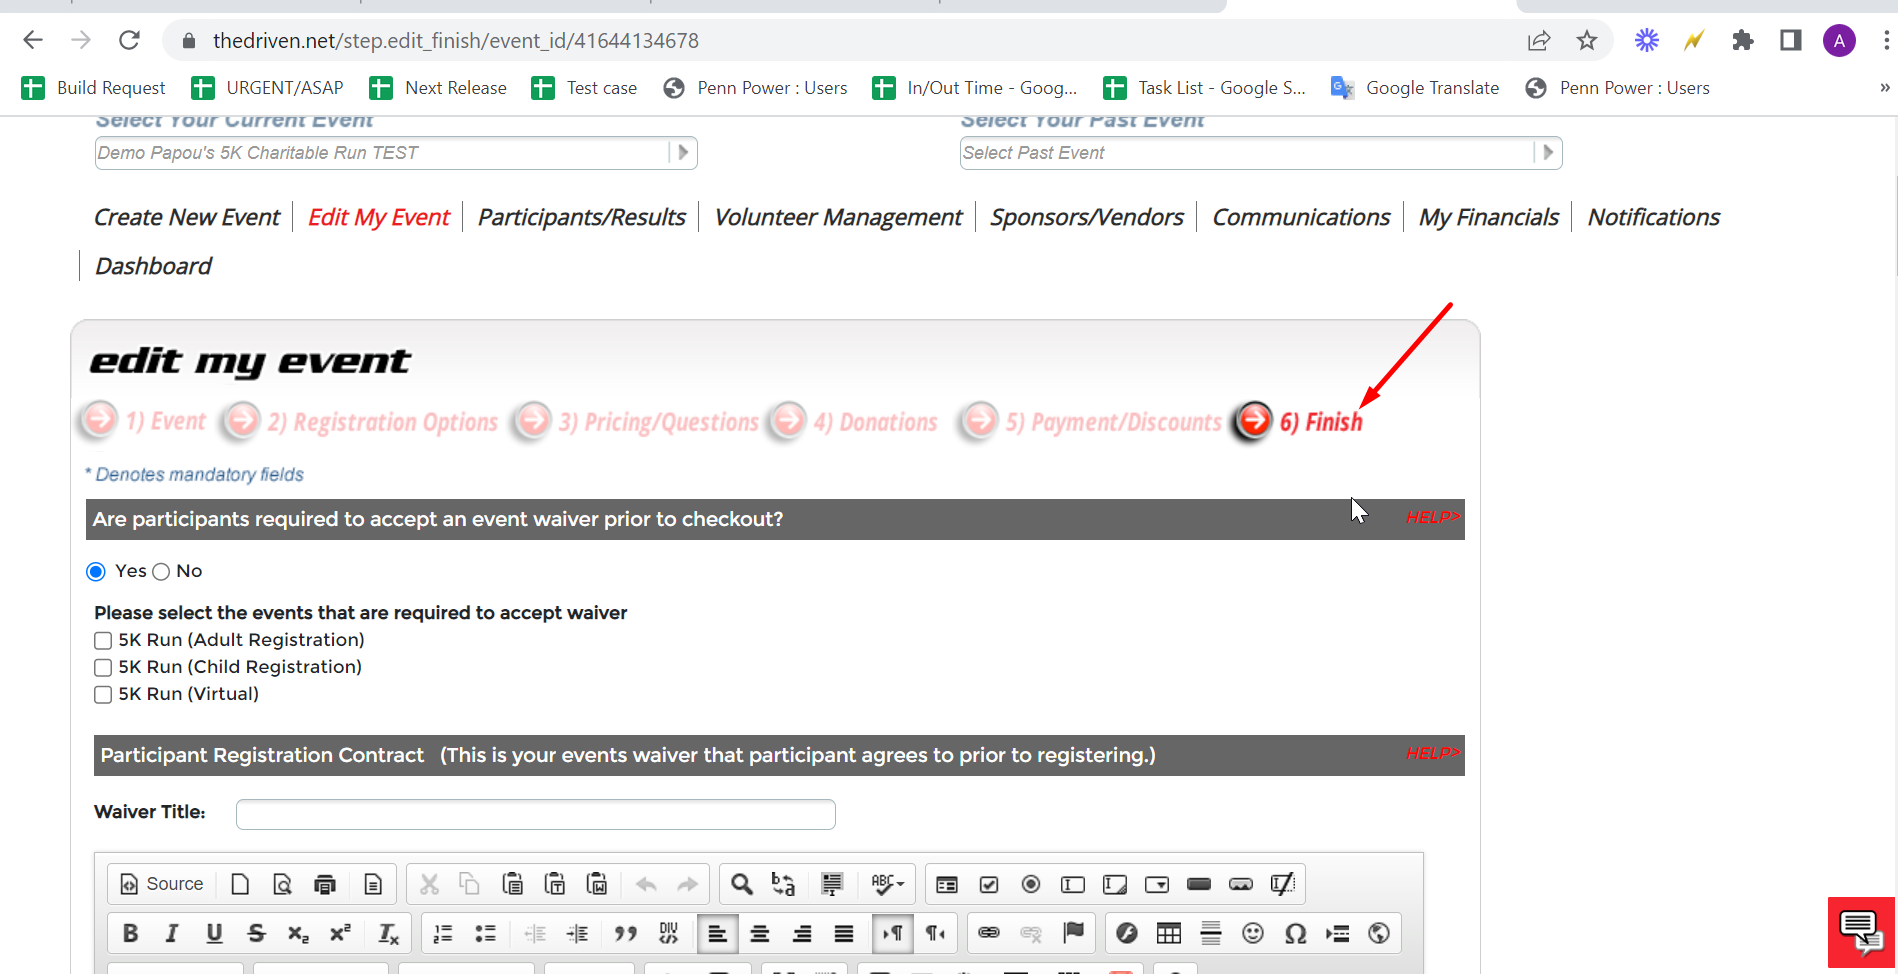
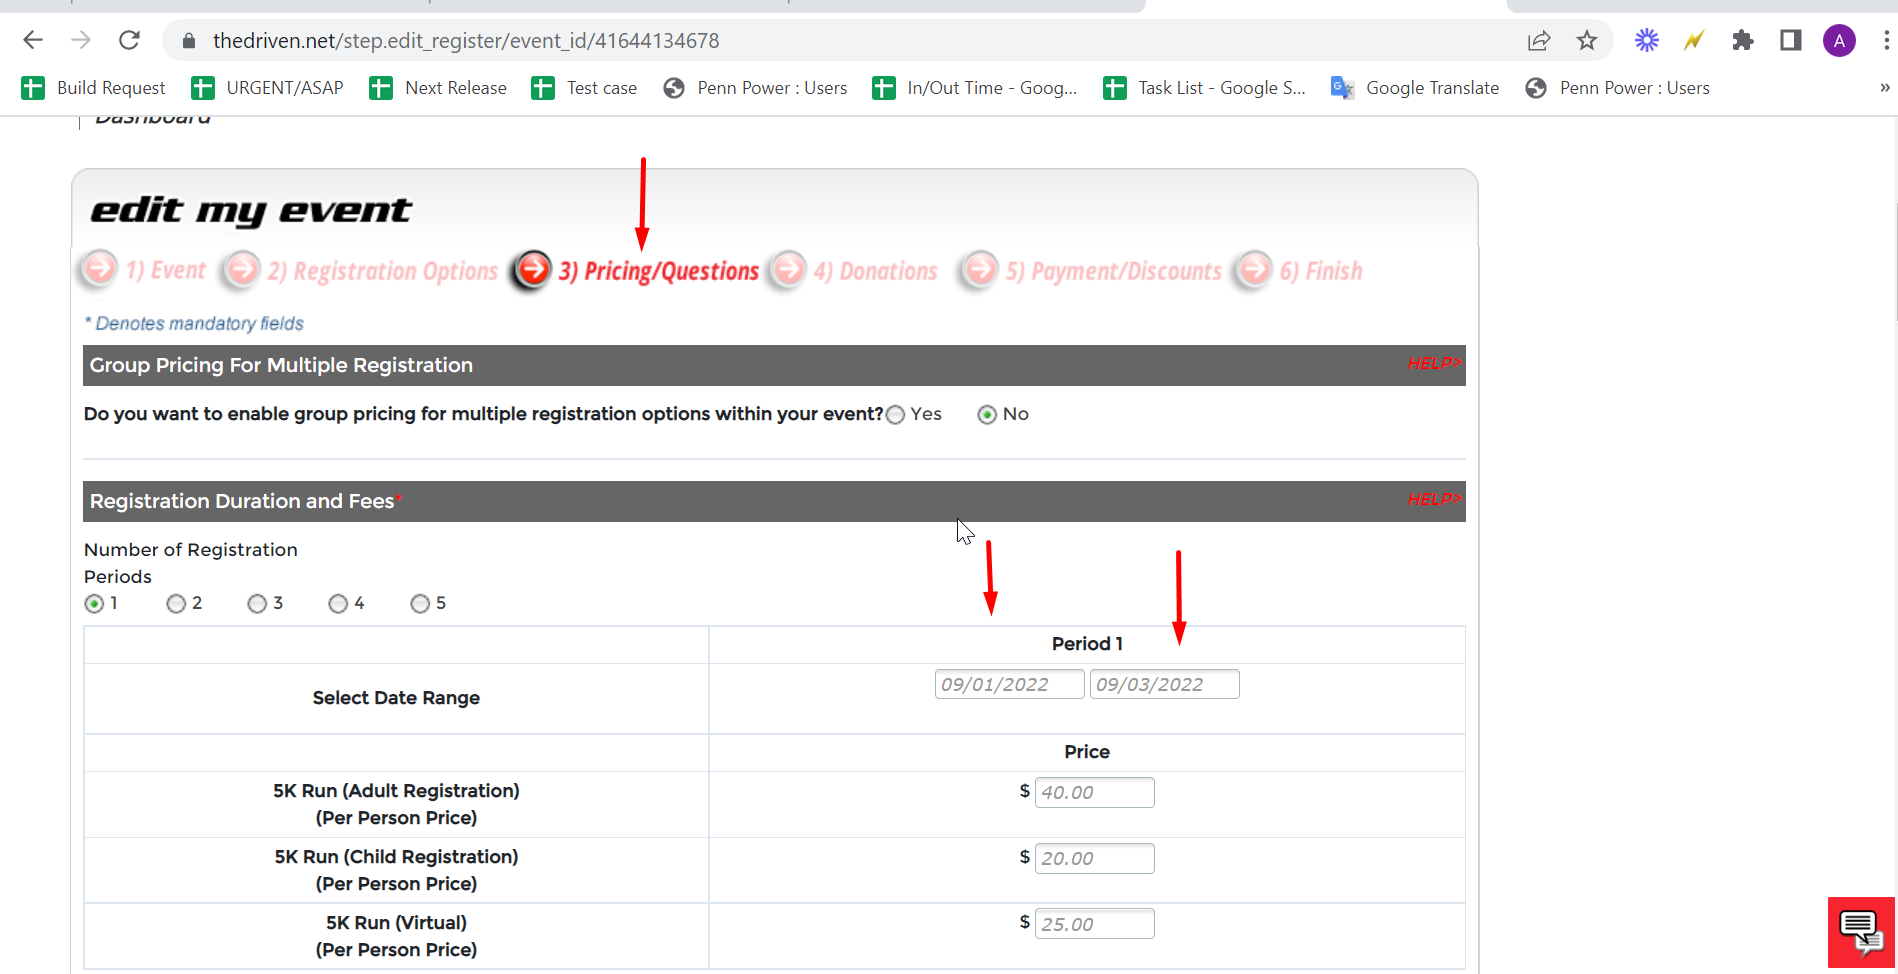
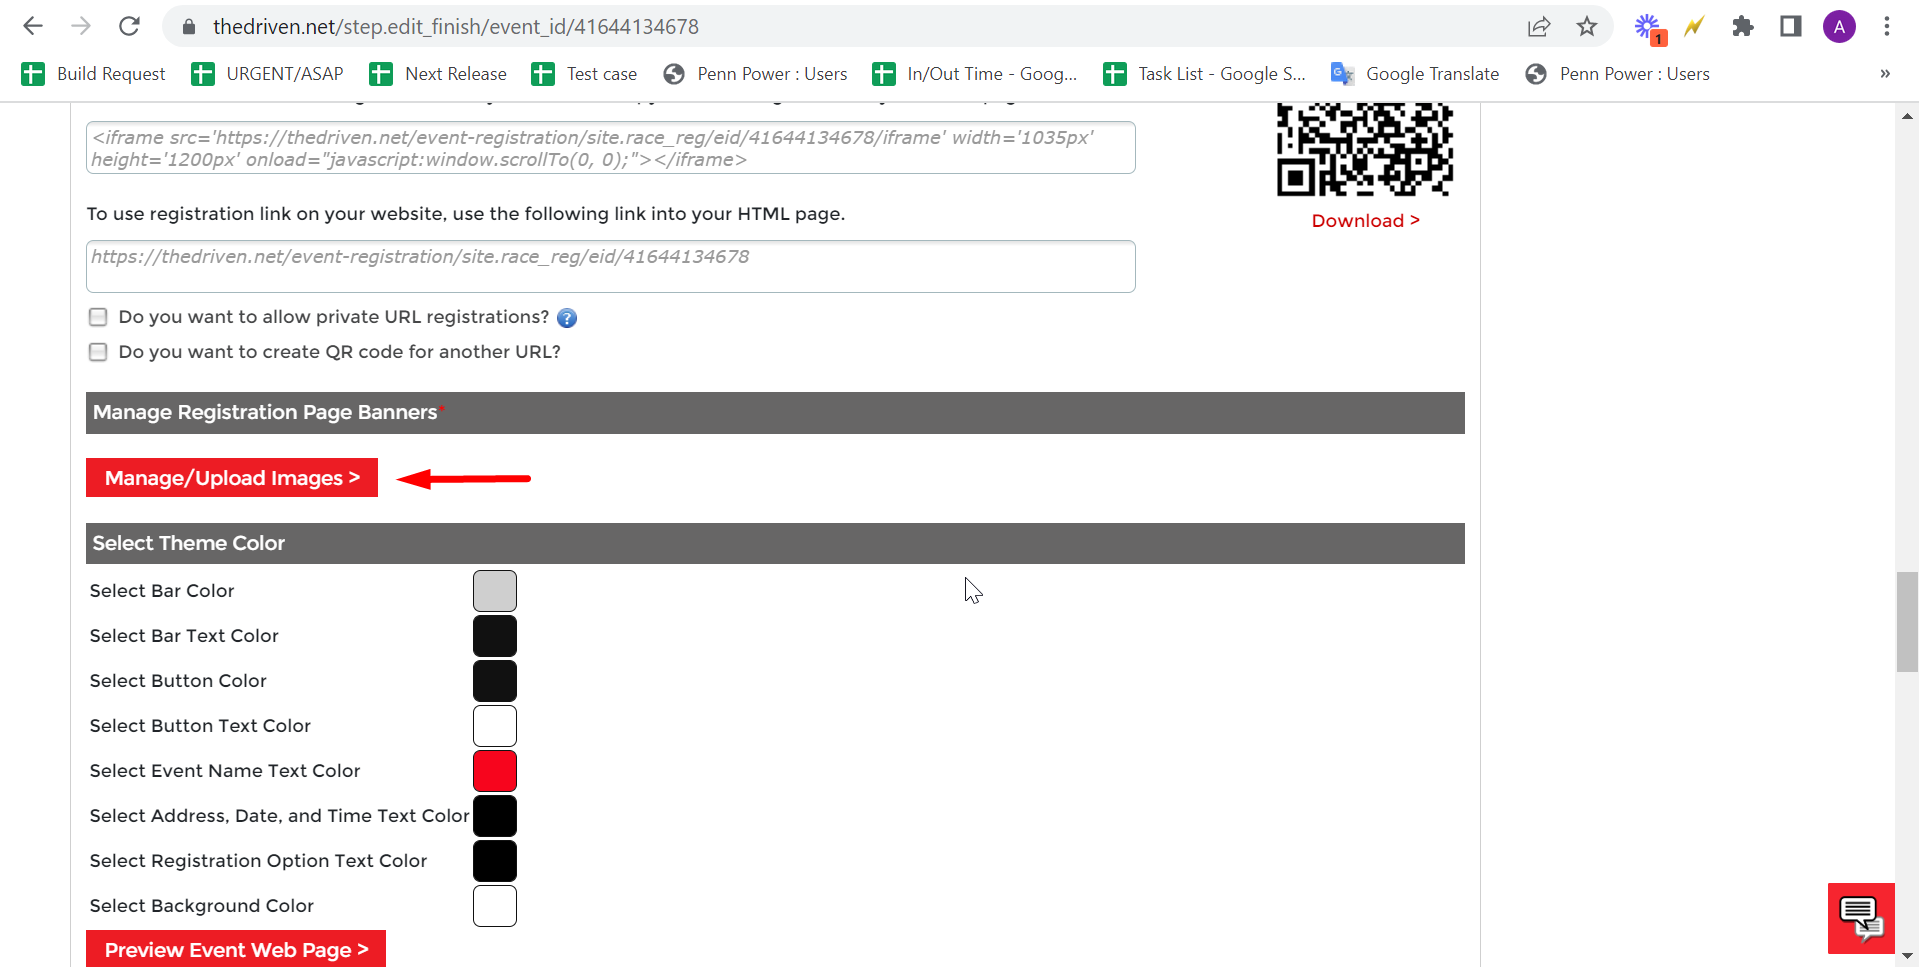
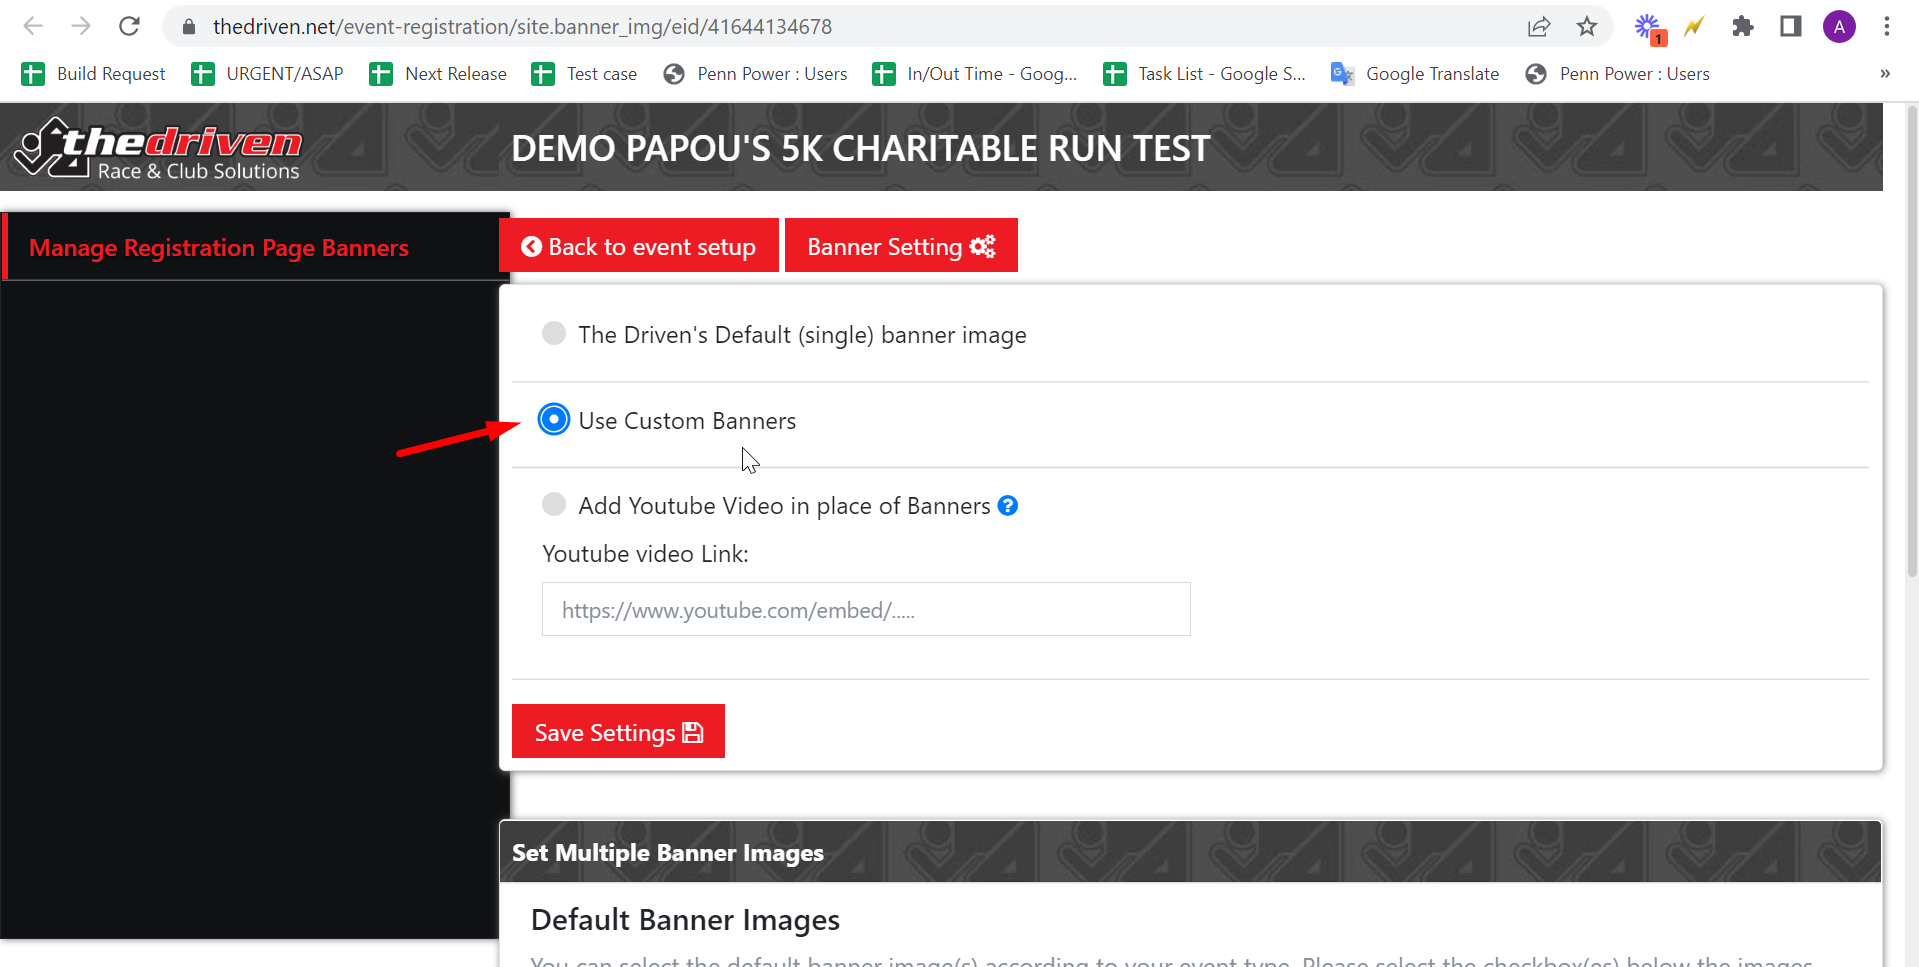
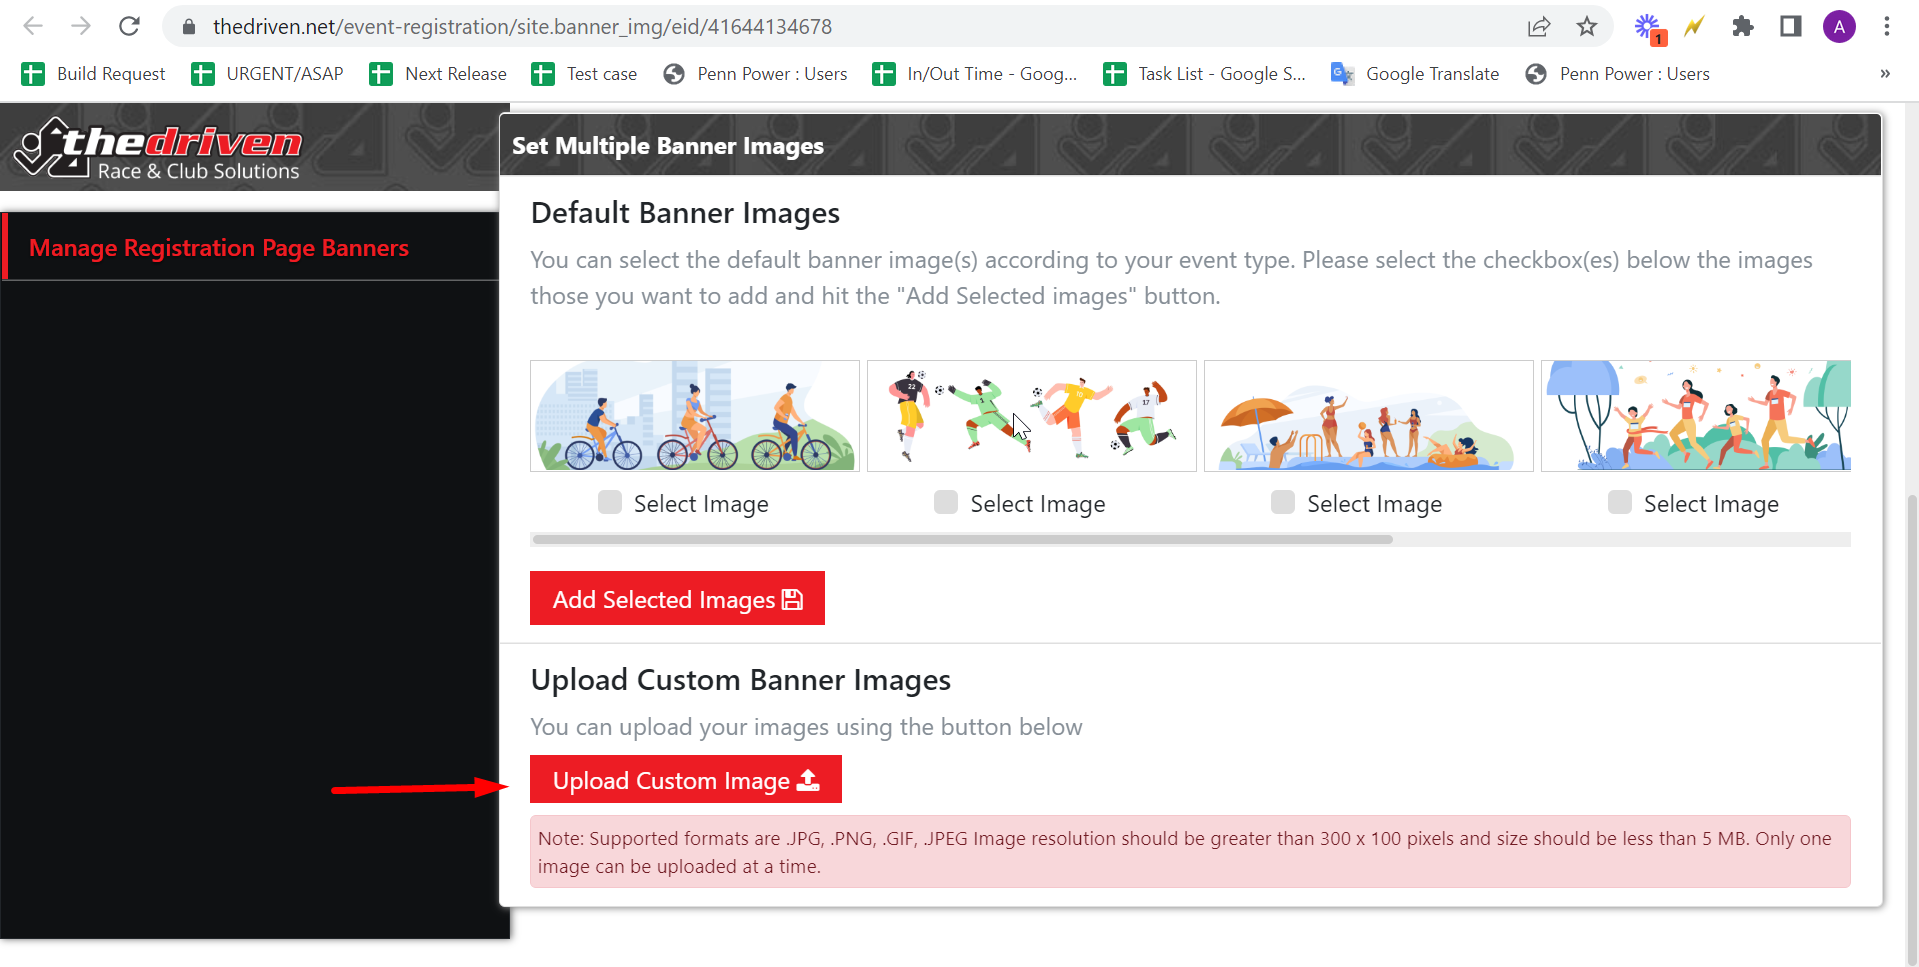
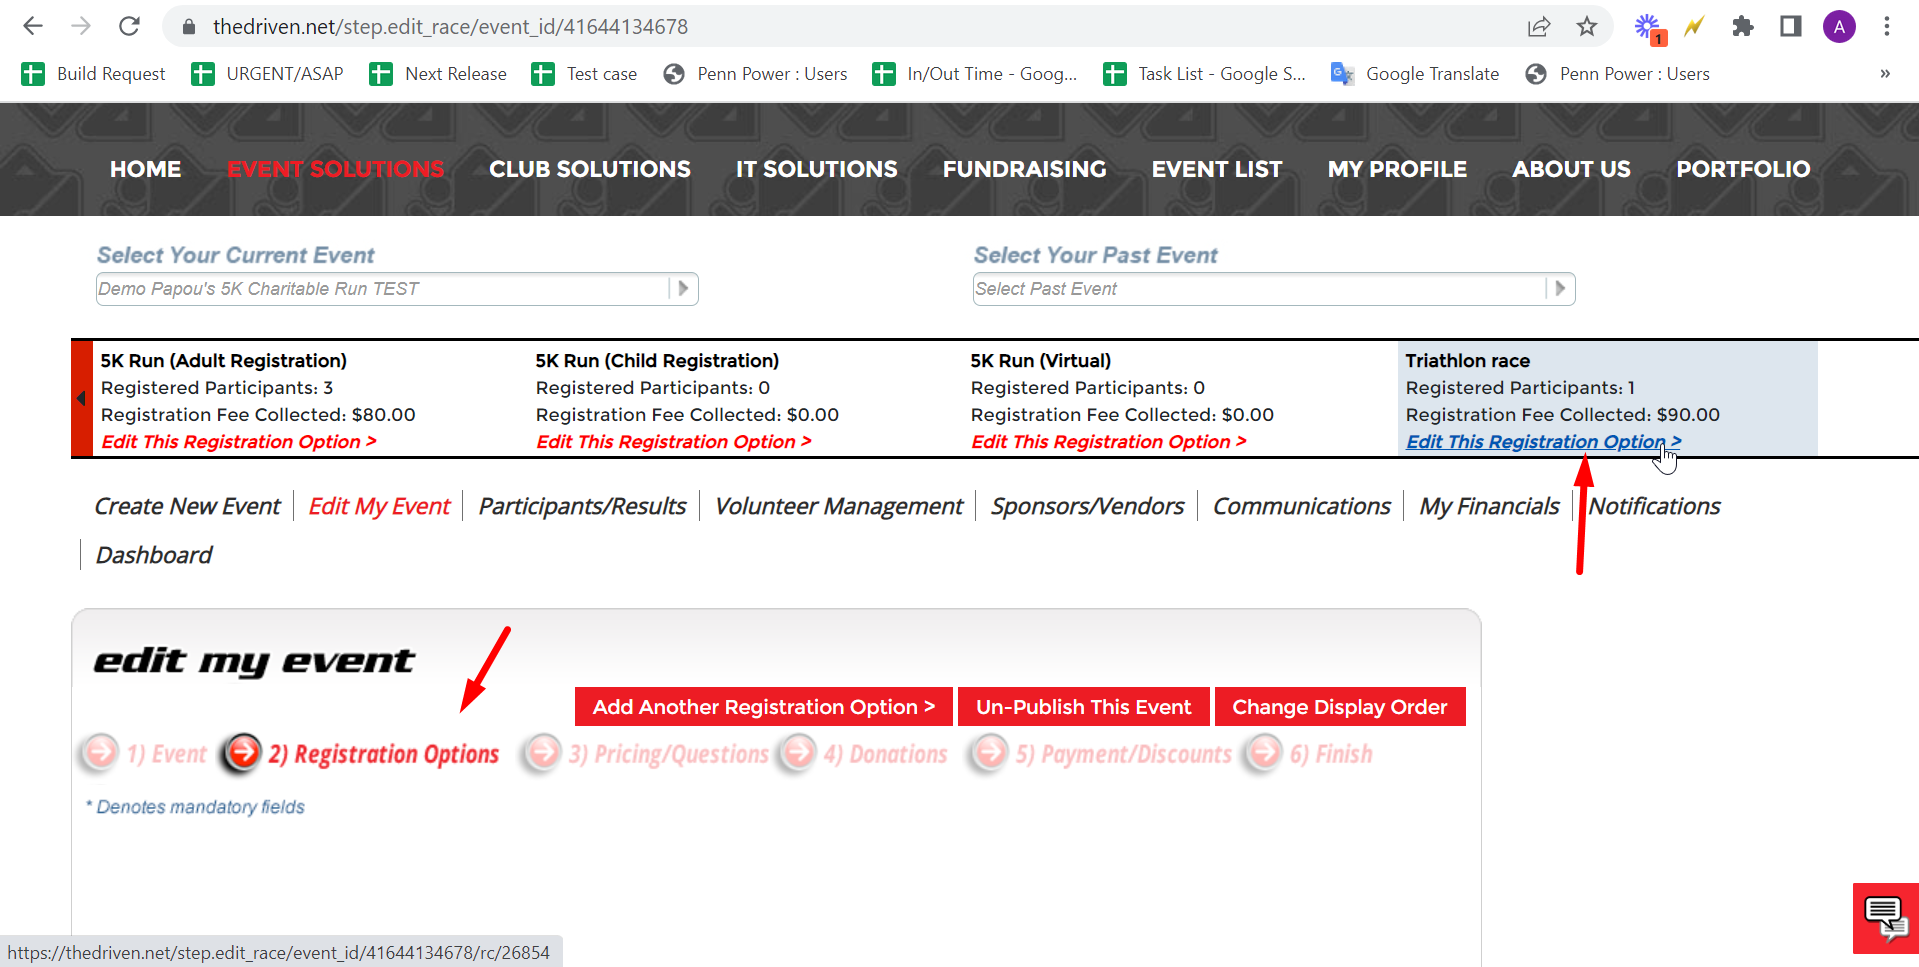
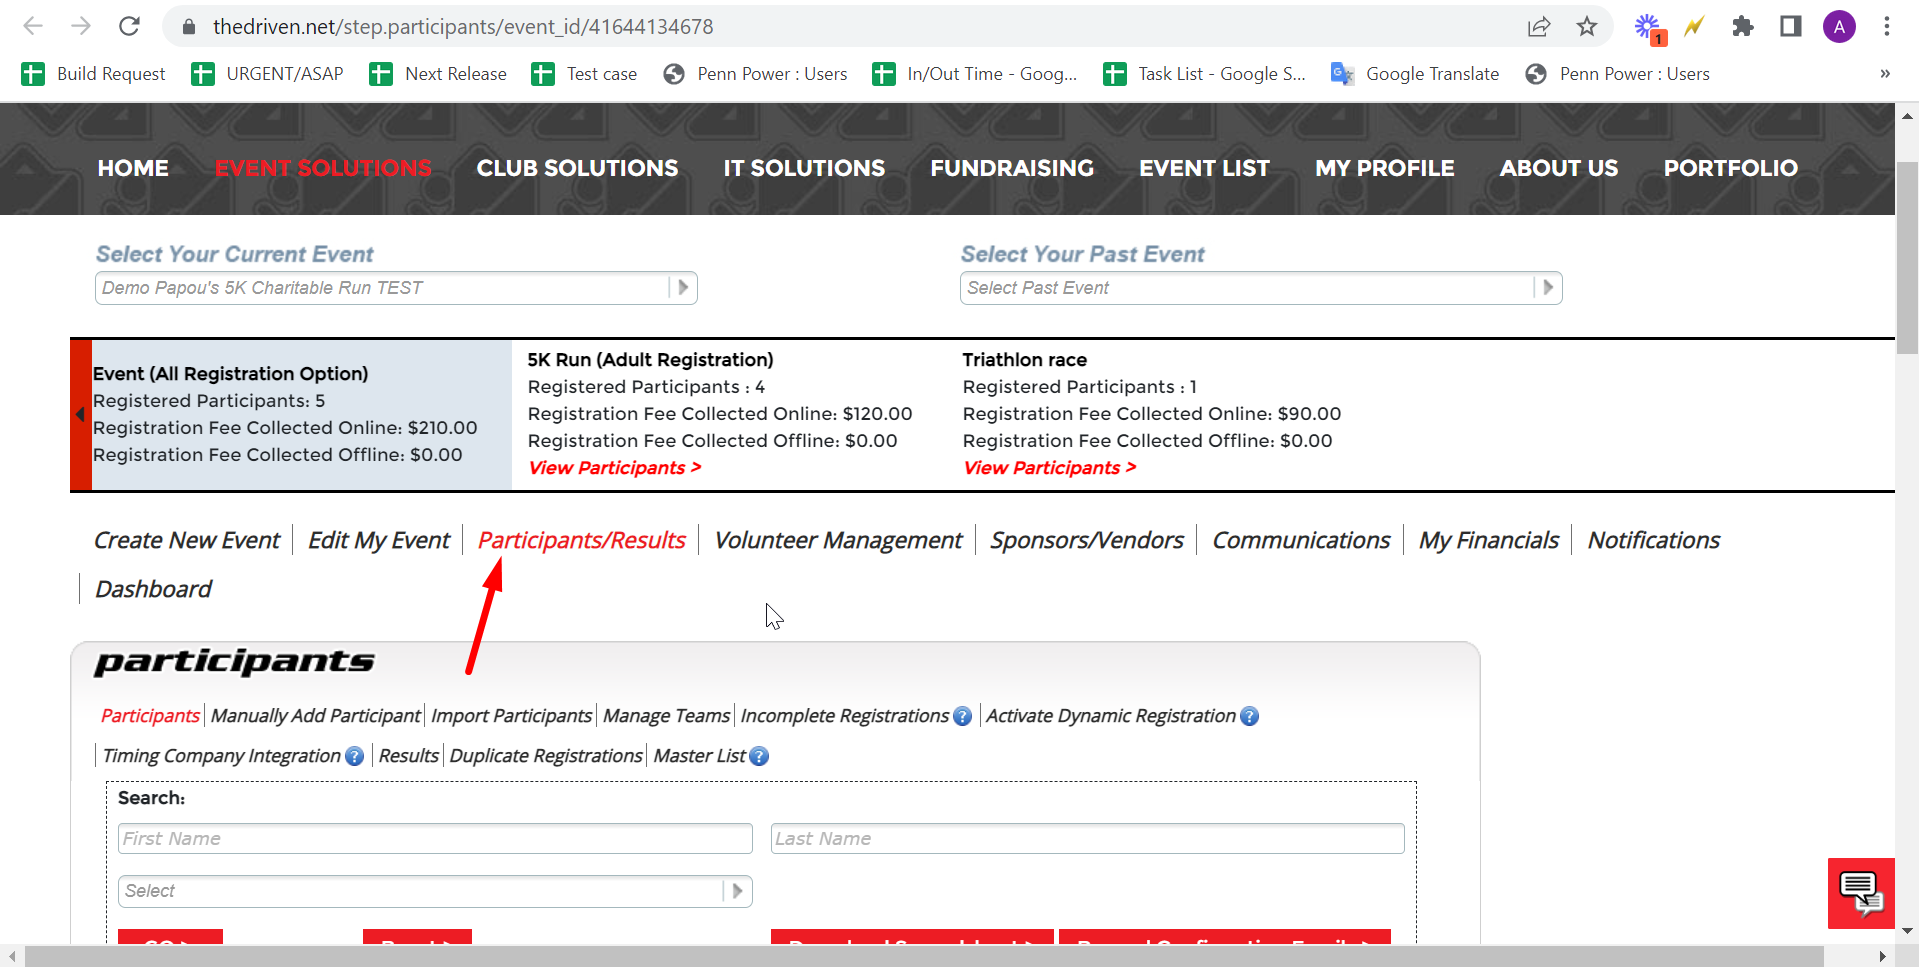
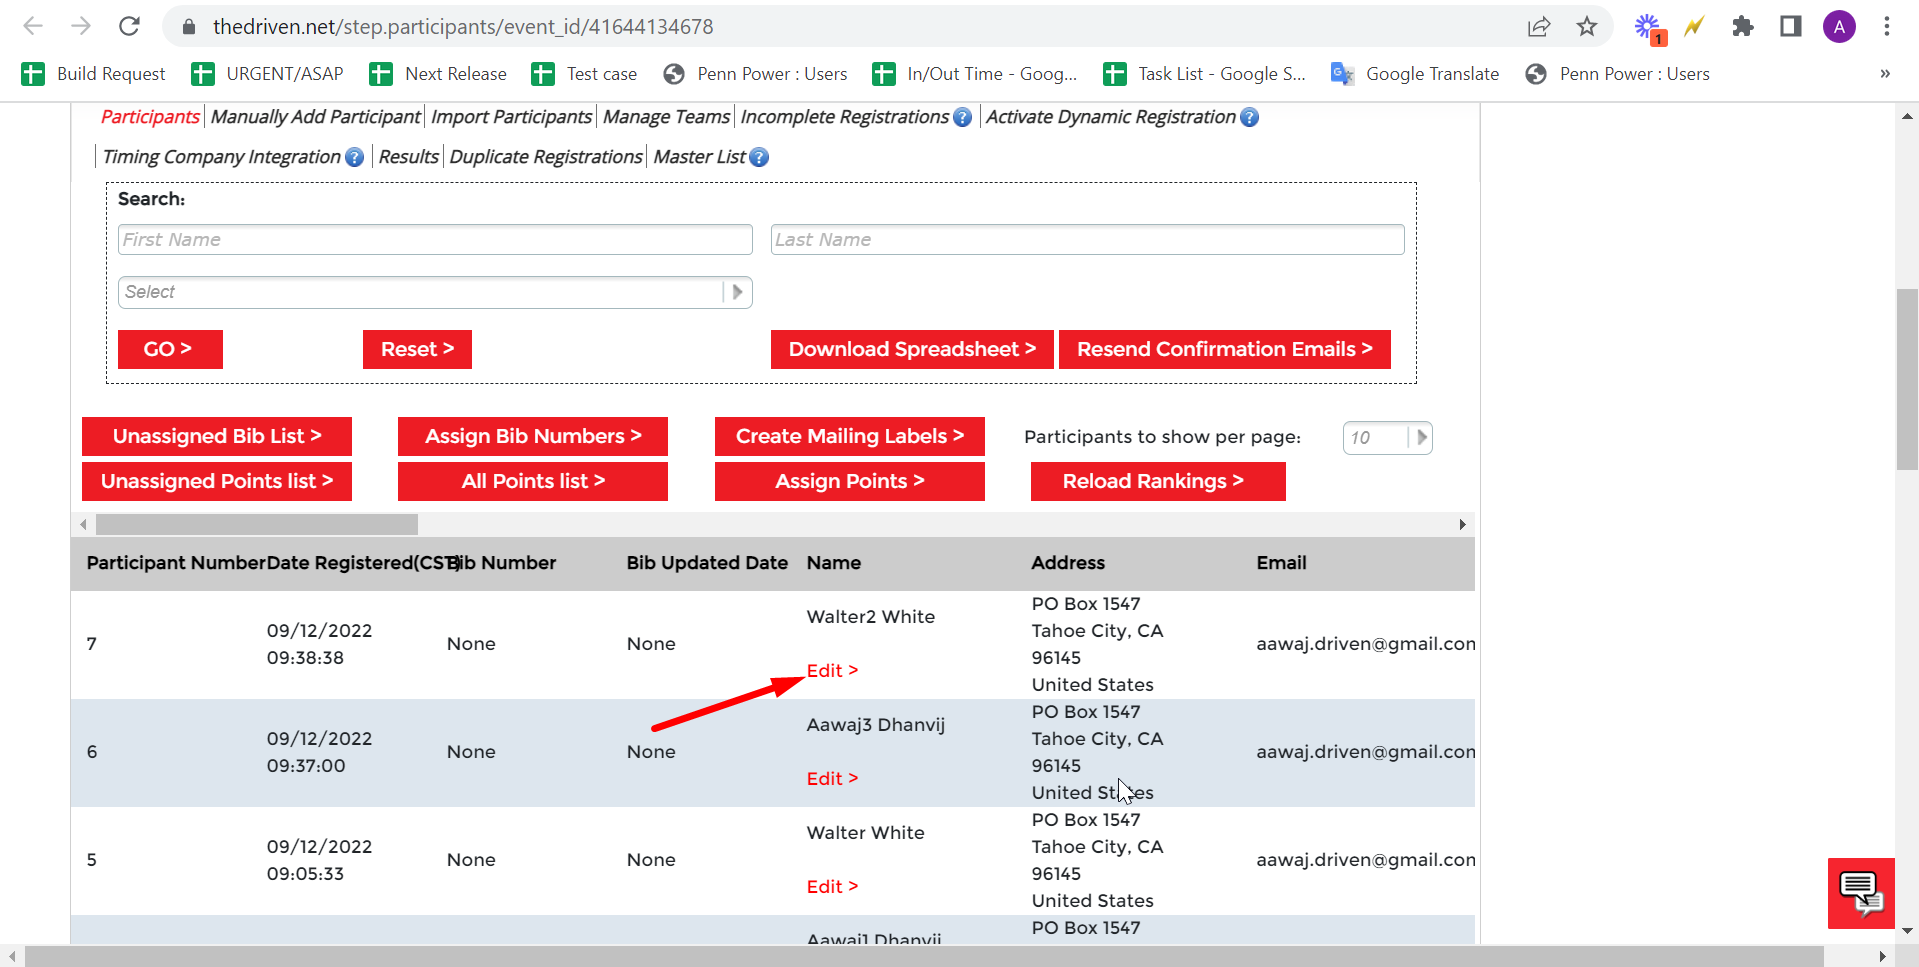
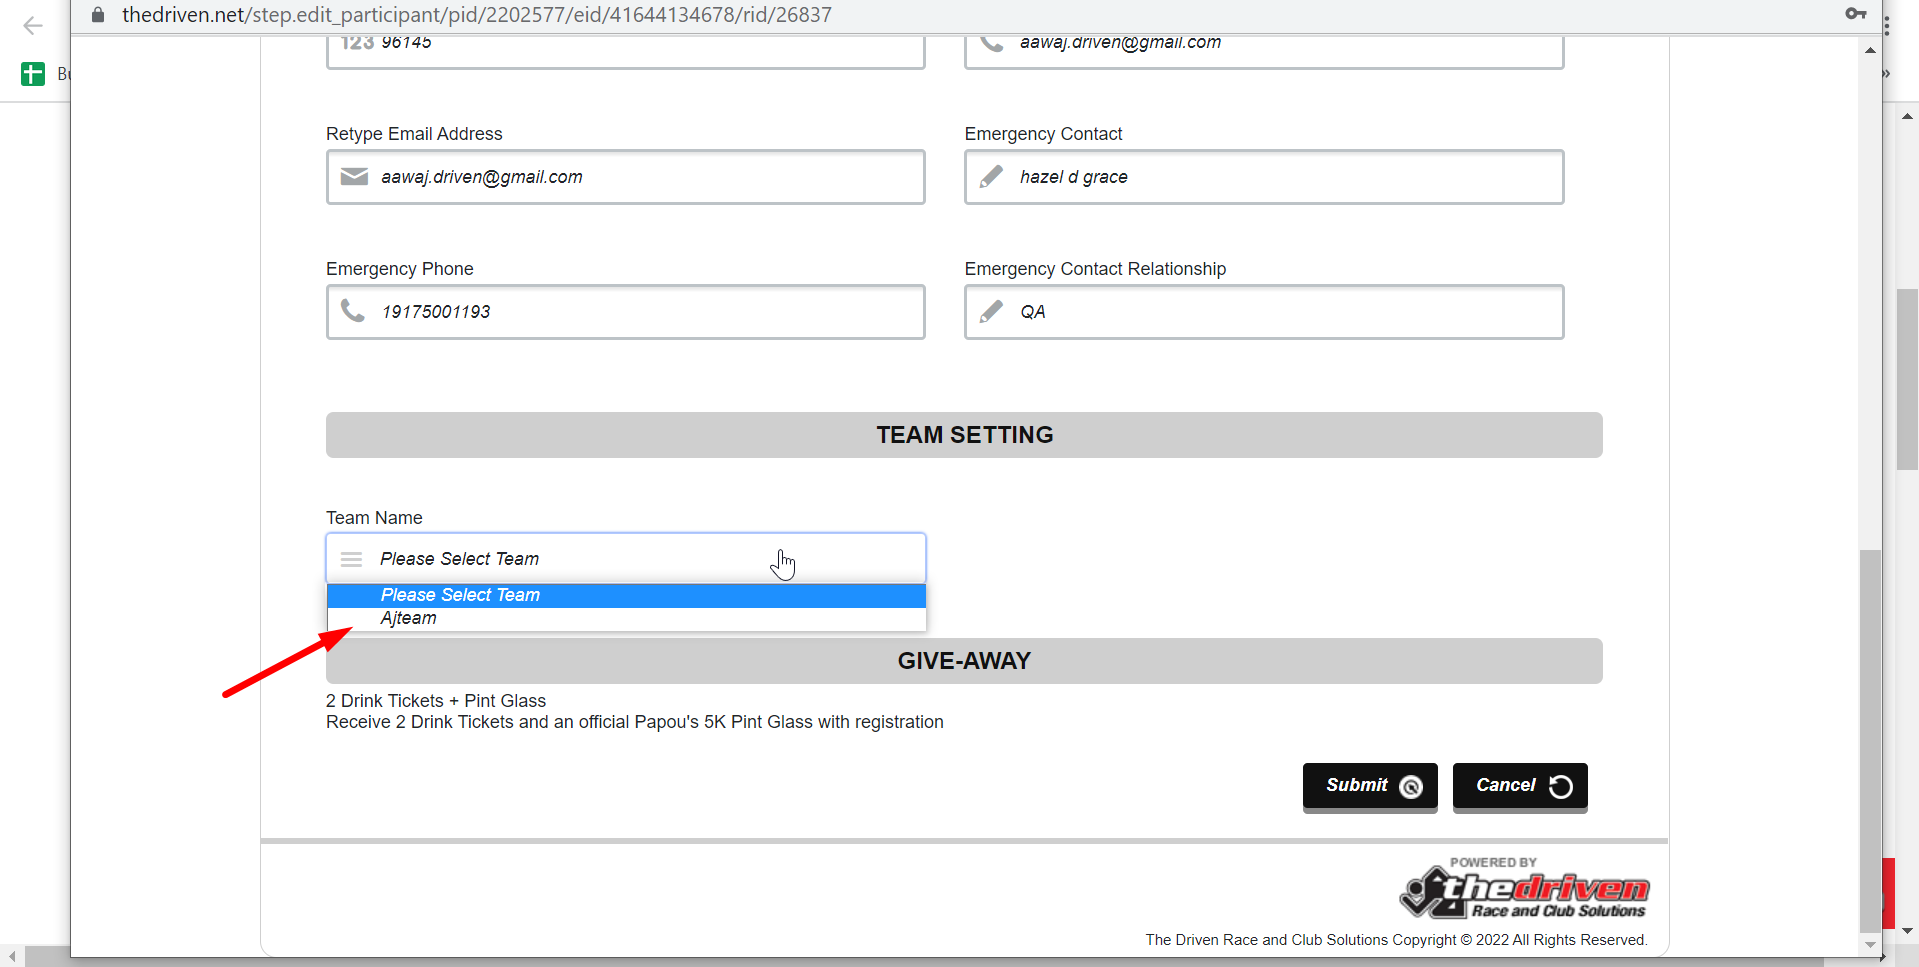
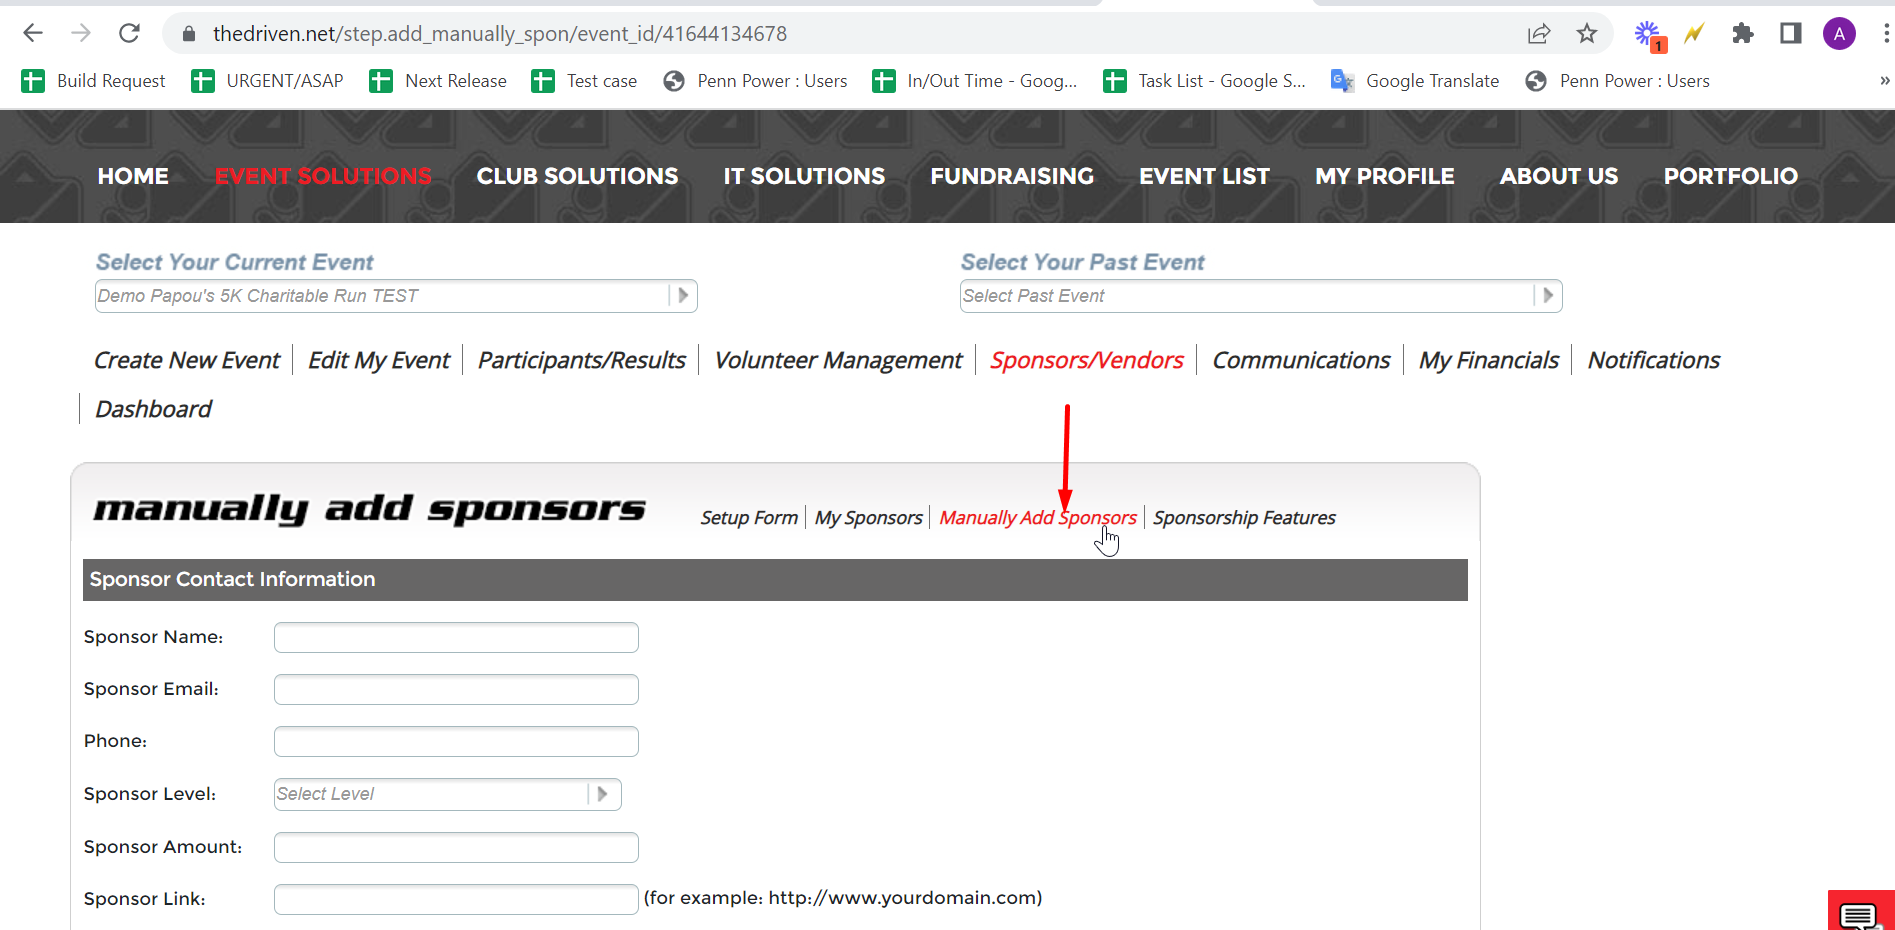
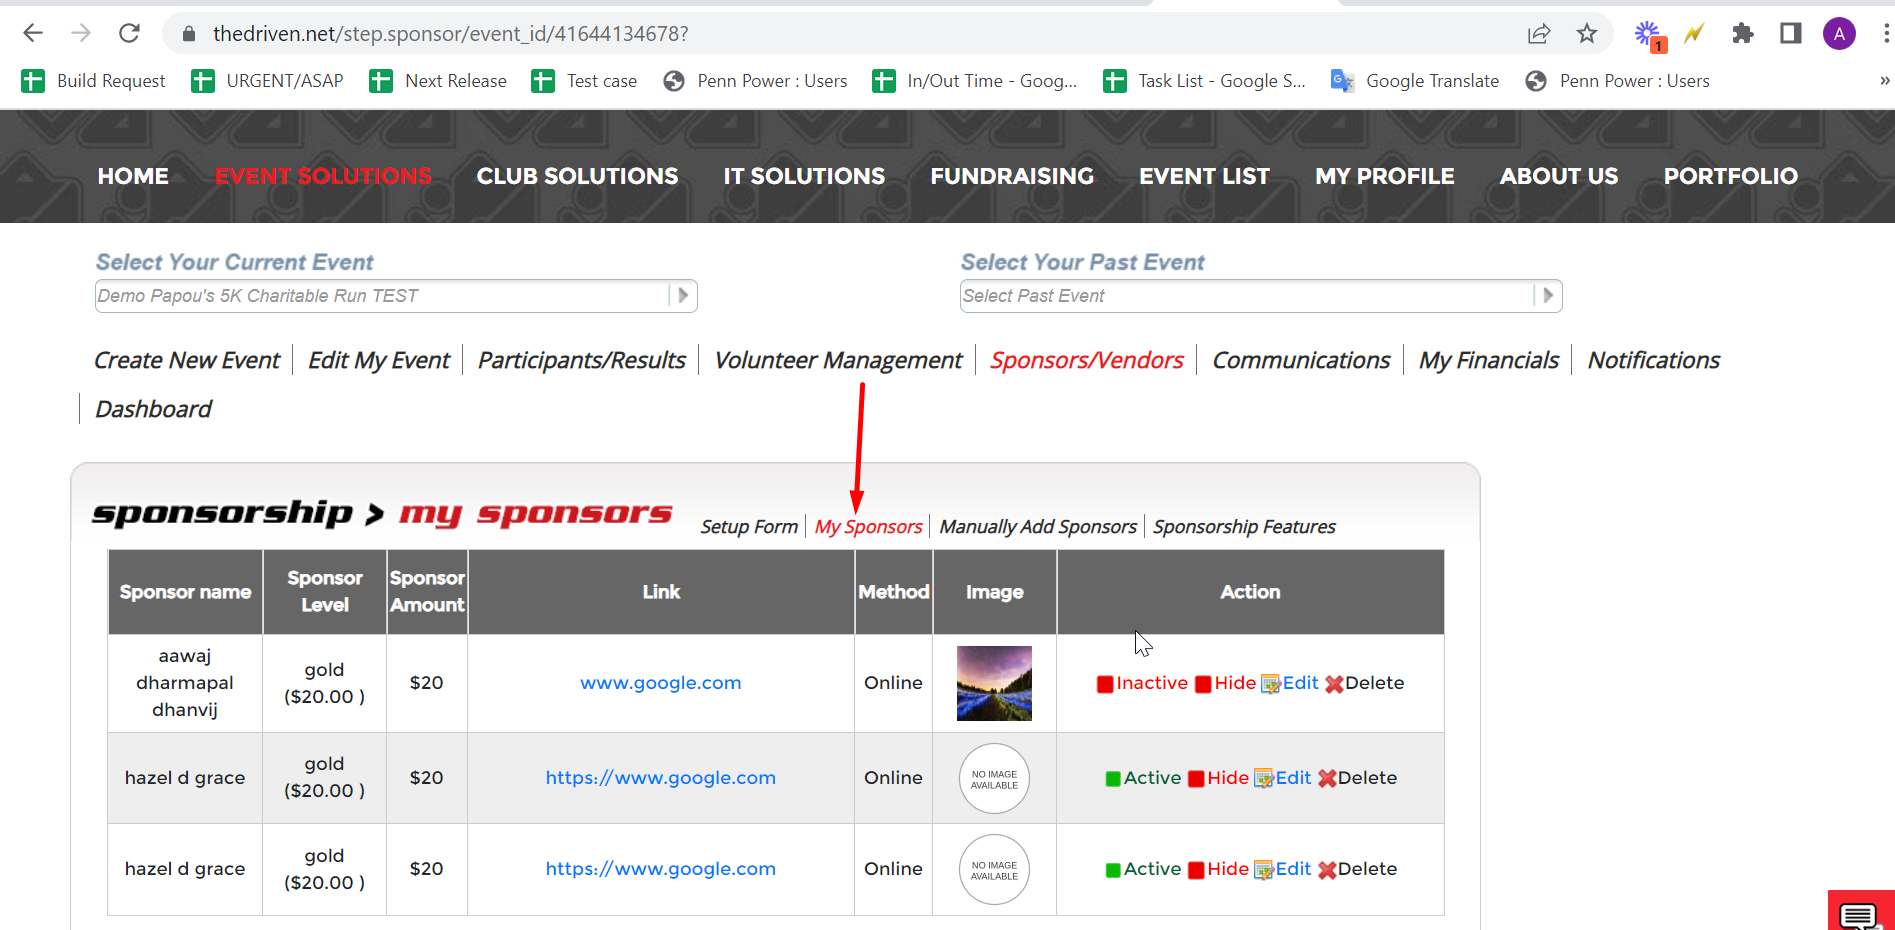
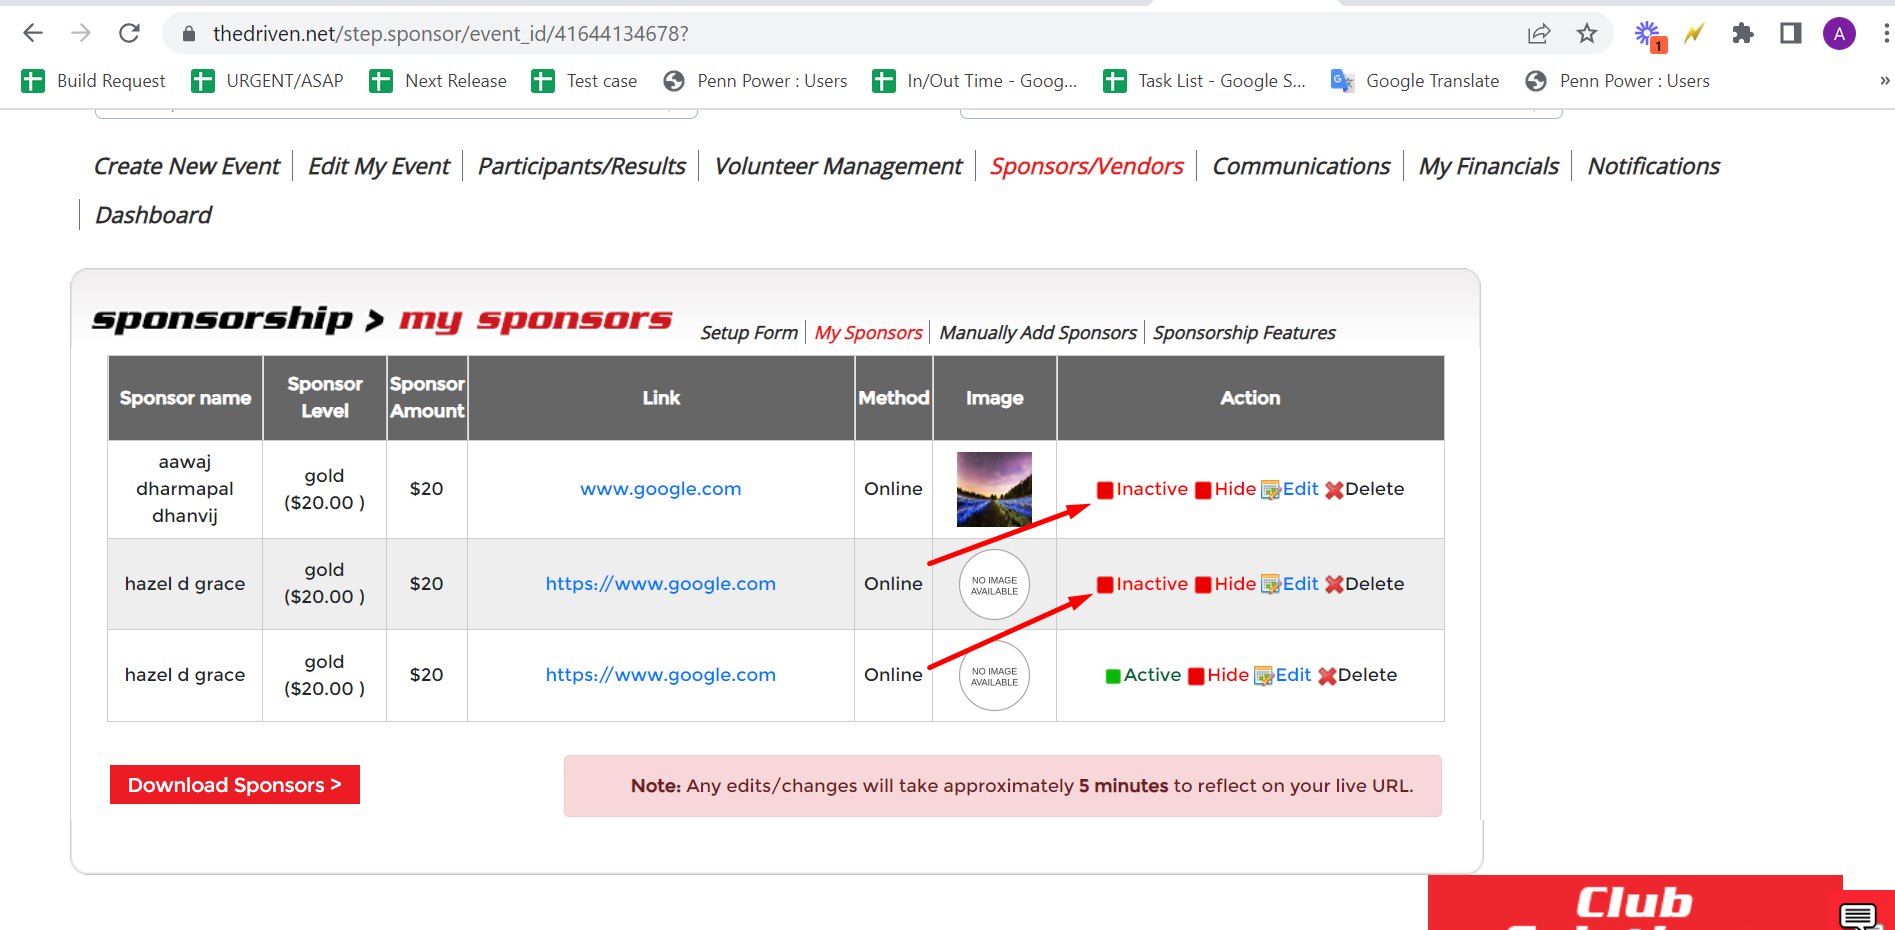
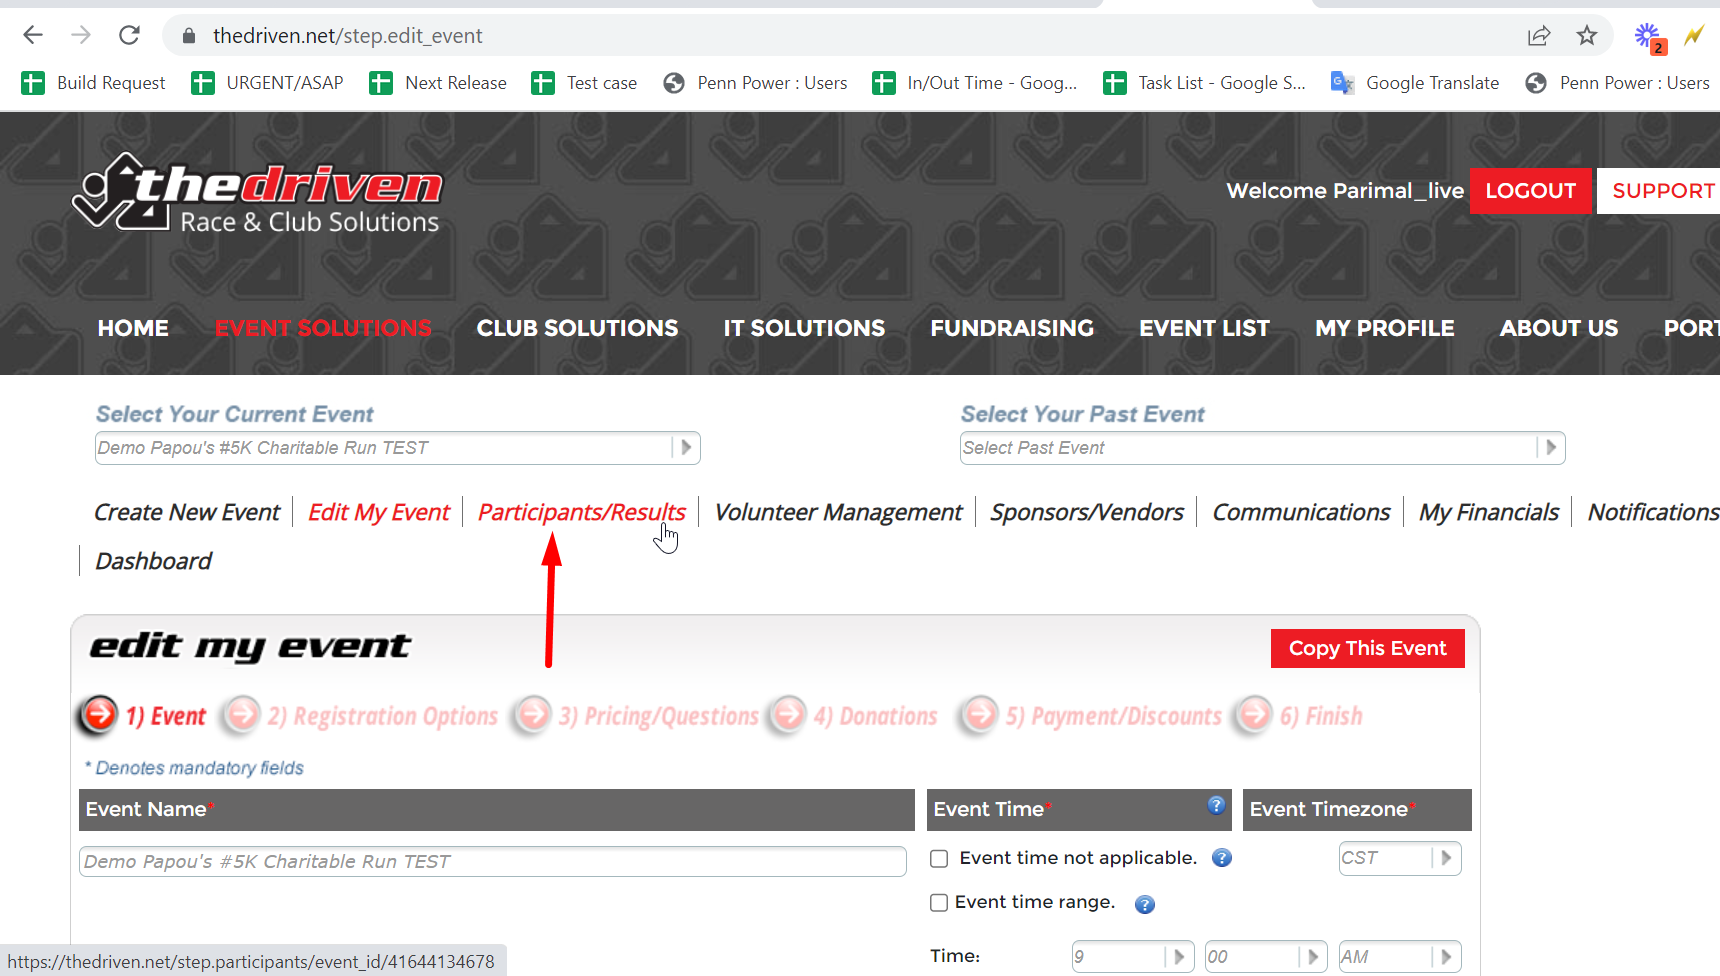
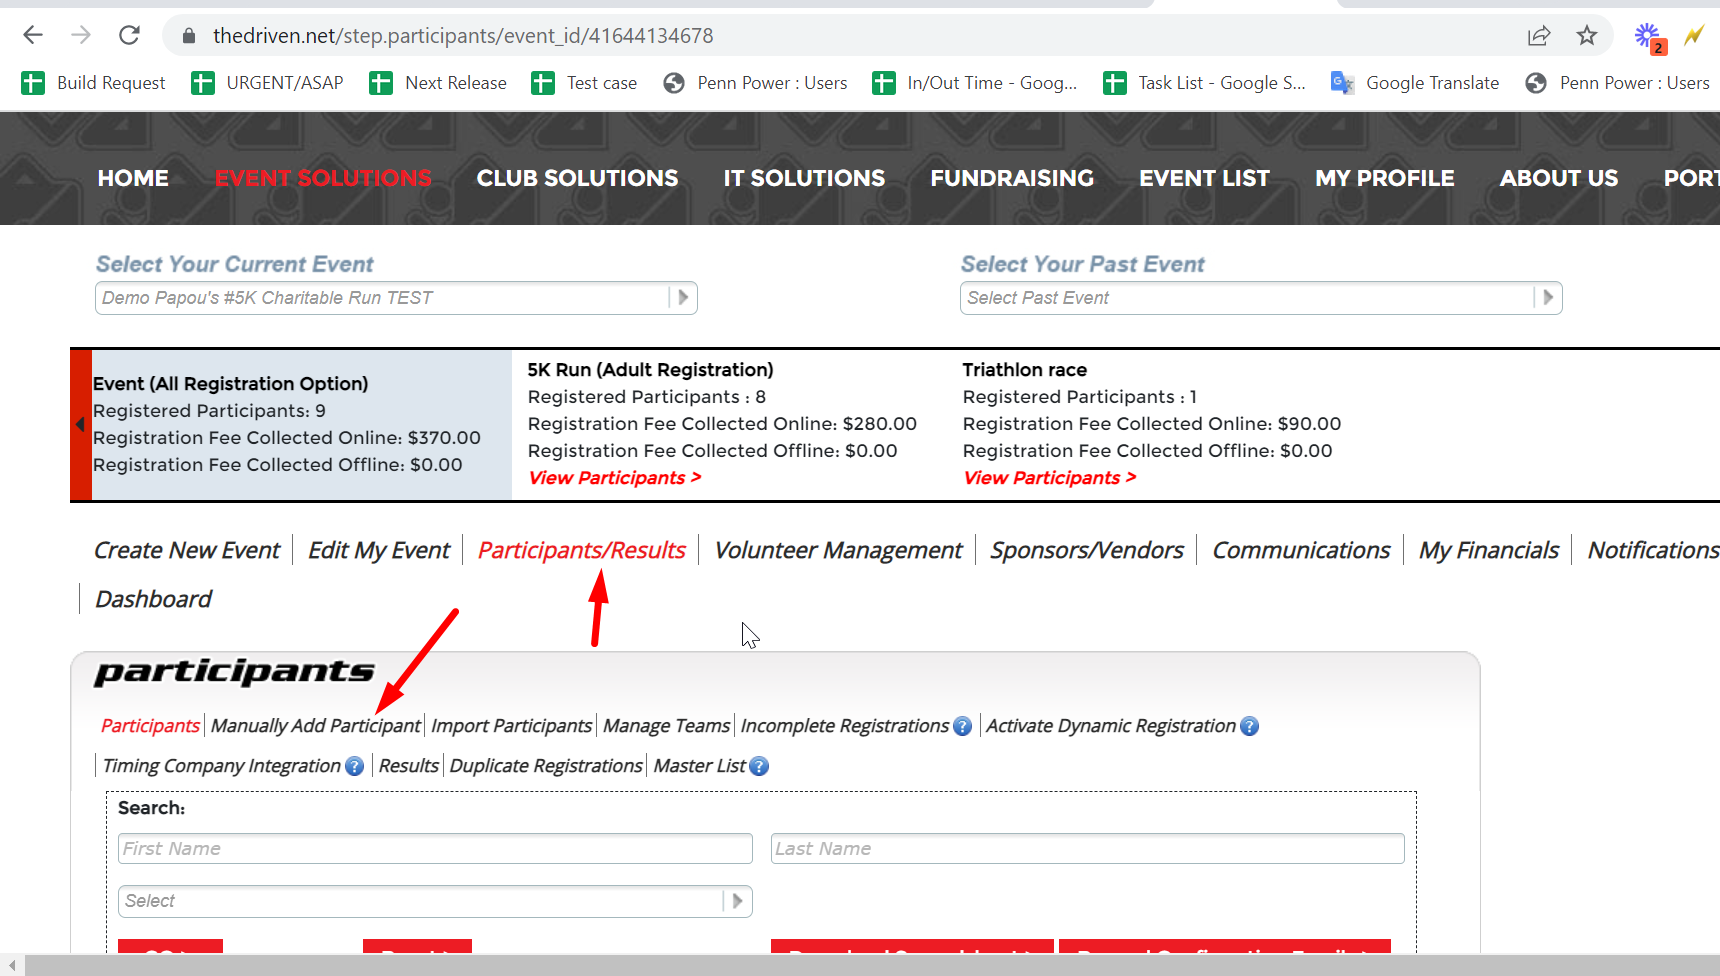
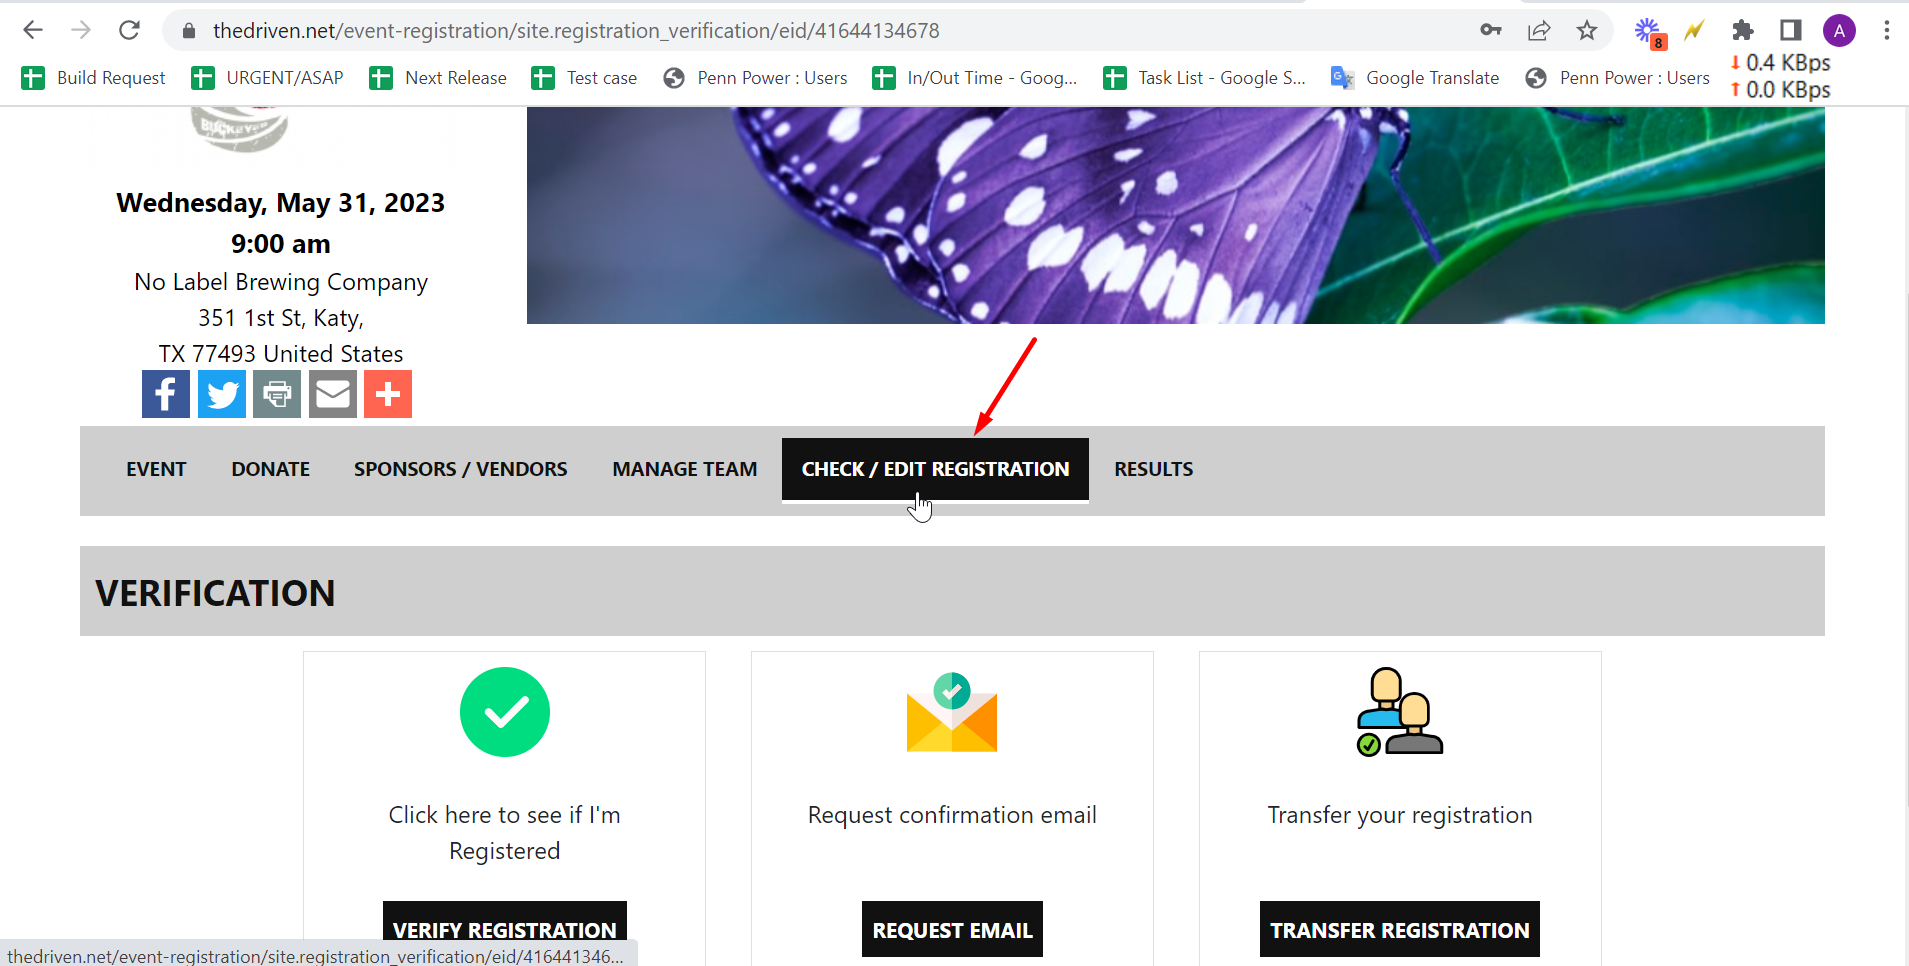
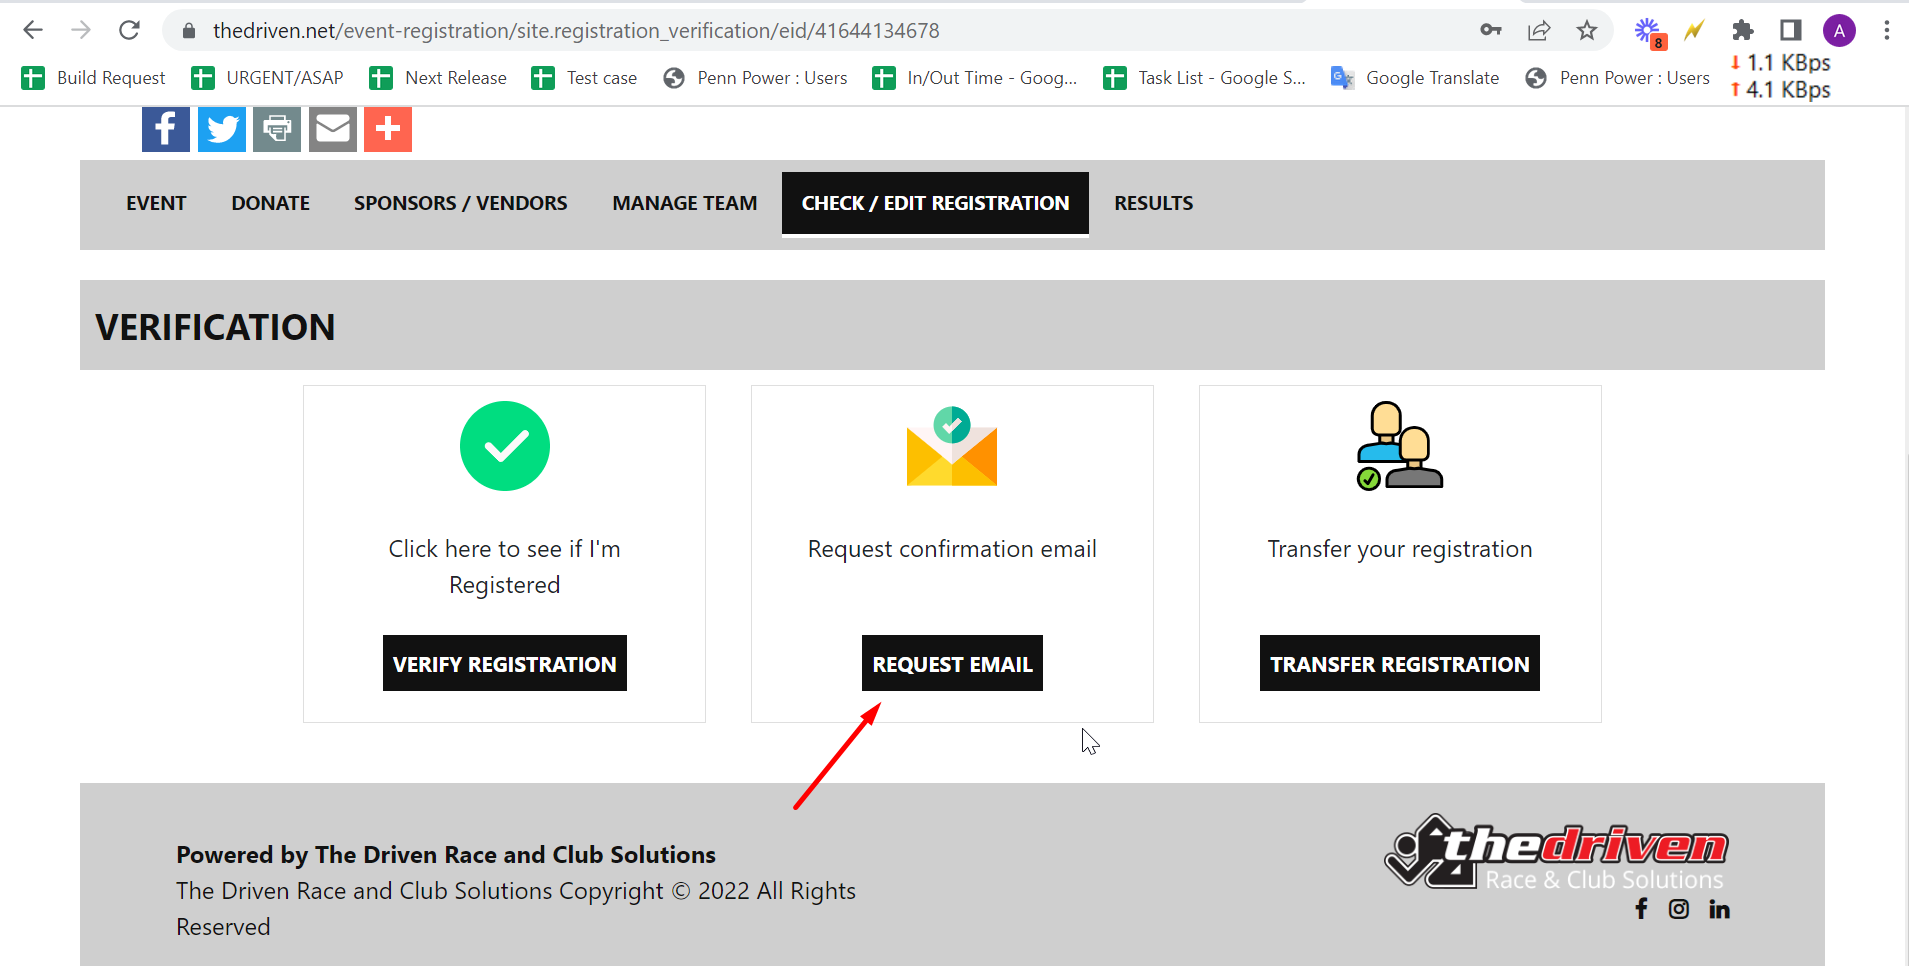
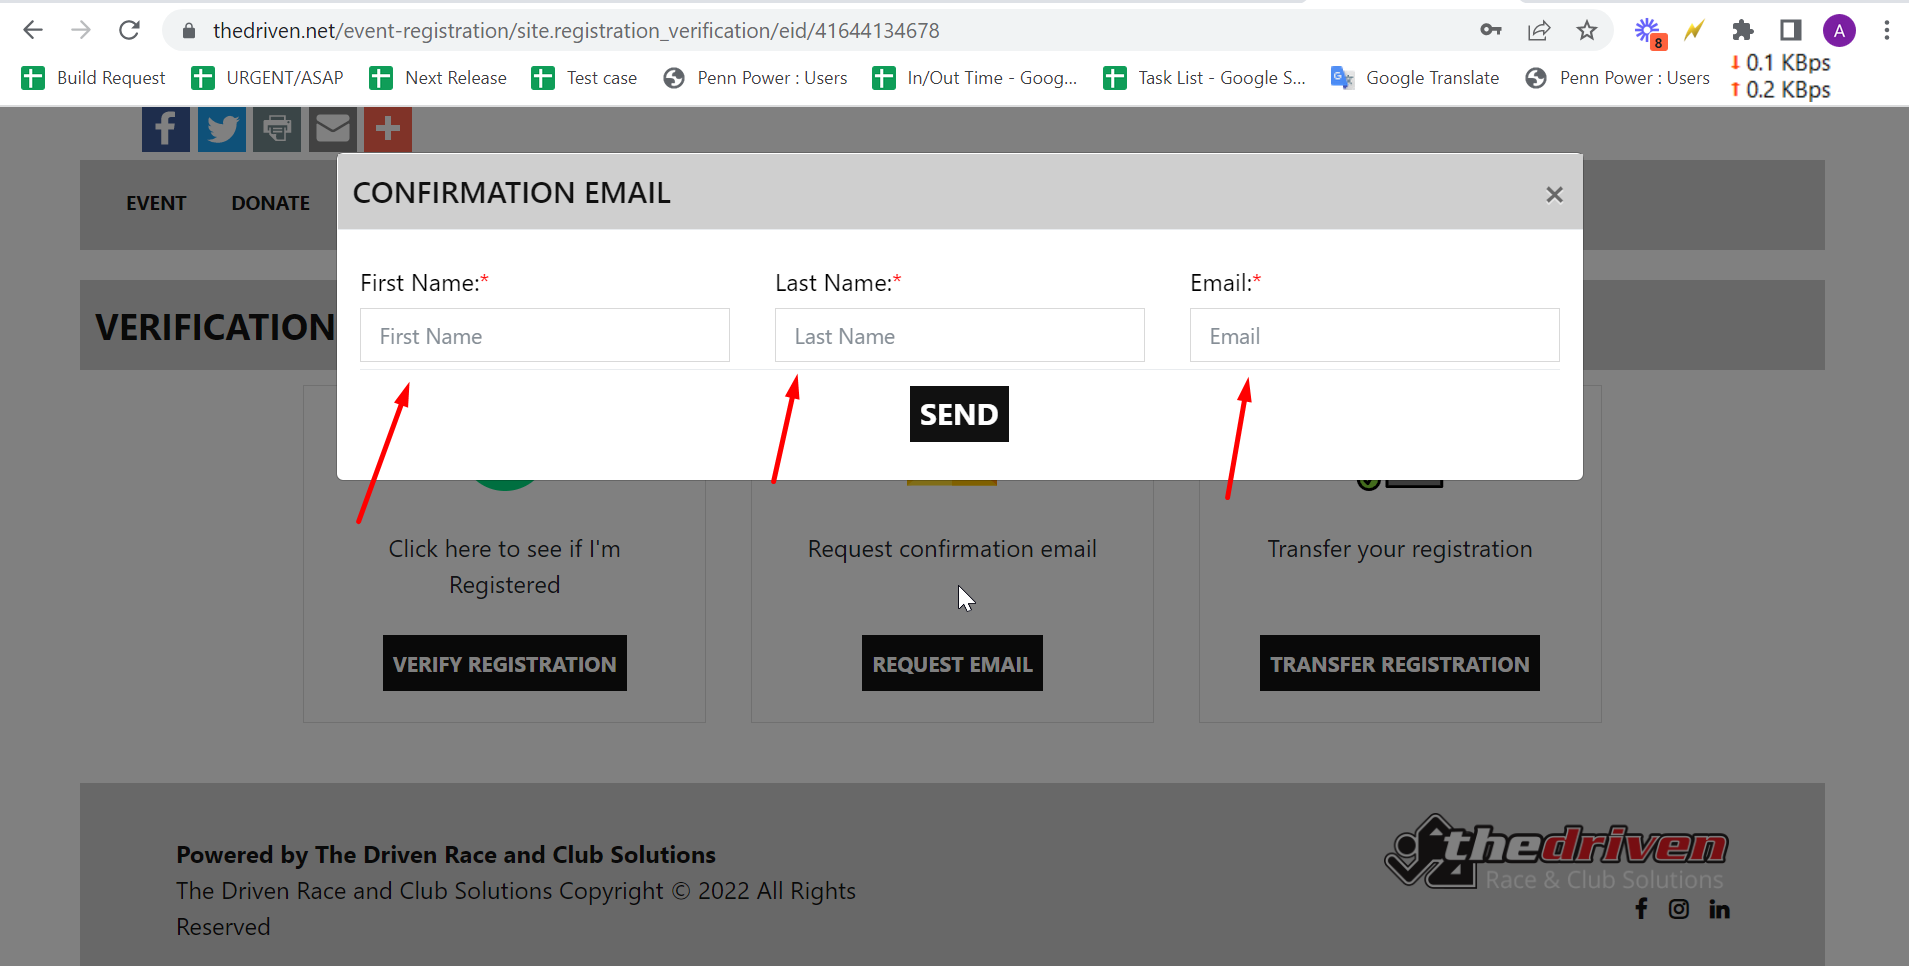
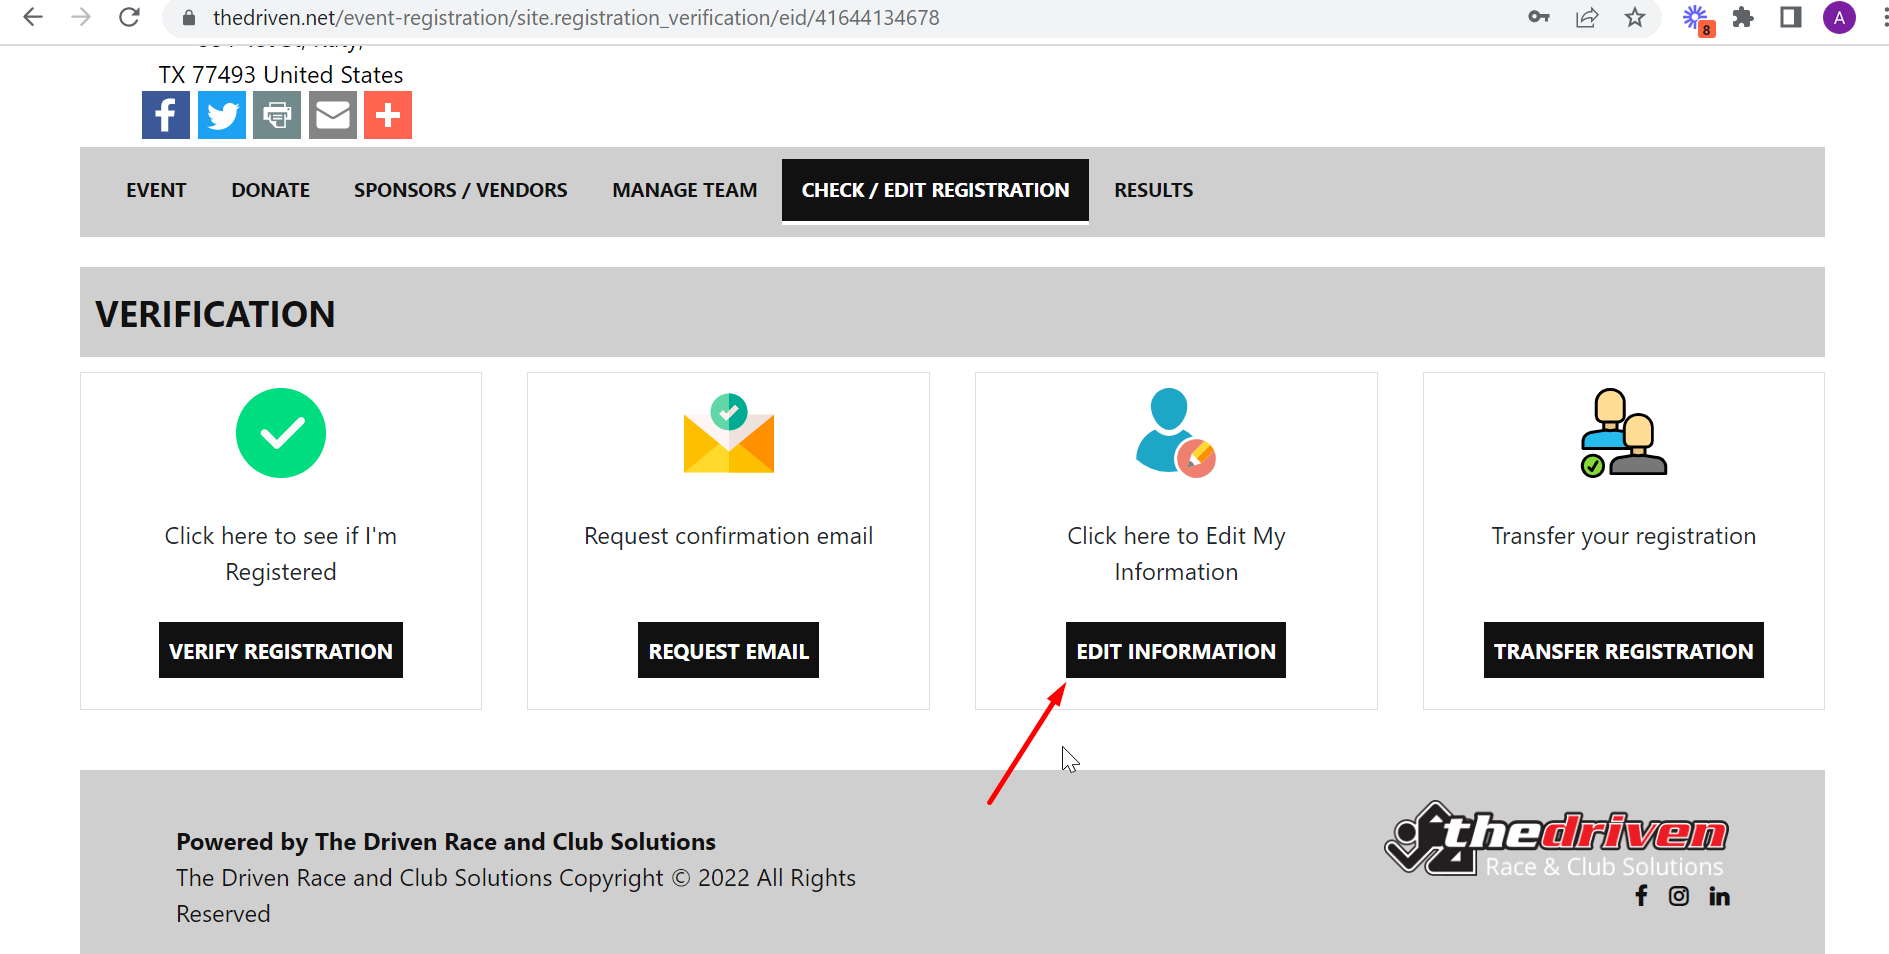
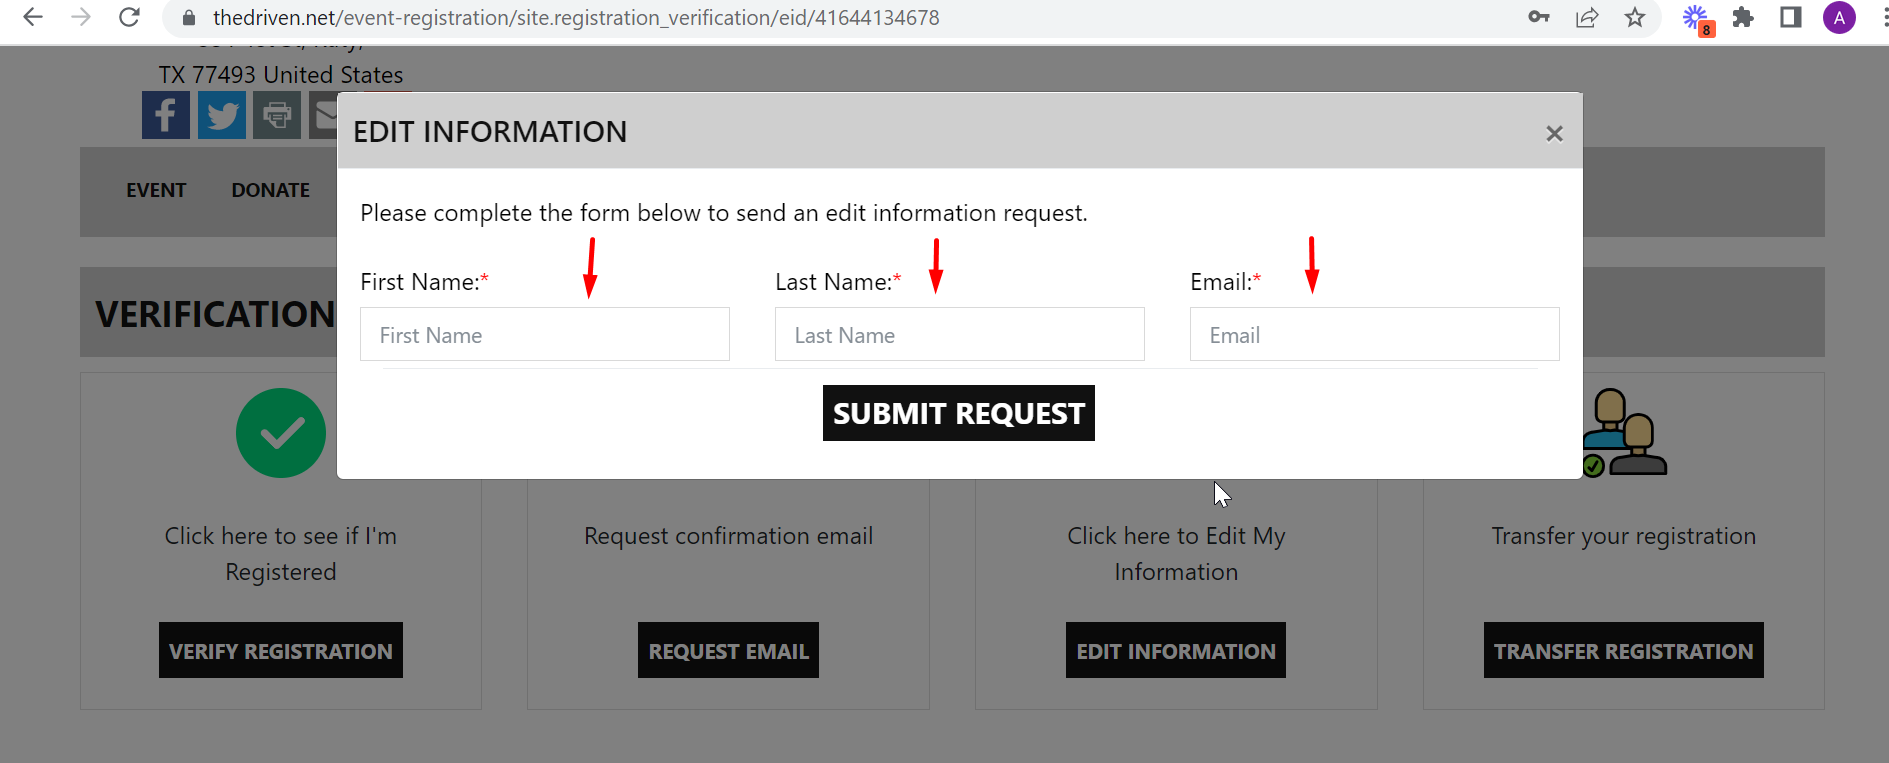
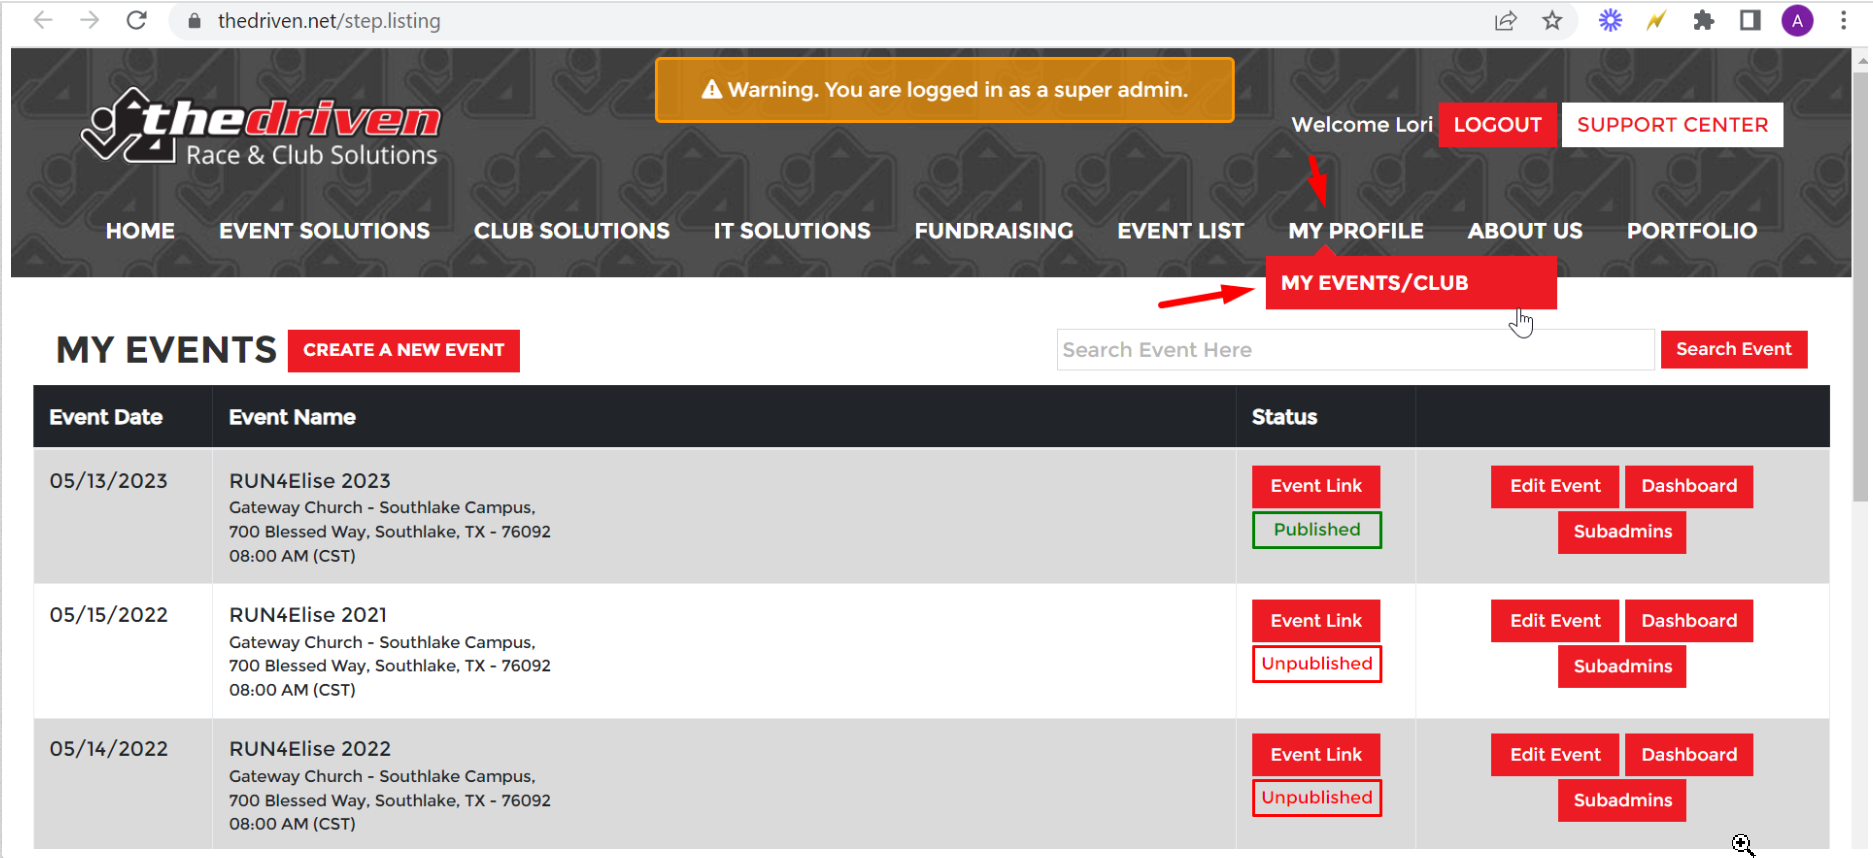
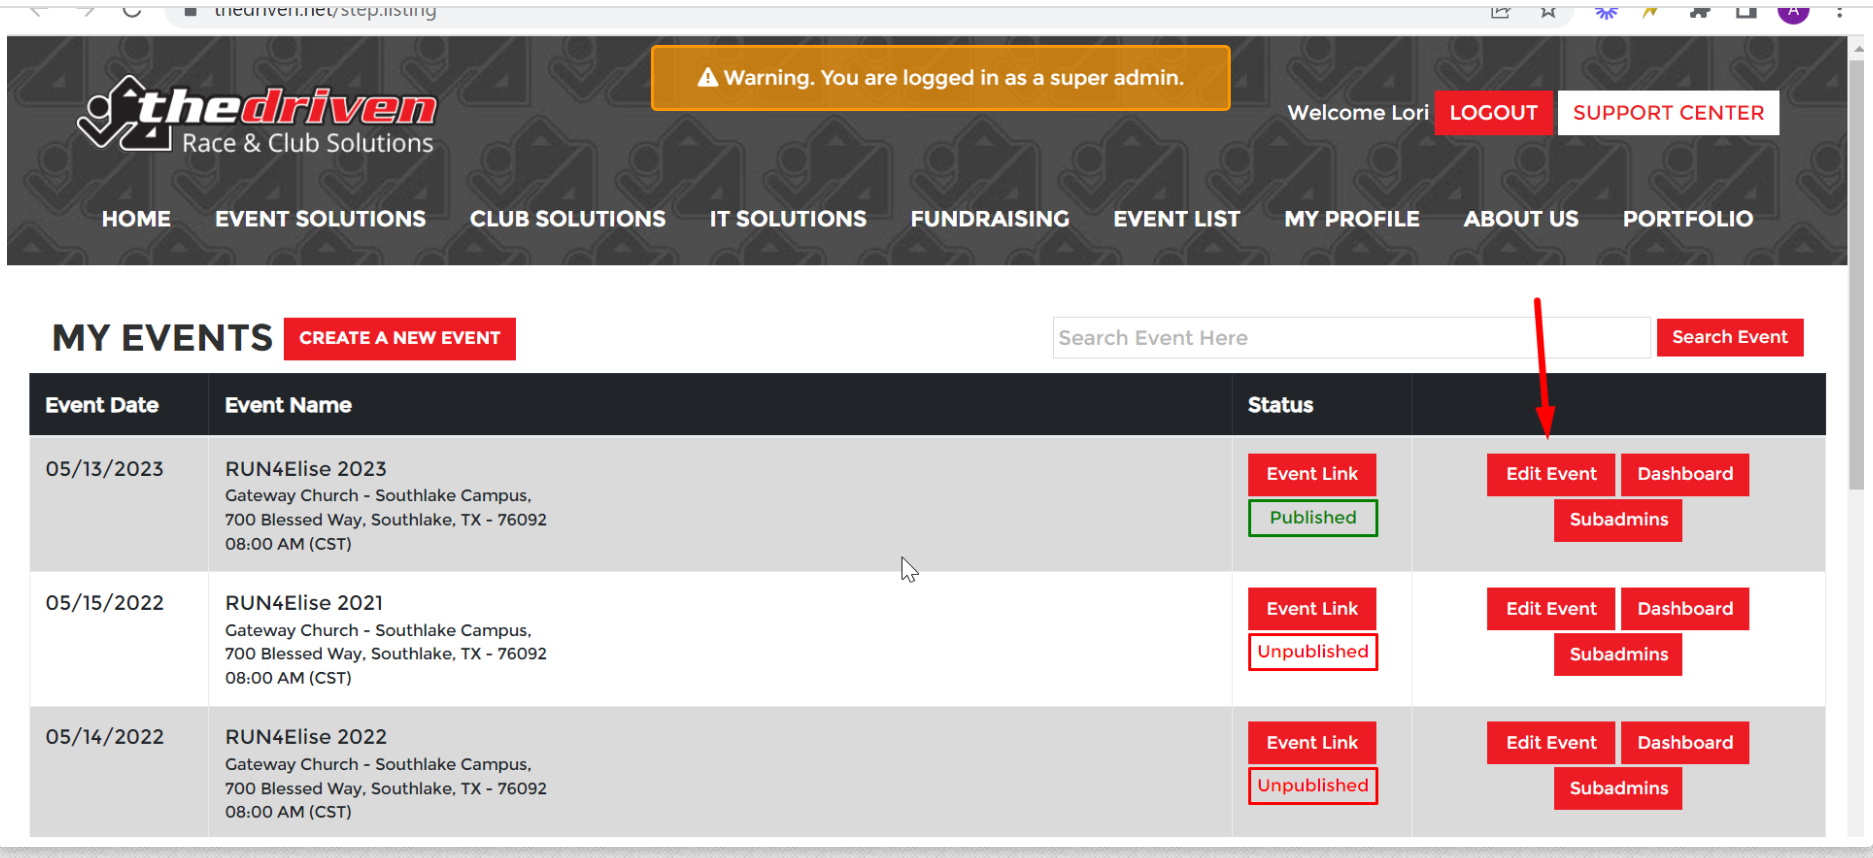
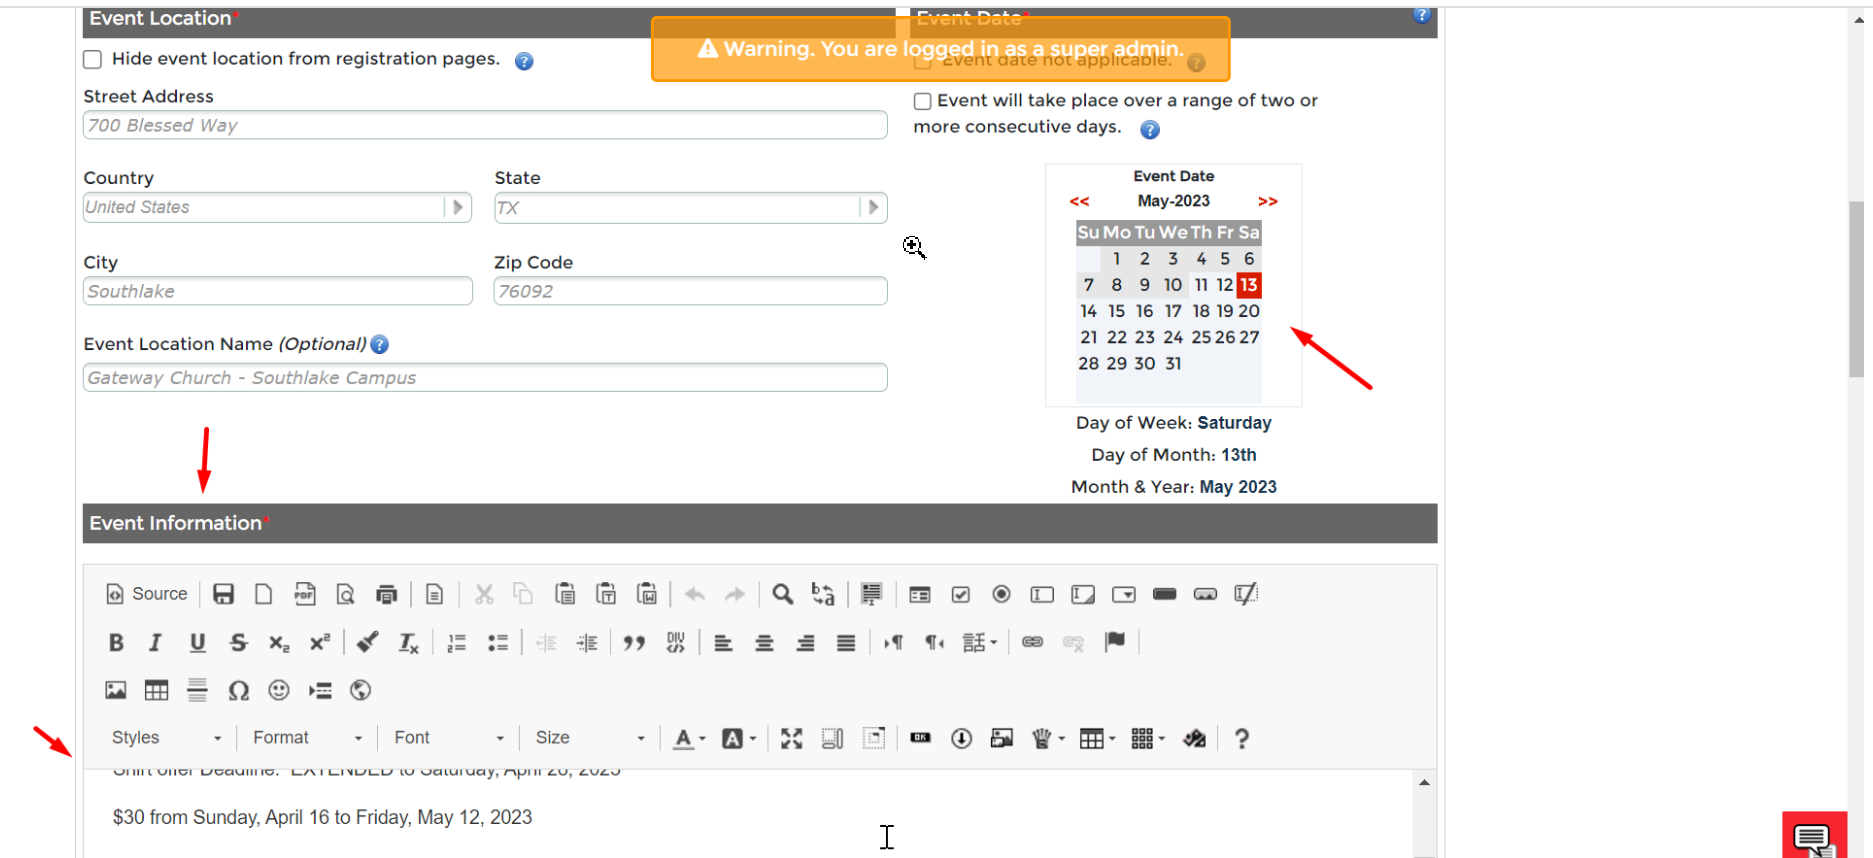
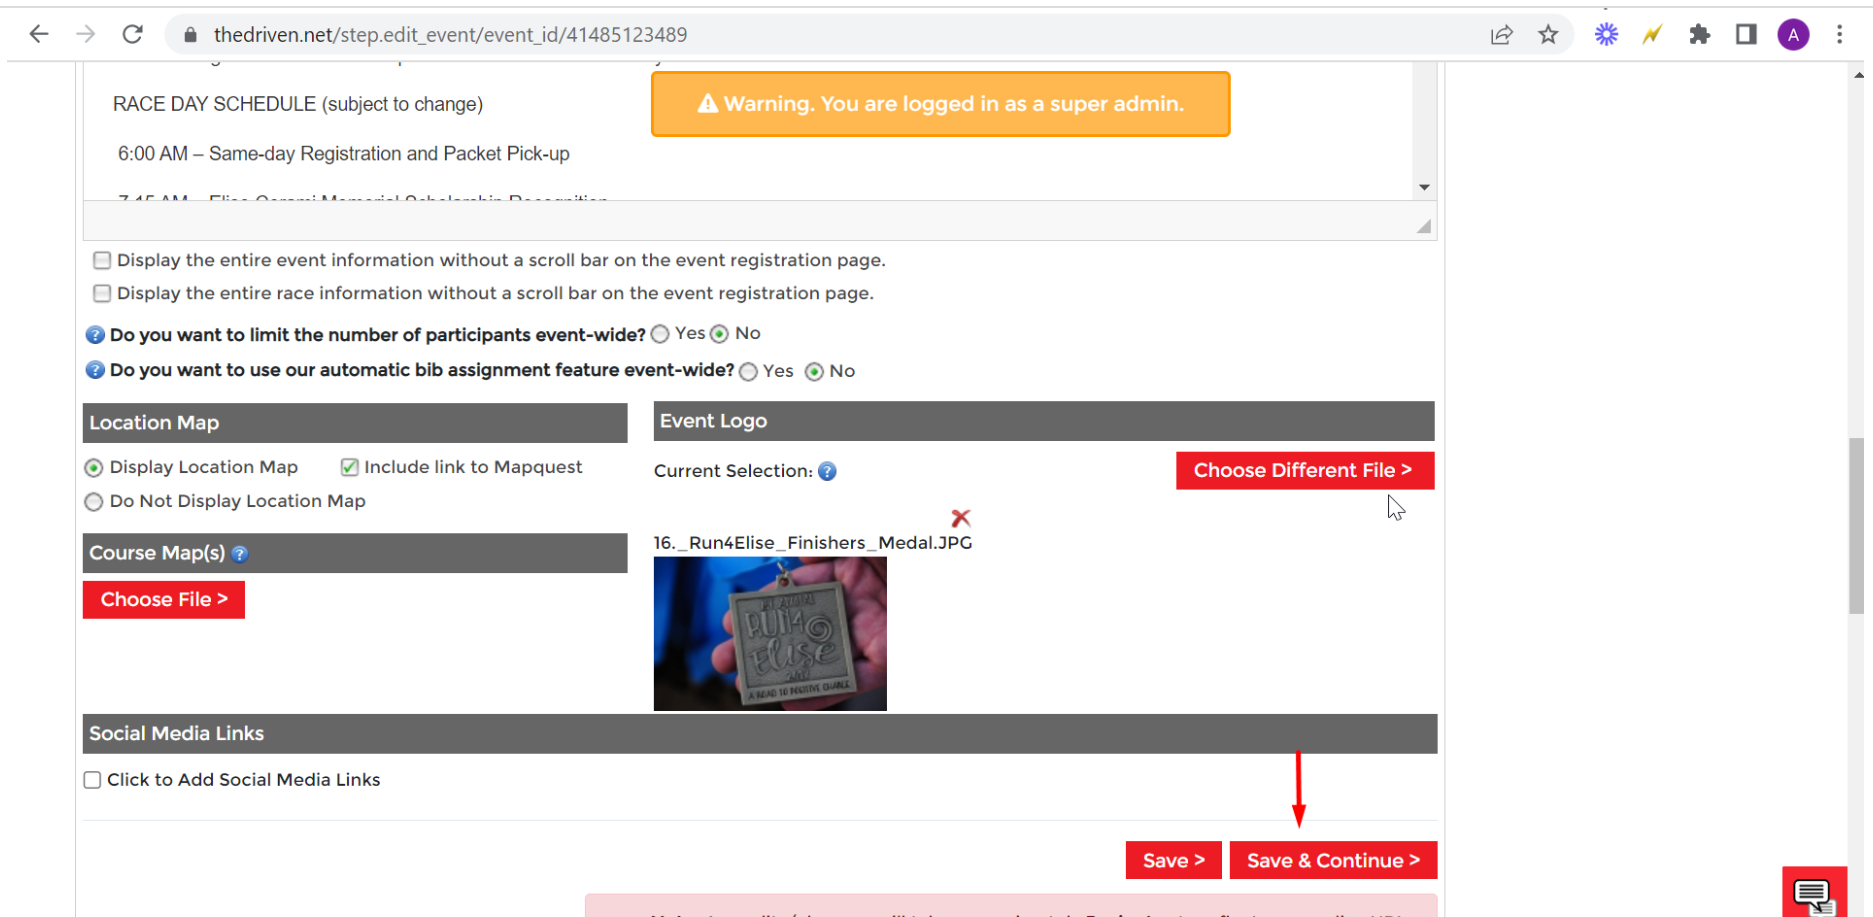
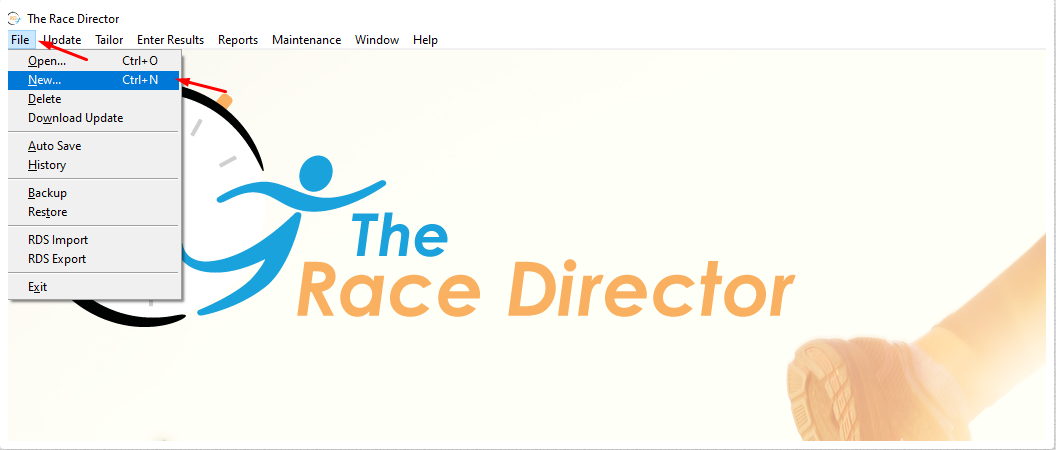
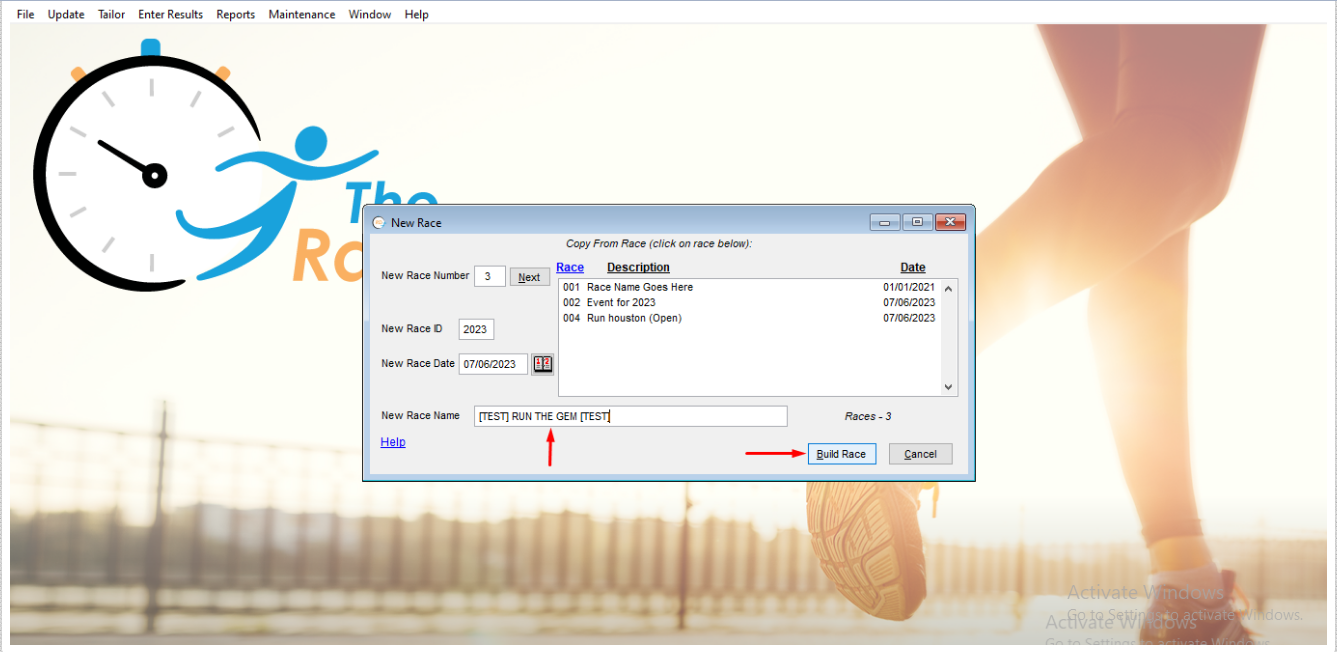
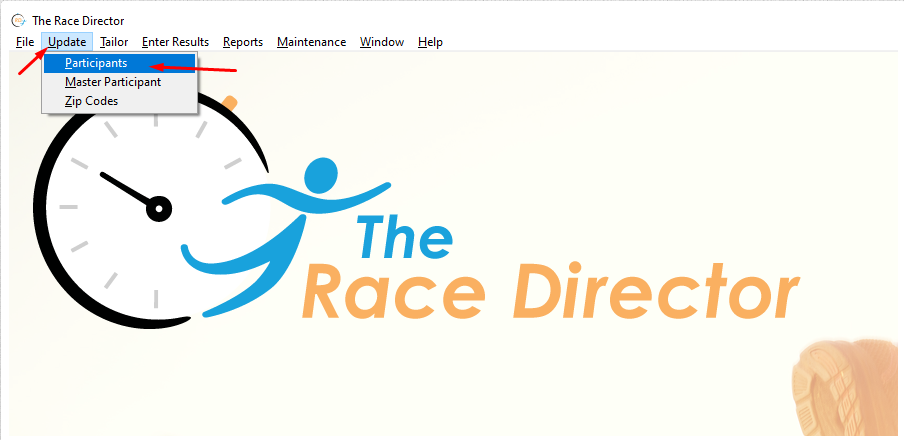
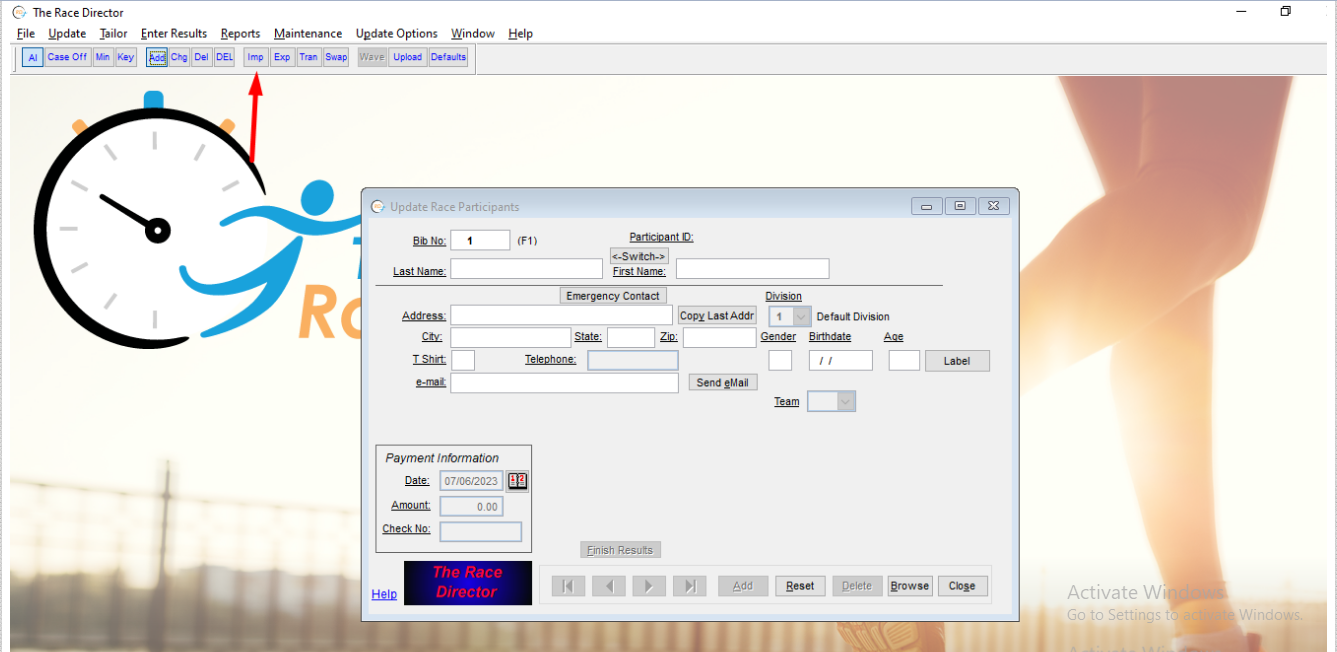
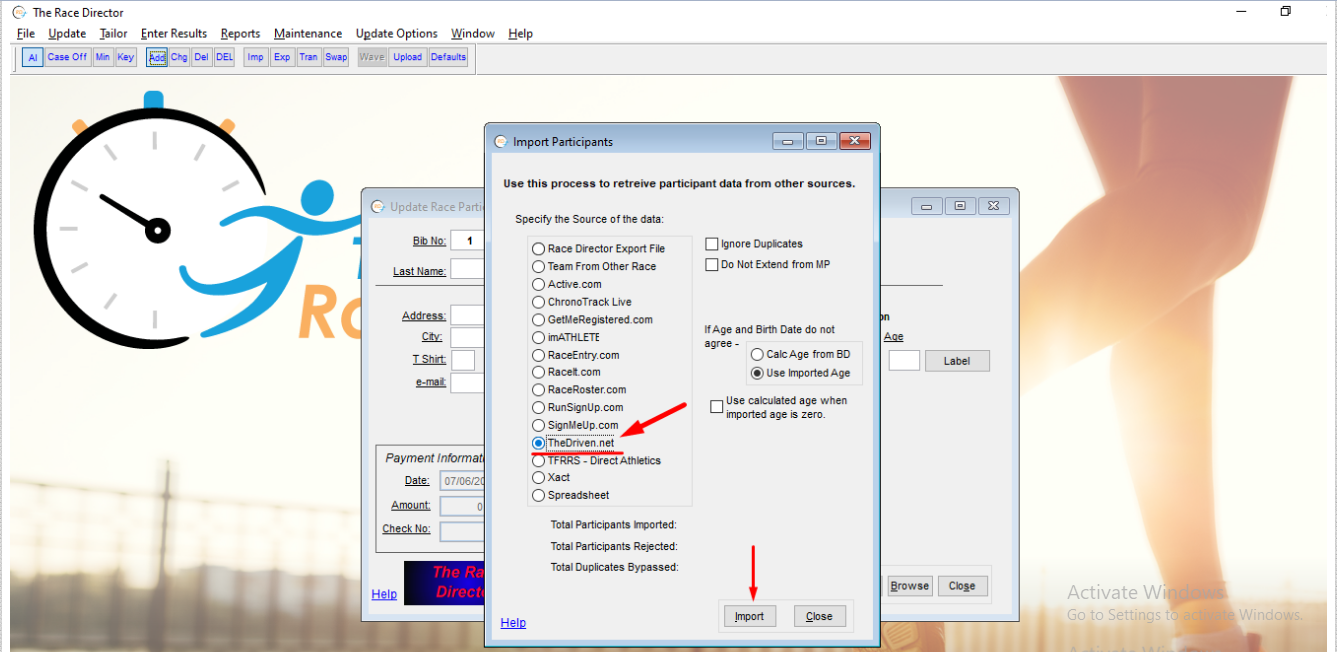
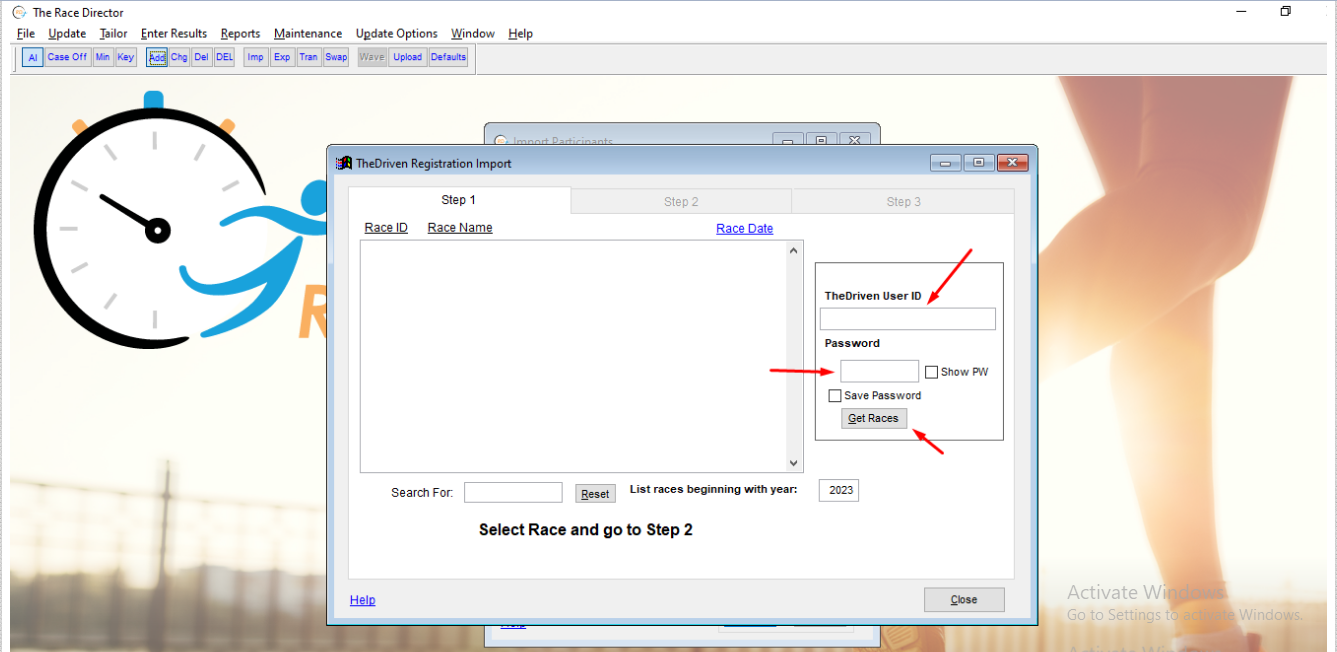
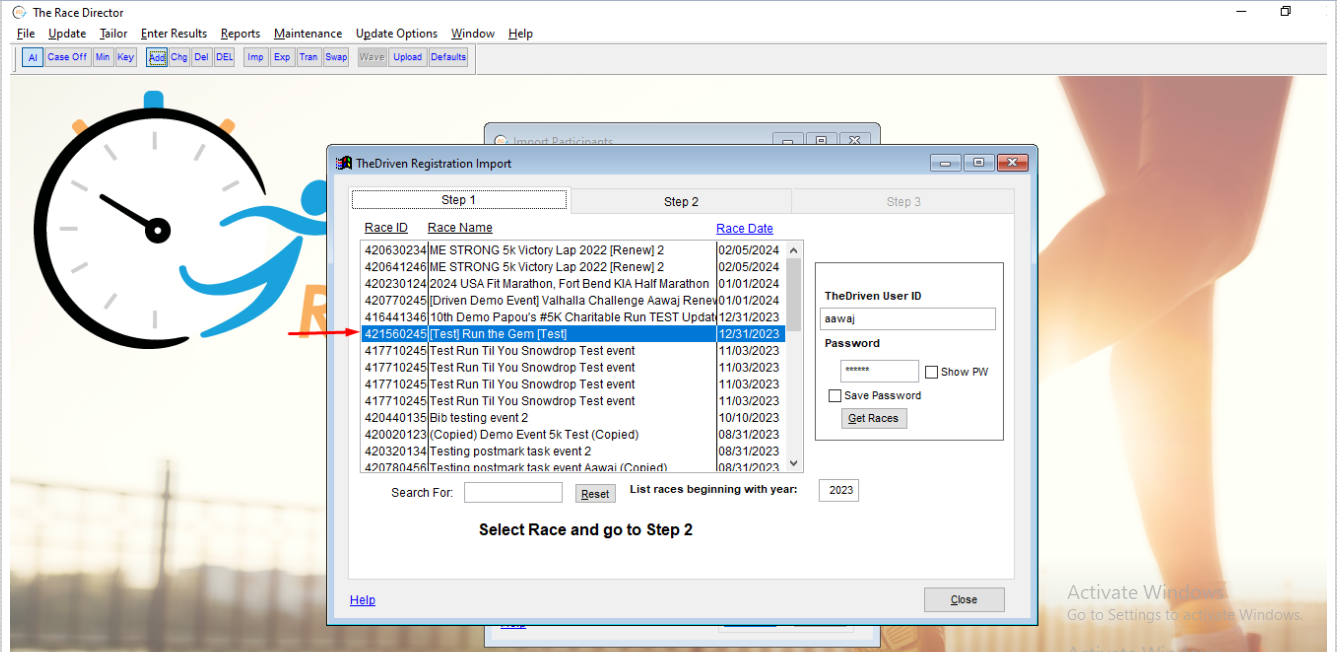
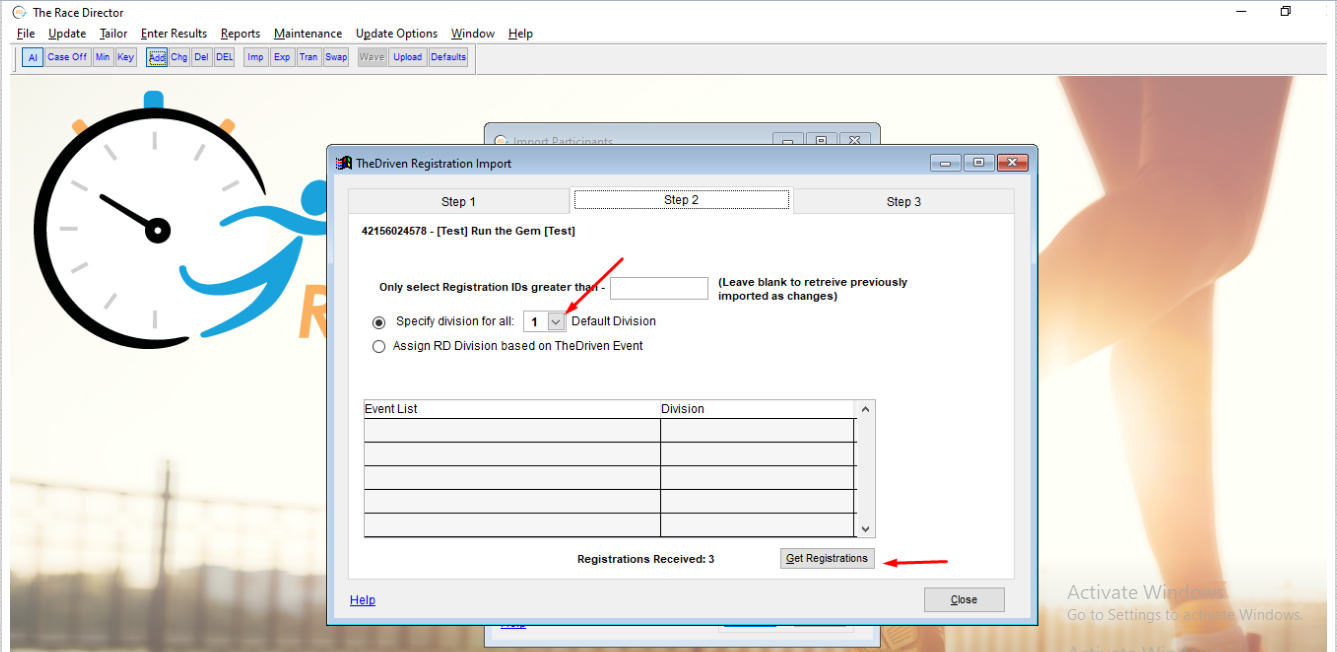
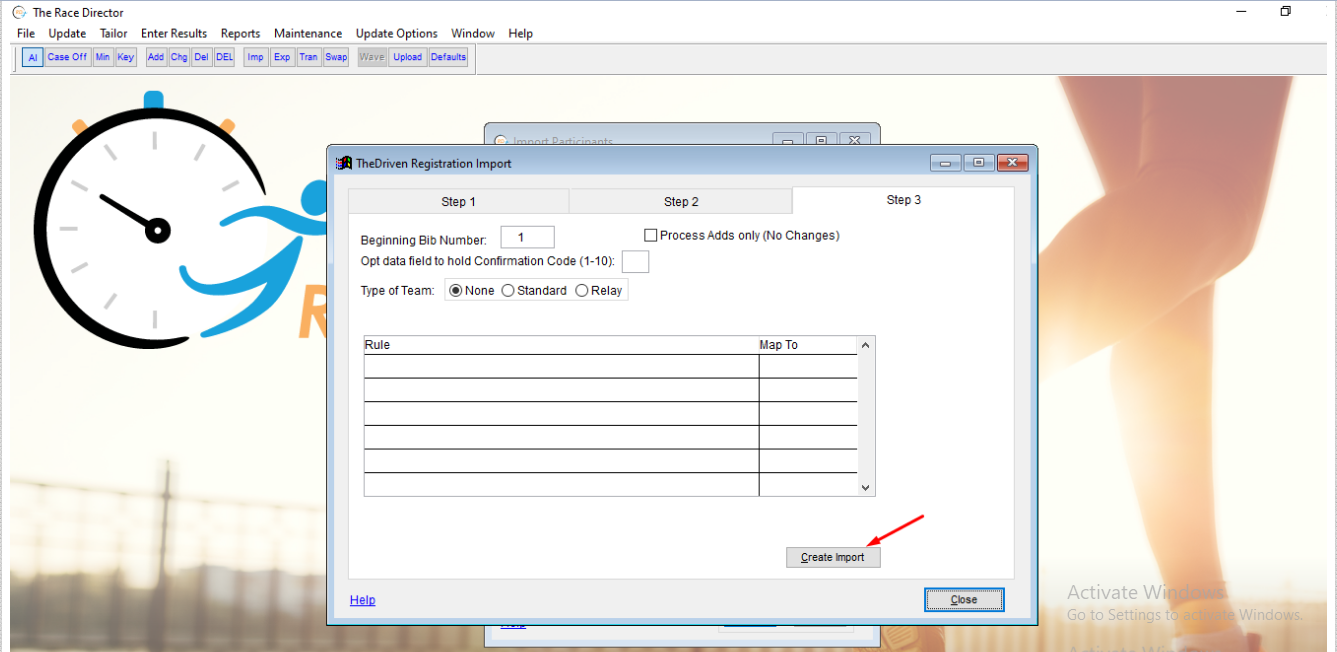
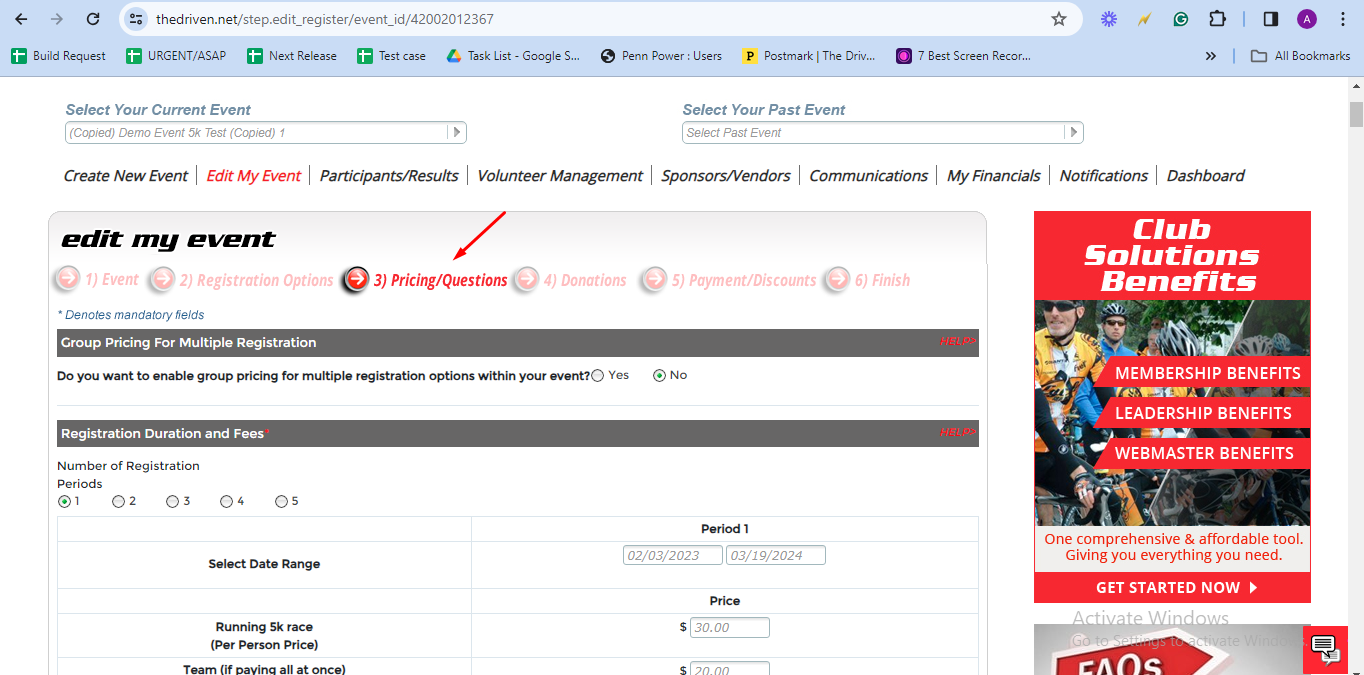
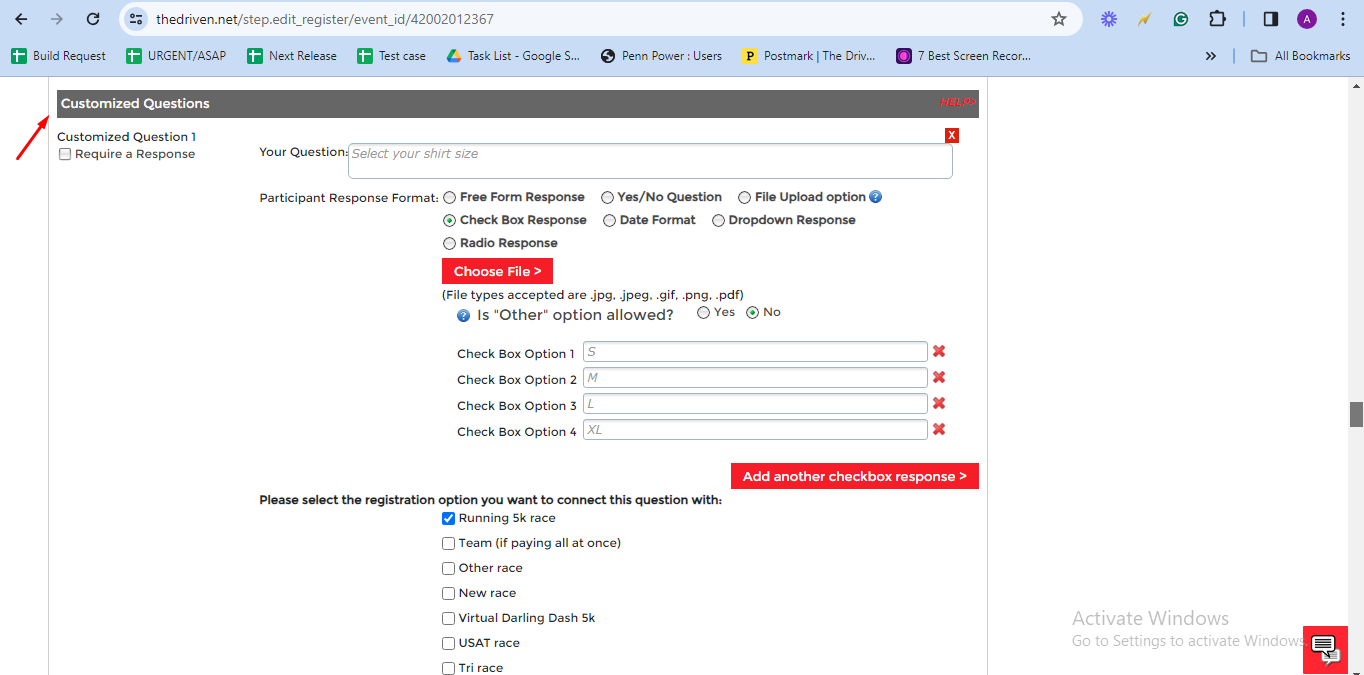
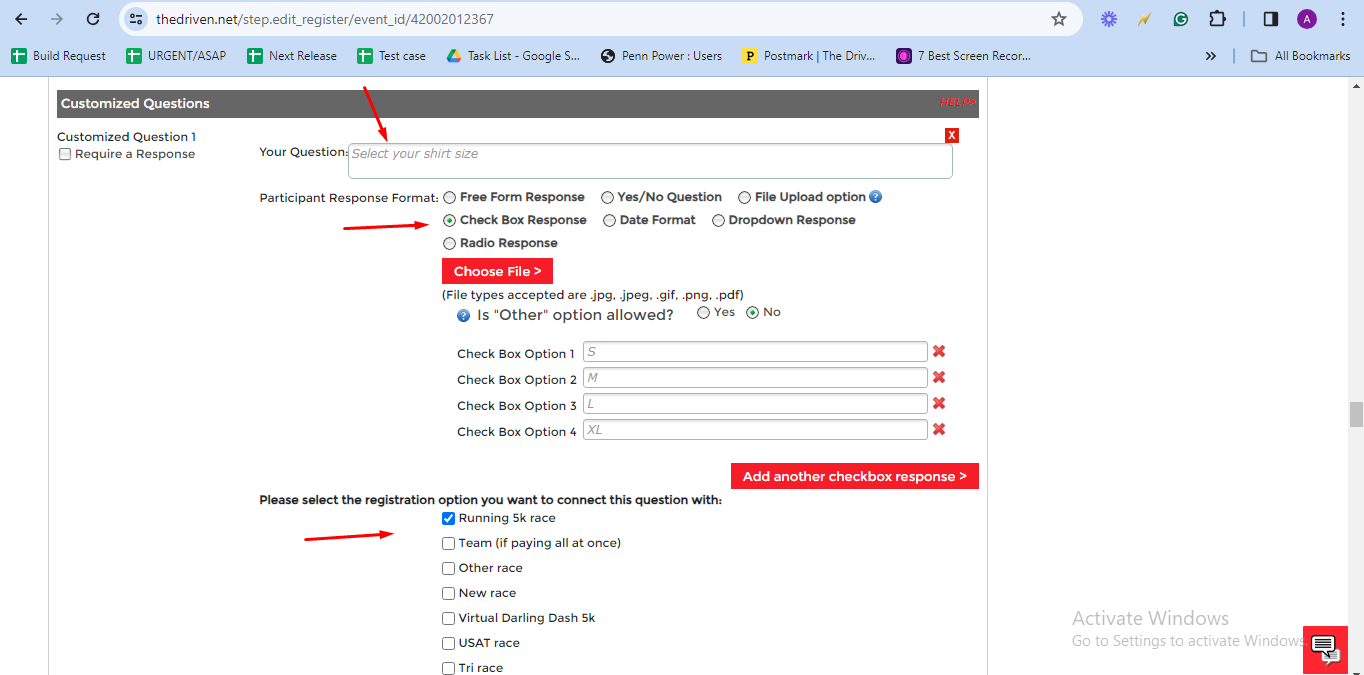
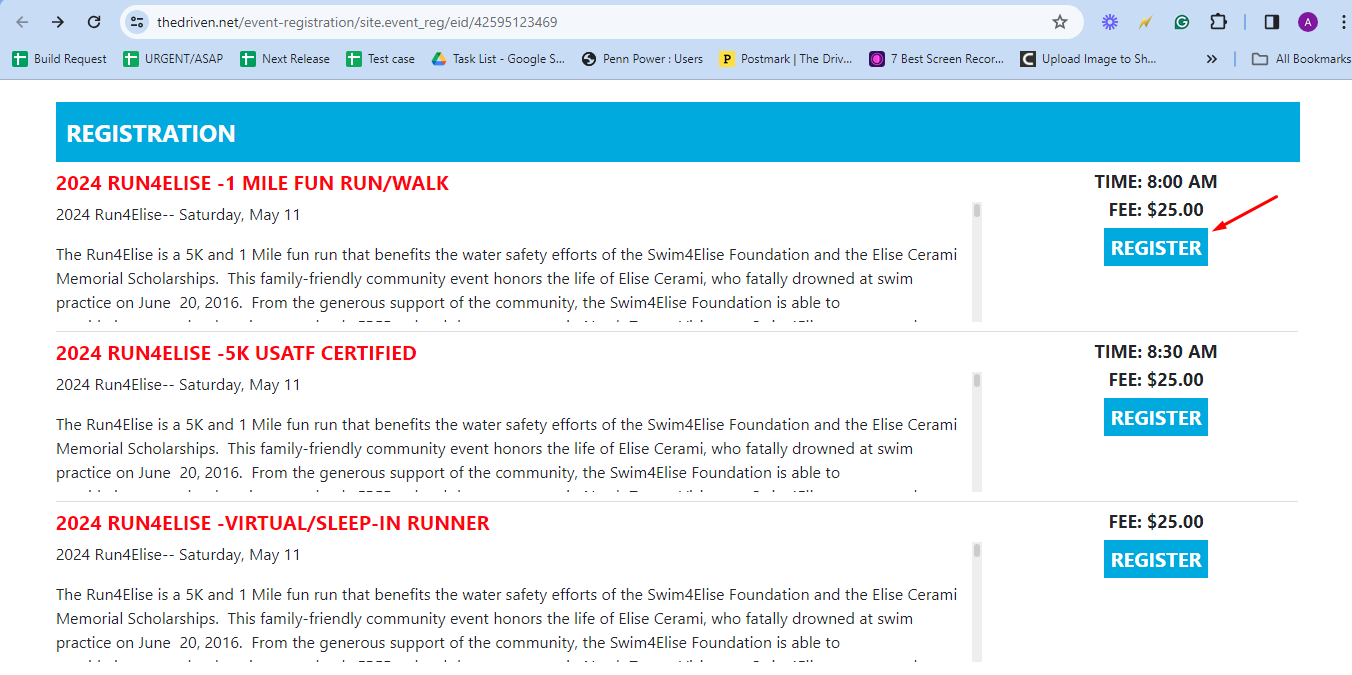
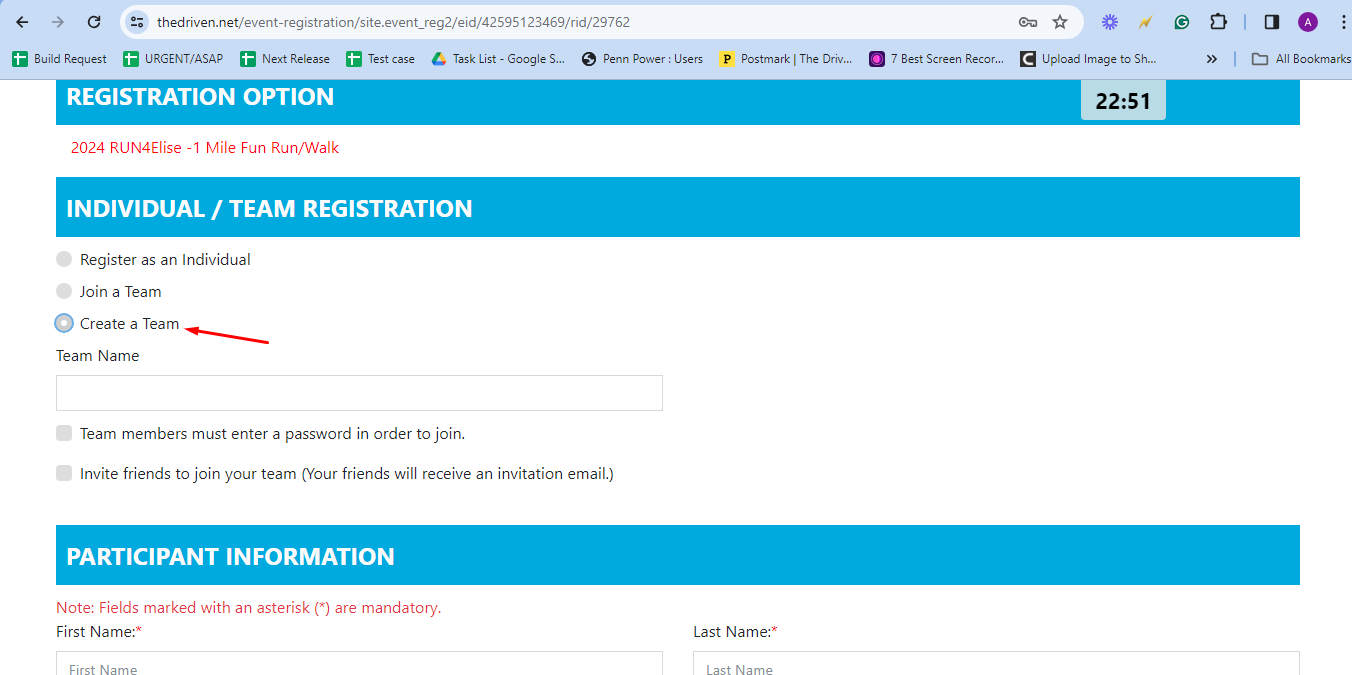
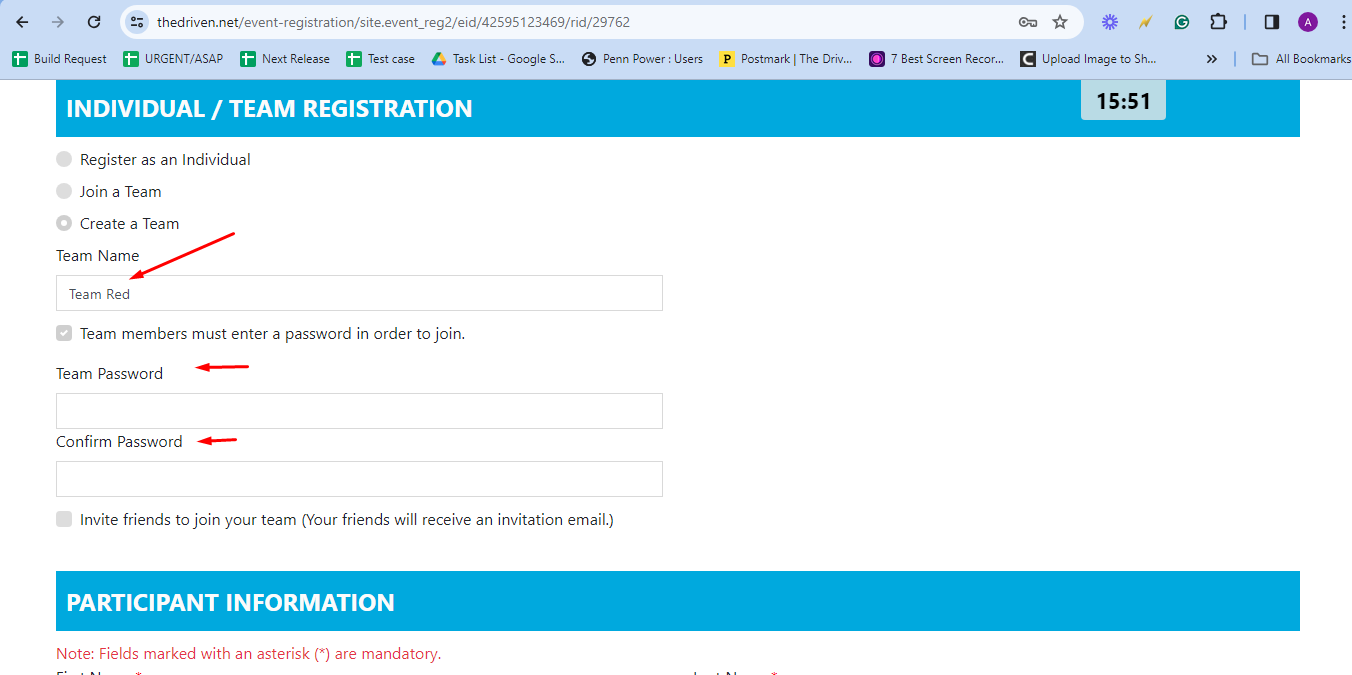
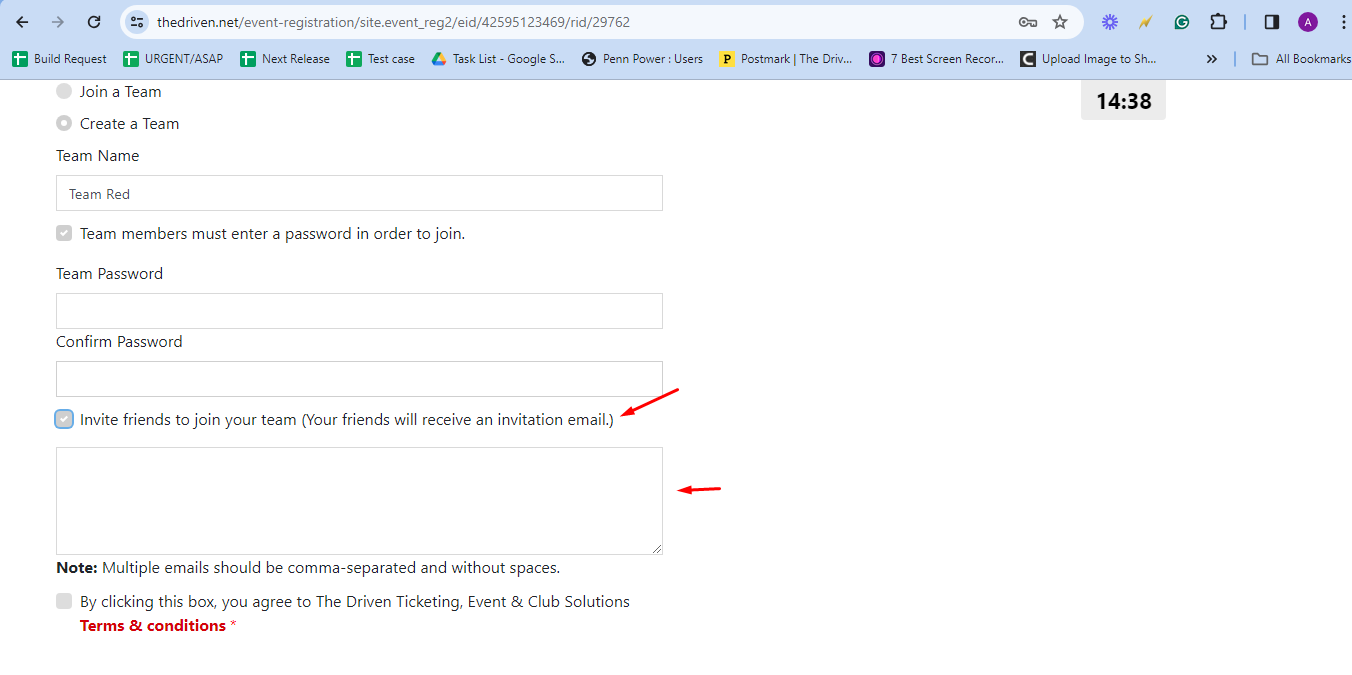
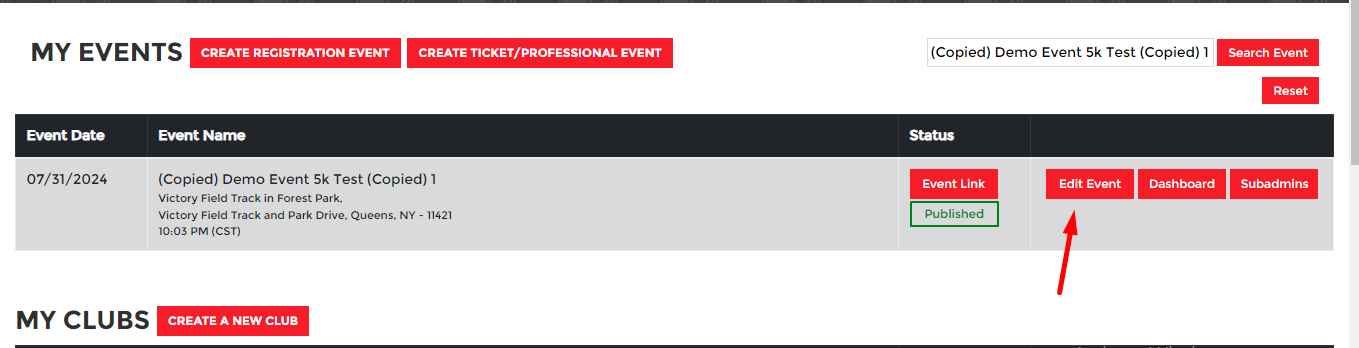
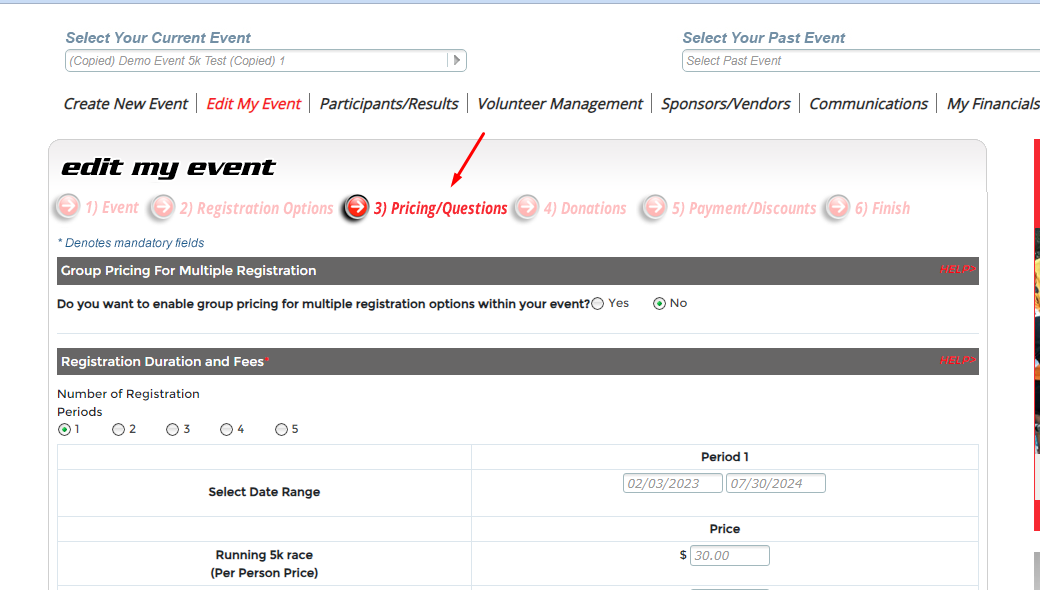
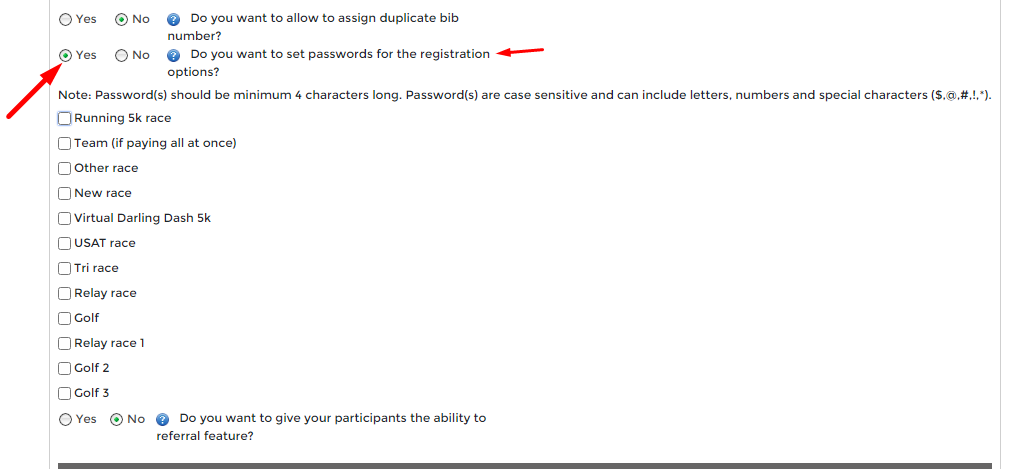
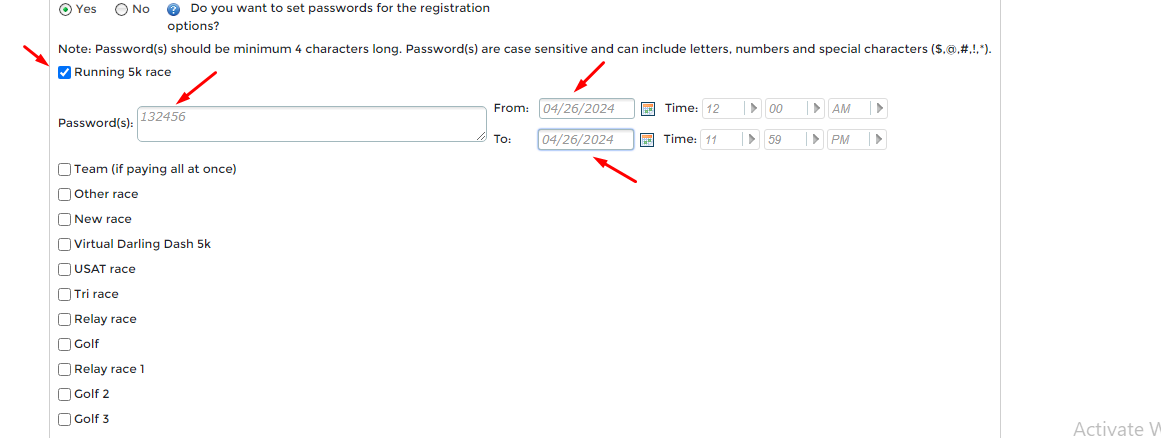
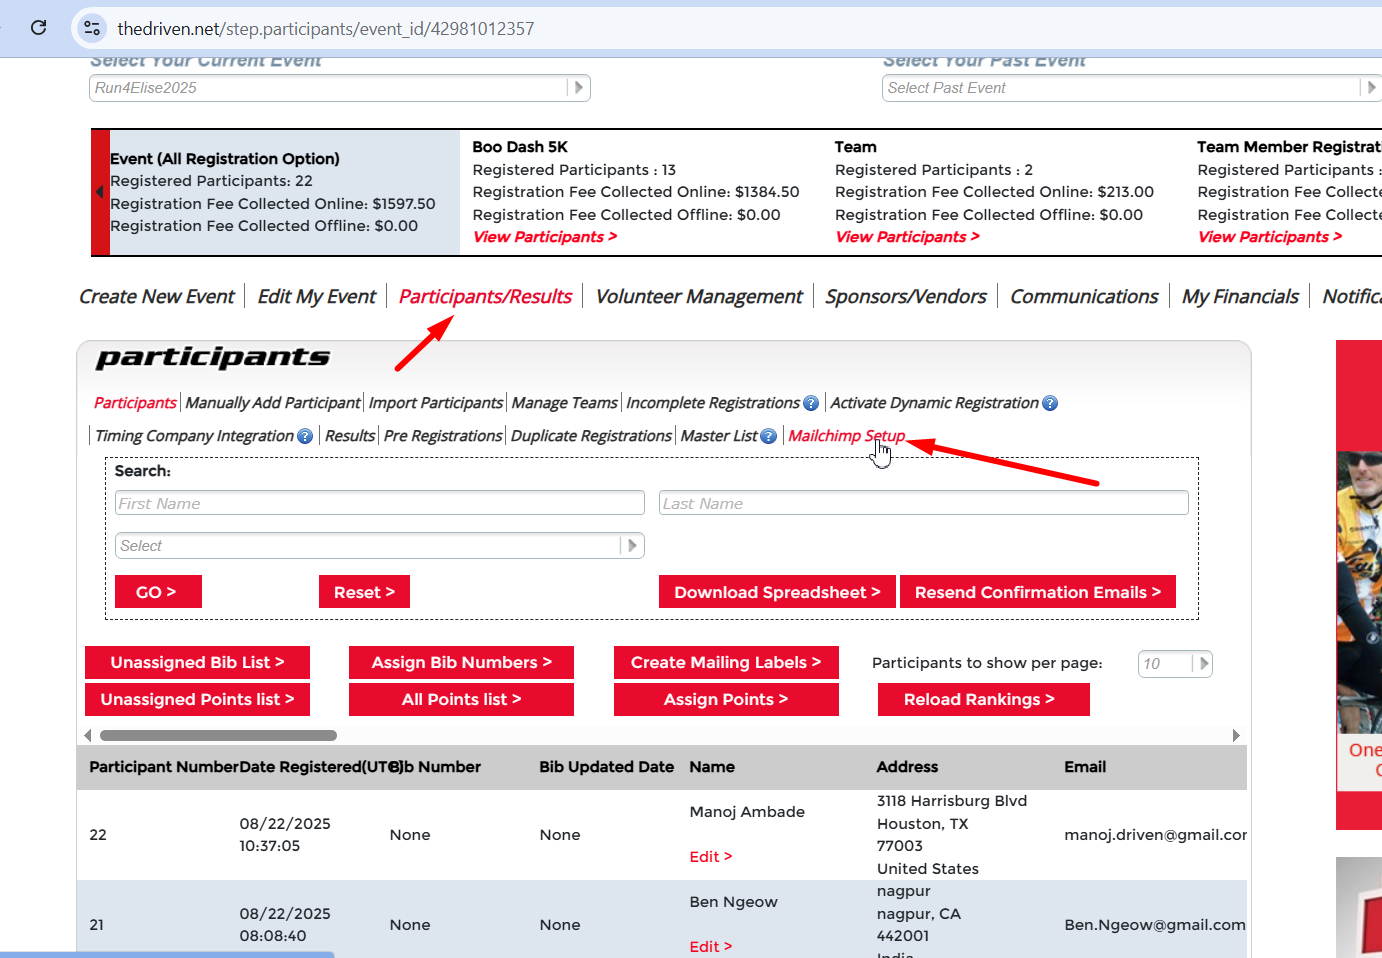
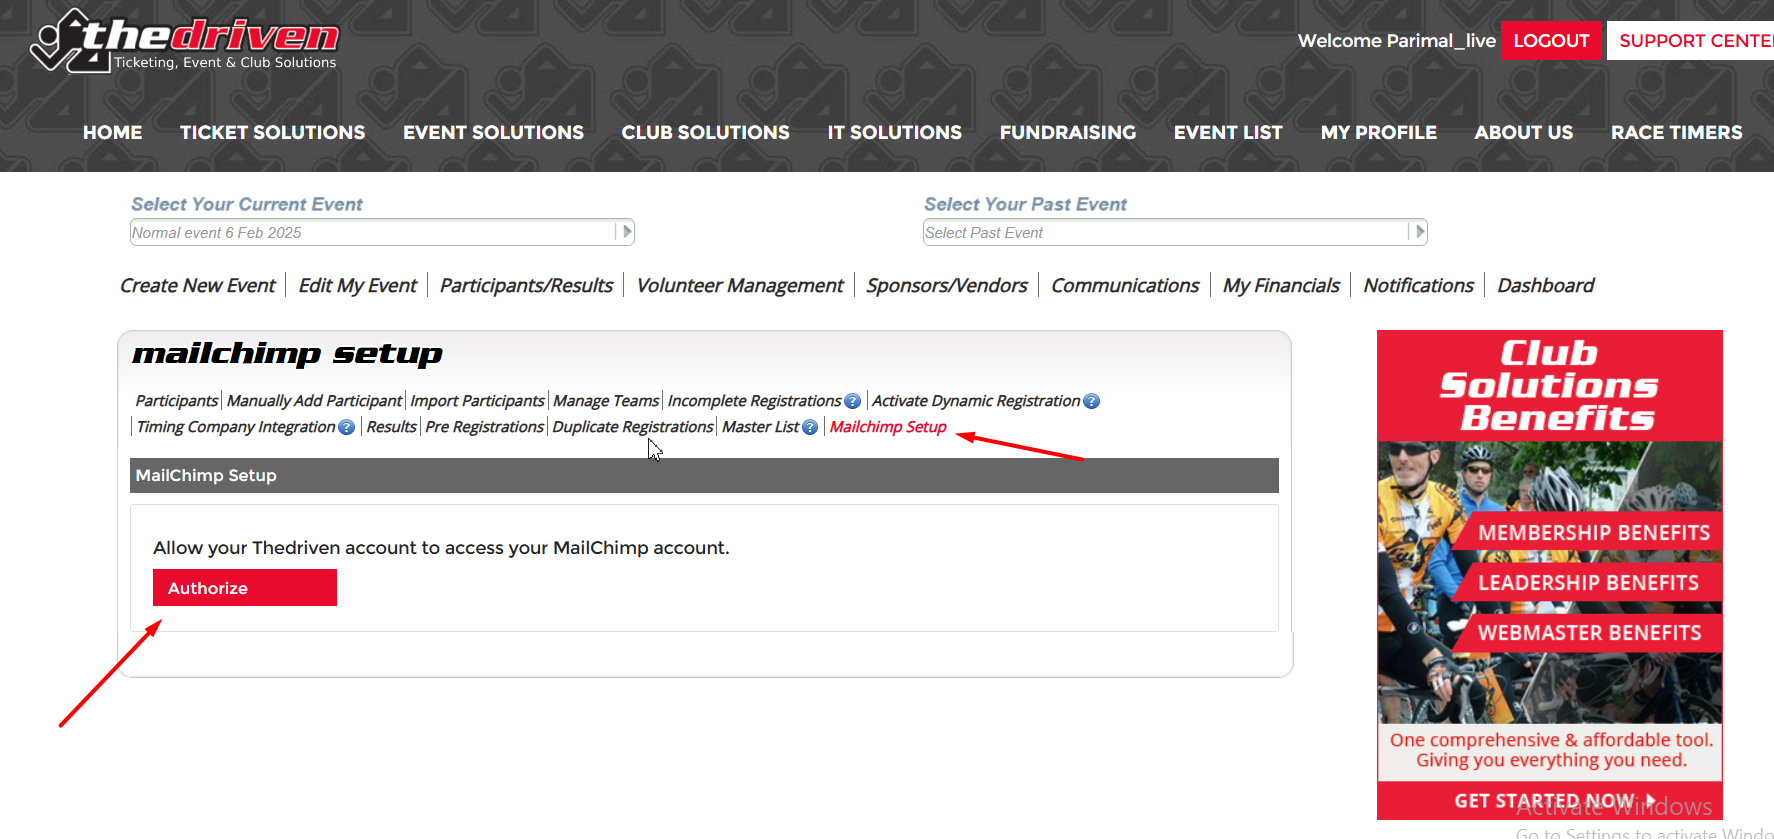
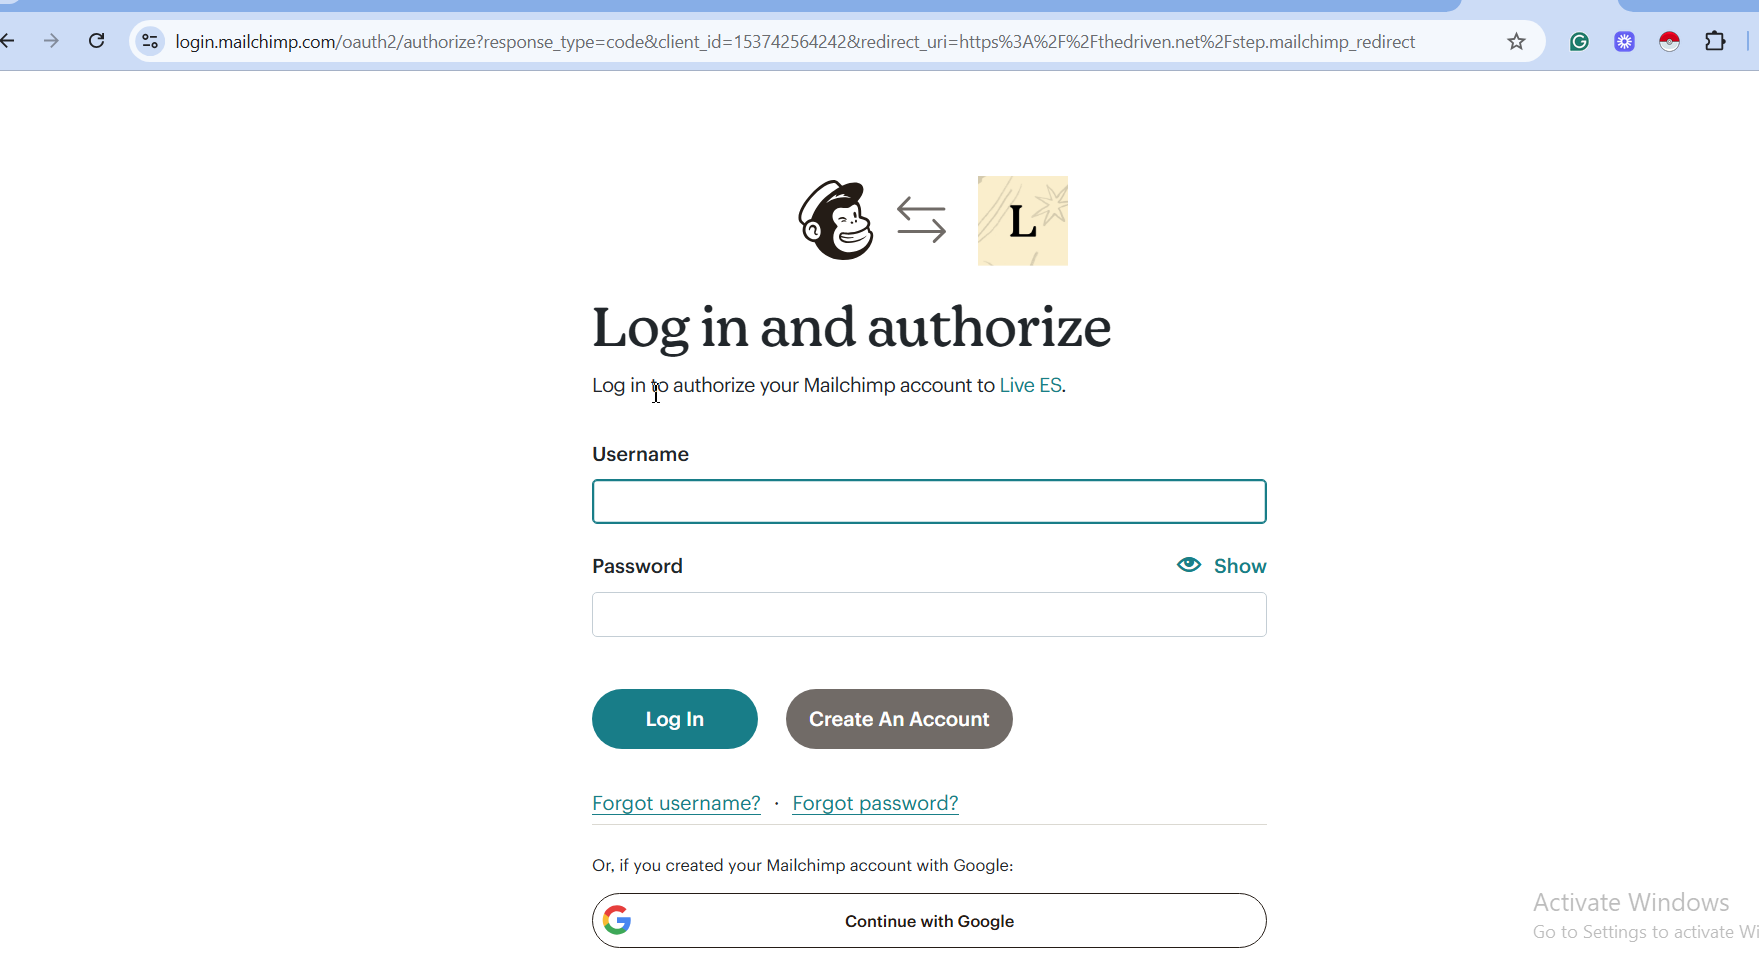
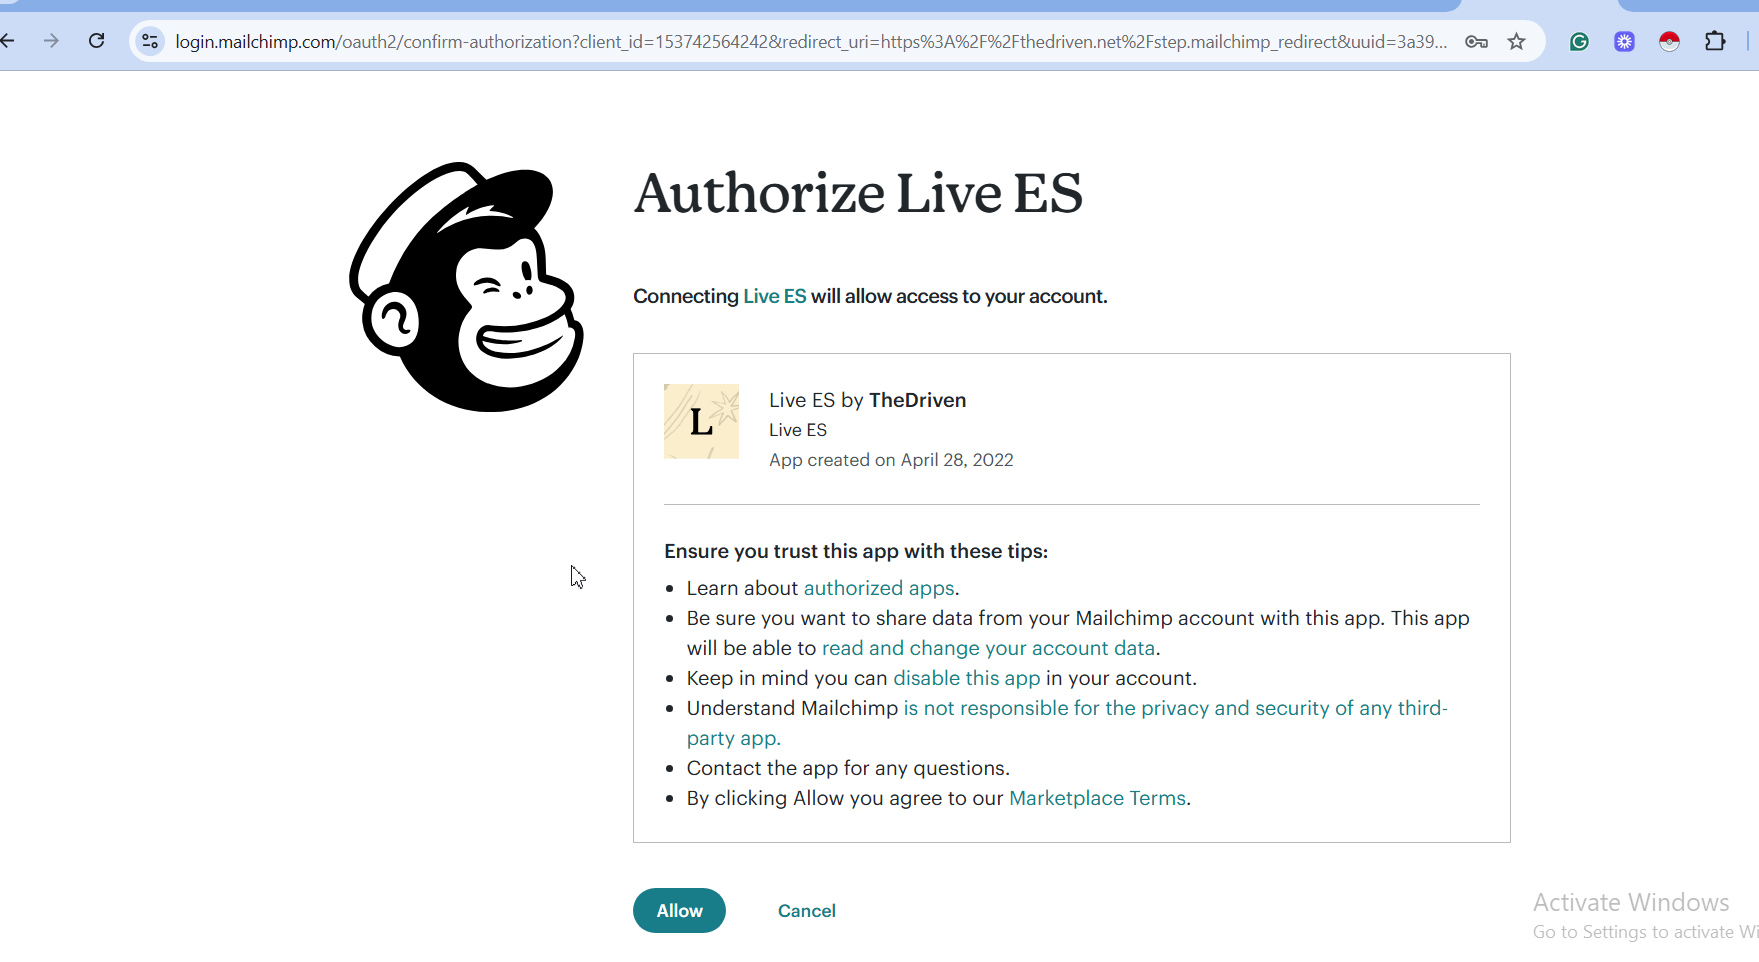
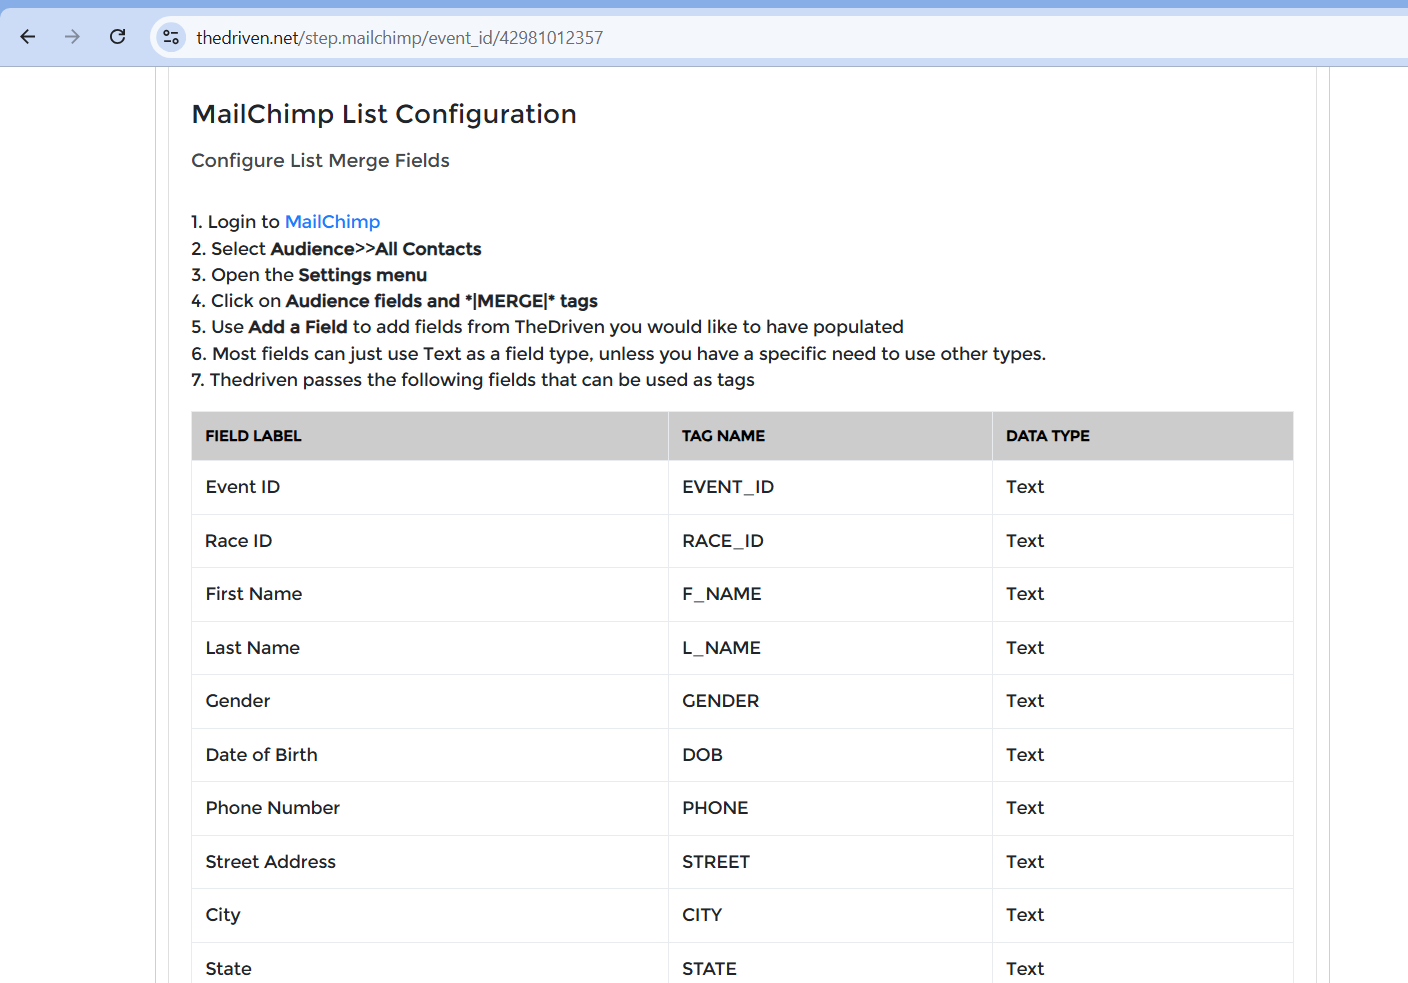
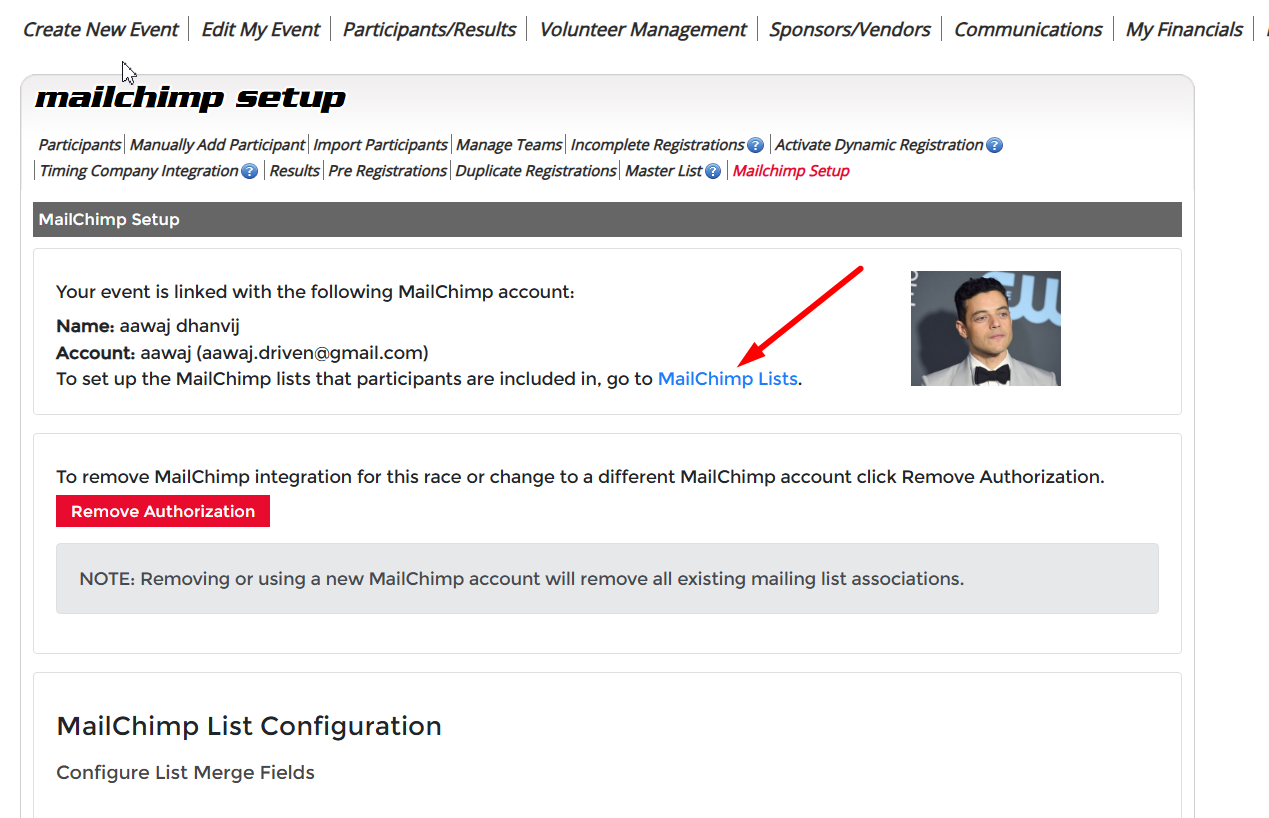
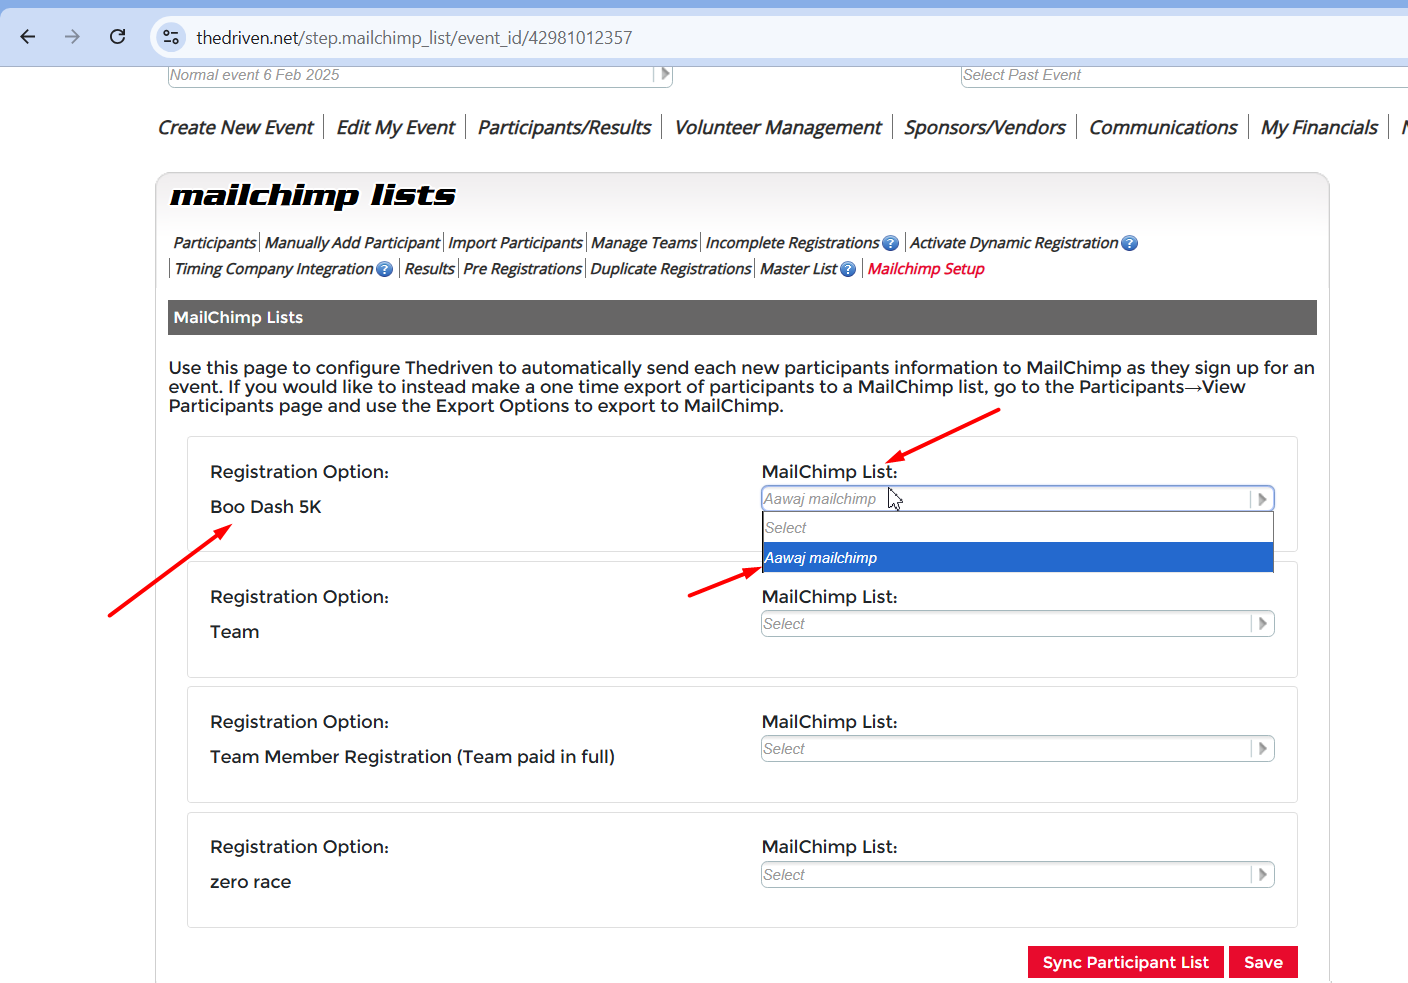
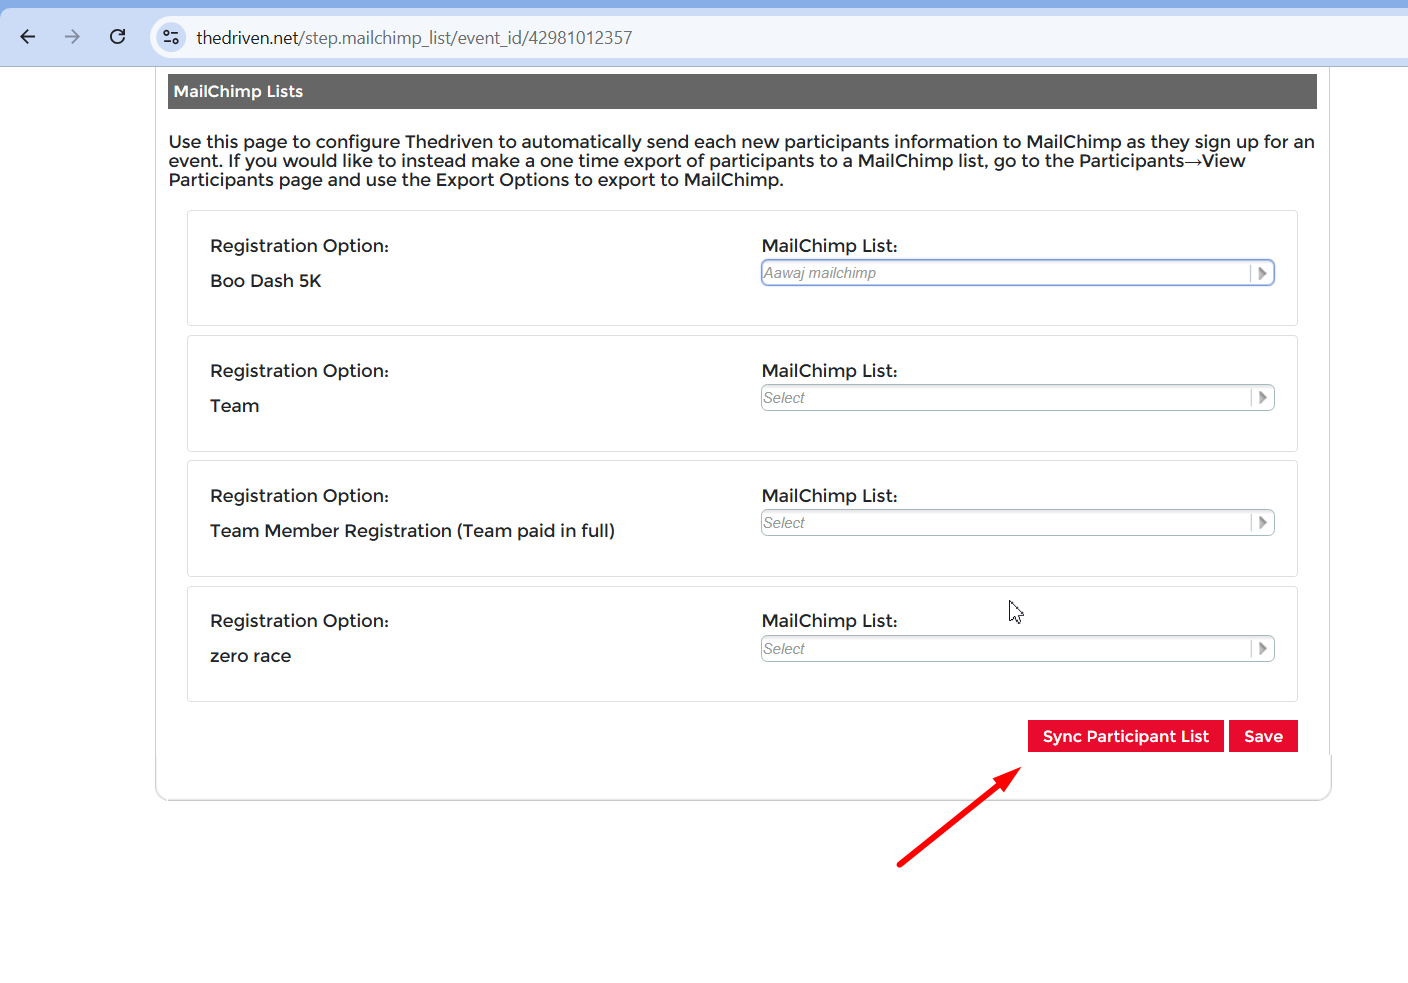
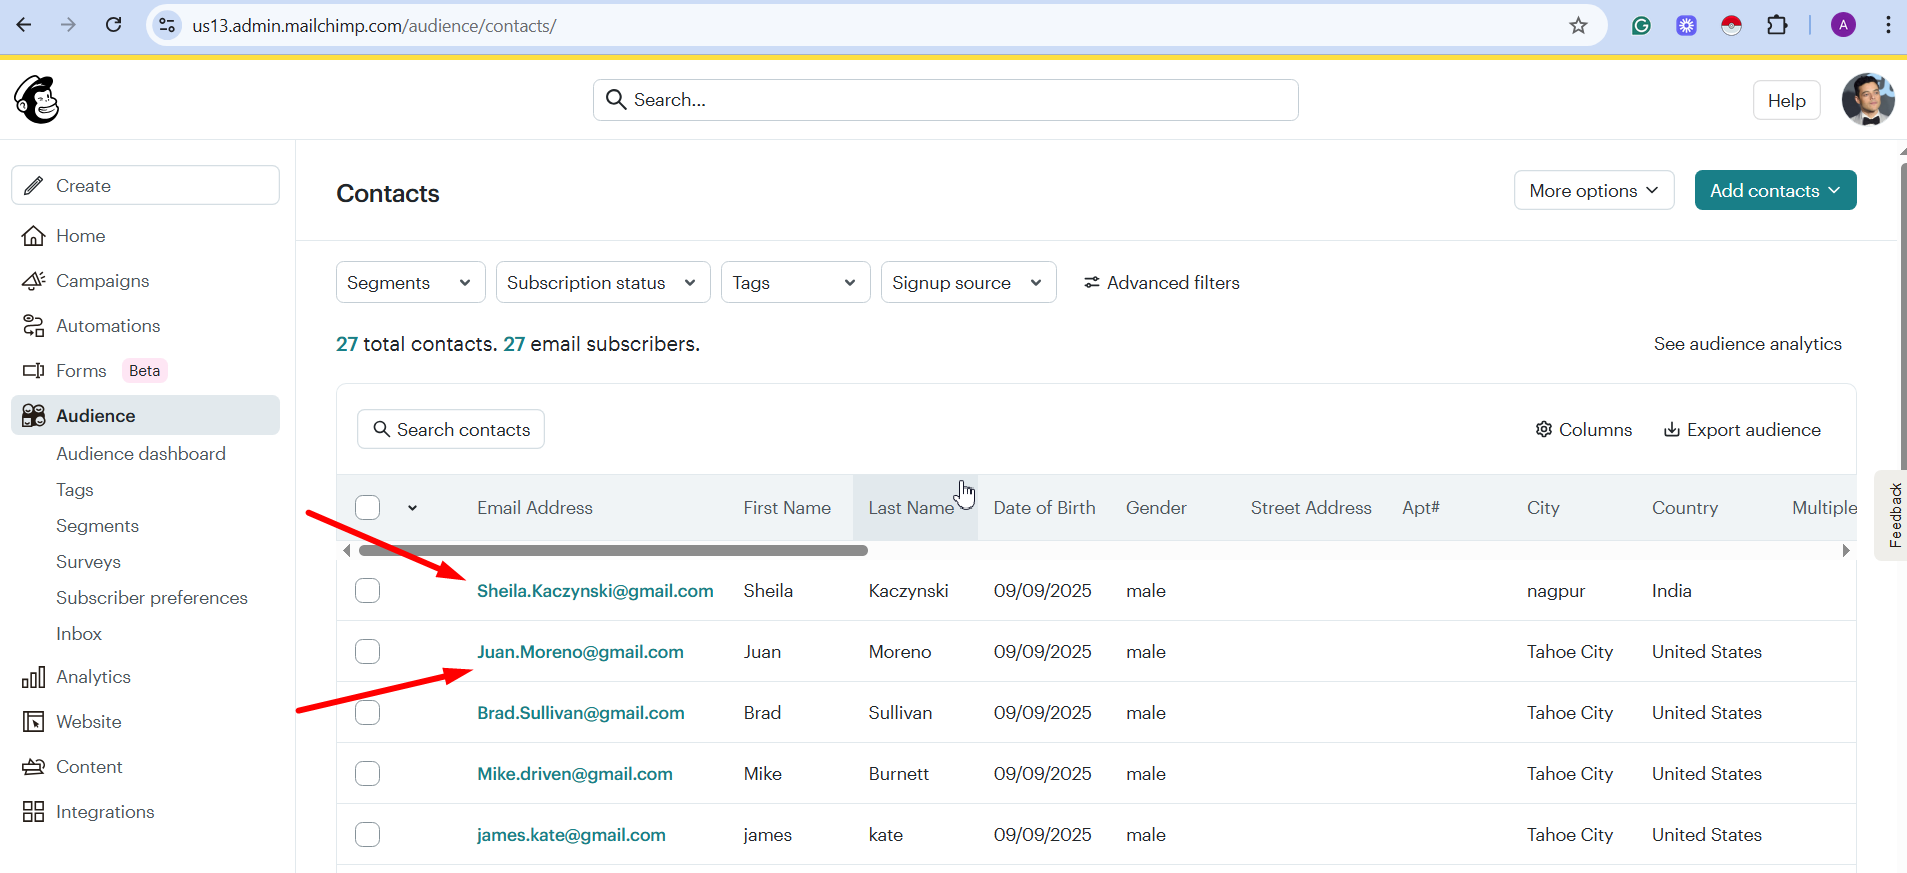
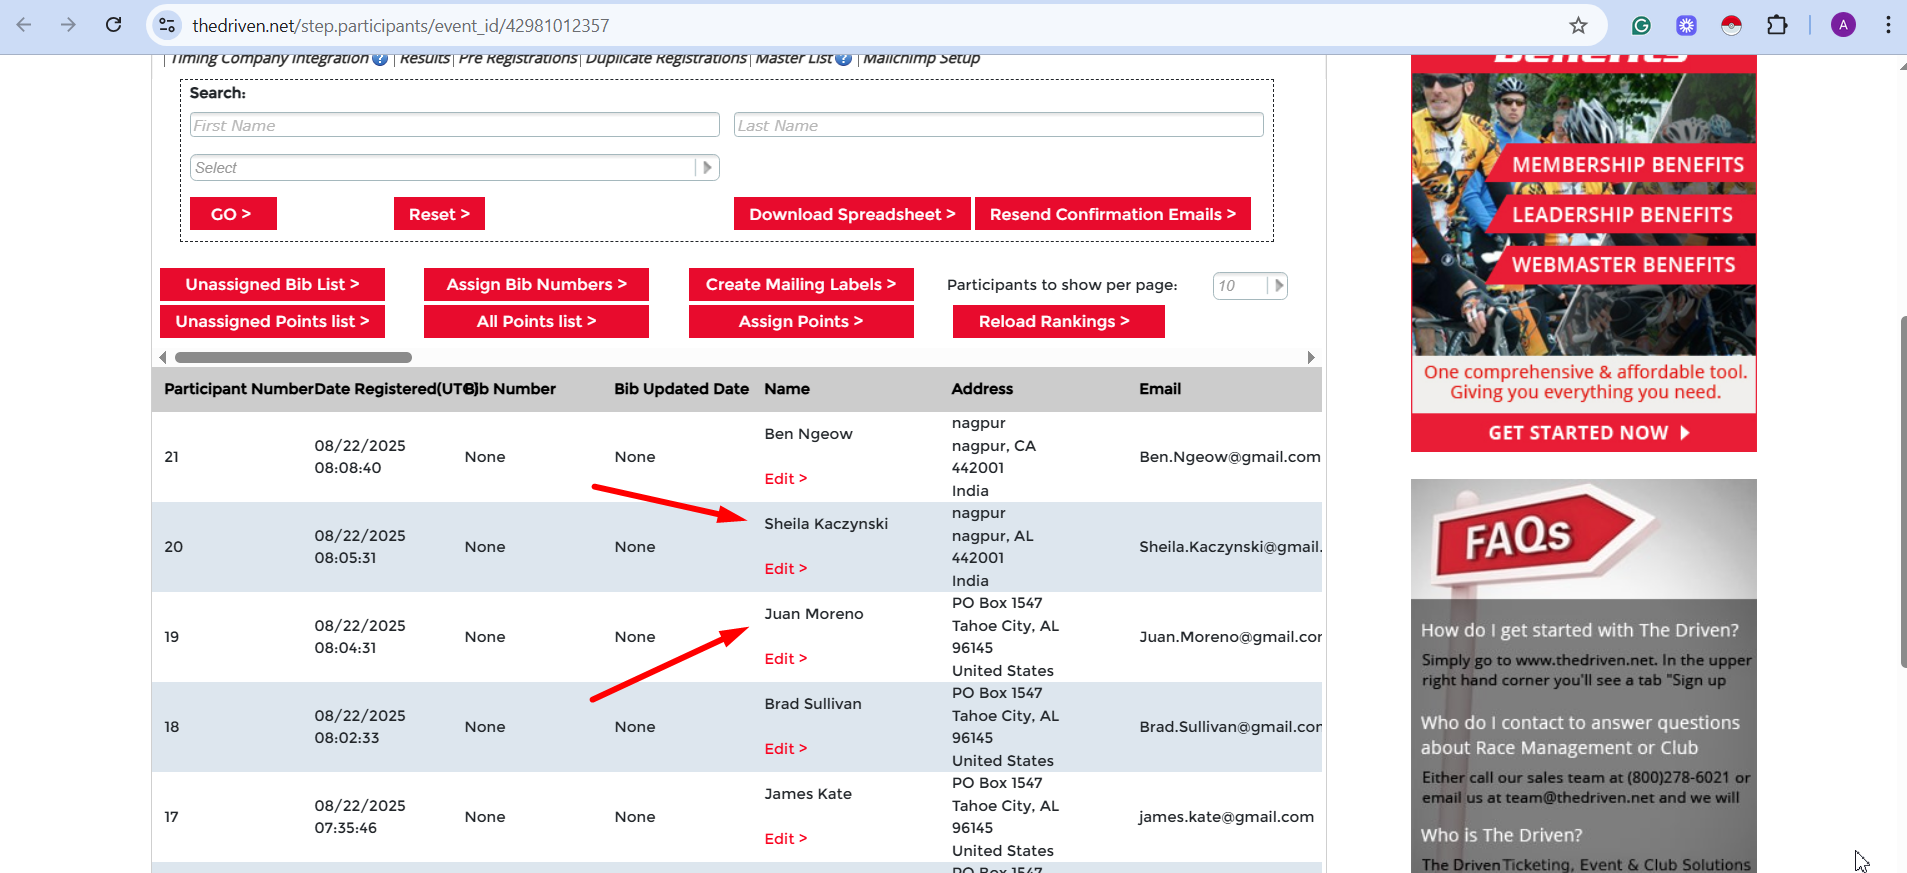